Decide in advance who works when, and when days off and annual leave fall
When you want to manage staff work schedules
Coordinate with your staff and confirm a month's work schedule — who works which days at what time, and when offs and annual leave fall, all decided in advance.
✅ Before you start
- Have you finished adding staff? If not → When you want to organize departments and staff
- Have you finished setting working hours? If not → When you want to set up your clinic for the first time
1. Draft the plan
Go to Work schedule → Shift Planner in the left menu. At the top, this month's confirmation status (e.g. confirmed 19/27 members, 7 requests) is shown as a progress bar; below is the calendar plus the staff panel on the right. Select a staff member in the right panel, then click a date on the calendar to enter that member's plan.
💡 On your first visit a "How to make the schedule" guide card shows the order: ① add days off and leave → ② pick staff and press [Confirm] → ③ if something changes, [Unconfirm] → fix it → ④ [Confirm] again. After closing it, Show guide again reopens it. Next to each name in the right panel is a remaining leave badge (Nd leave / No leave / Nd over), so you can see the balance before adding leave.
Clicking a date brings up these options:
- Full-day off — off for the whole day
- Full-day annual leave — annual leave for the whole day
- Full-day shift — shown only when an explicit-input member is selected. Explicit-input members have no auto-fill, so use this button to enter workdays directly
- Detailed selection — set off or annual leave (and shifts, for explicit-input members) separately for the morning/afternoon/evening blocks
- Clear (reset) — remove the entry
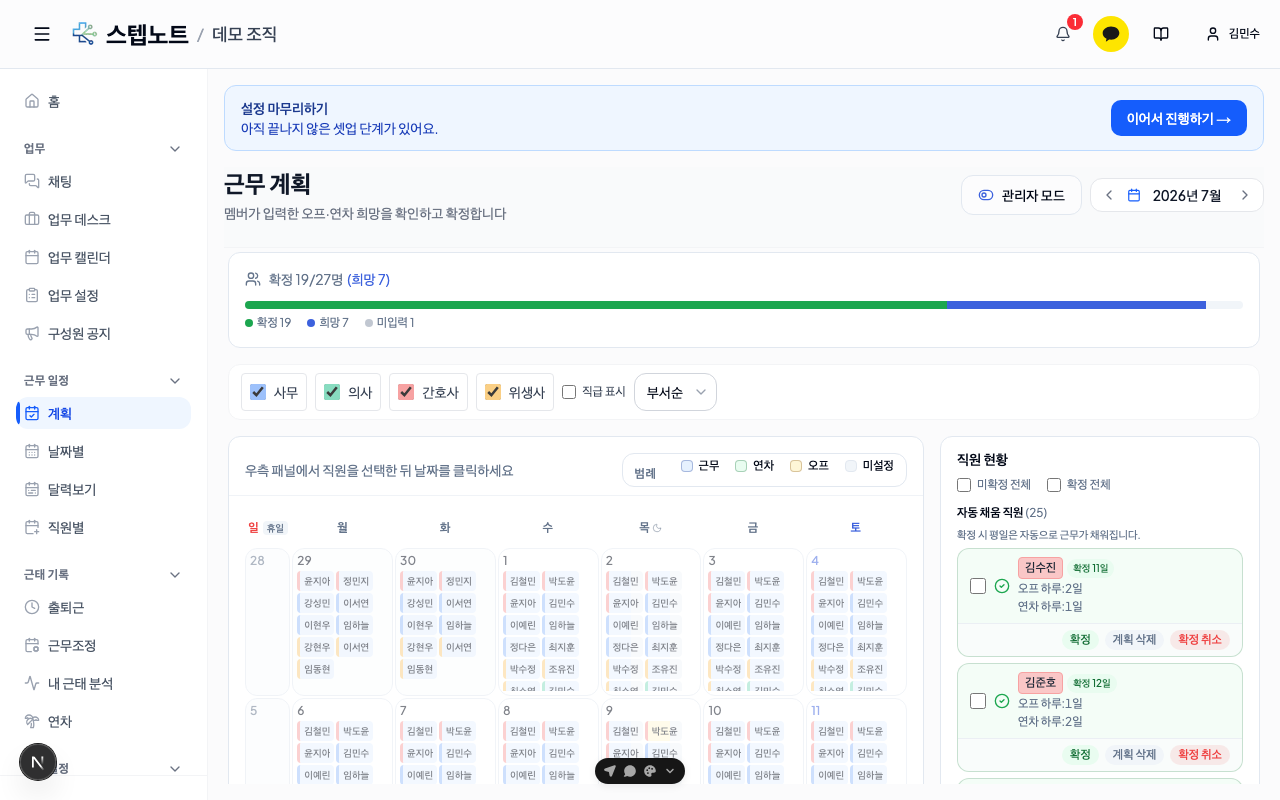
⚠️ When entering a plan, click the empty area of the date cell, not a name chip. Clicking a staff member's name chip already shown in the calendar opens a confirmation dialog to delete that member's plan for that date (administrator mode).
💡 What is a plan? The stage where staff coordinate with each other before the schedule is confirmed. Each member enters their offs and annual leave (for a whole day, or by morning/afternoon/evening blocks), and when the administrator confirms, the remaining weekdays are auto-filled by pattern and become the schedule as is.
👥 Tell your staff "In the Work schedule → Shift Planner screen (the same screen in the mobile app), tap the date you want to rest on in the calendar, then choose Full-day off or Full-day annual leave. If you're only resting part of the day — morning, afternoon, or evening — use Detailed selection to specify the time blocks."
2. Confirm the schedule
Check the members you want to confirm in the right-hand staff panel and press the Confirm selected (N members) button. Each member's monthly schedule is generated automatically by combining the clinic working hours, their personal pattern, and holidays.
⚠️ After confirmation, that member can no longer change their own plan. From then on, only the administrator can make changes, in the per-member screen described in step 3. Unconfirming keeps the entered plans, so fix them and confirm again. By default, unconfirming cancels every confirmed date from today onward; to cancel only past dates or part of the range, press Choose period in the dialog to expand the calendar.
⚠️ If leave runs short, a warning dialog appears when you add leave. Add leave anyway puts the balance in the negative (the badge turns into a red "Nd over") and granting leave later fills it back in. Grant leave first opens the grant-leave dialog for that member right away, and Add as unpaid leave enters unpaid leave instead.
💡 Weekdays auto-work vs Only entered days The staff panel is split into two groups, and confirmation works differently for each. For the Weekdays auto-work group (auto-fill mode), weekdays are automatically filled with shifts by pattern when confirmed; for the Only entered days group (explicit-entry mode), only the shifts, offs, and annual leave they entered are applied (no auto-fill — empty days stay blank).
| Aspect | Weekdays auto-work | Only entered days |
|---|---|---|
| Weekday shift filling | ✅ Weekdays are filled with shifts automatically on confirmation | ❌ None |
| Entered offs & annual leave | ✅ Applied | ✅ Applied |
| Empty days | Filled with pattern shifts | Blank (only explicitly entered shifts, offs, and annual leave are applied) |
Regular staff with accounts default to auto-fill; accountless staff default to explicit input. You can change this default per member in the Schedule auto-fill section of the user info edit screen — see step 4 of When you want to organize departments and staff.
When you press the confirm button, the two groups are shown separately in a preview, so you can spot members with zero explicit entries (who would end up with an empty schedule) before confirming.
💡 Confirmed only part of the month? Next to the "Confirmed N days" badge by the member's name, an orange "Unconfirmed N days" badge shows the number of remaining days, and the confirm button changes to "Confirm more". The calendar on the left also shows a head count on each still-unconfirmed date. Once every date is confirmed, the badges and button all disappear.
3. Fix individual cells even after confirmation
Go to Work schedule → Member view in the left menu. The confirmed monthly schedule is shown as a per-member grid.
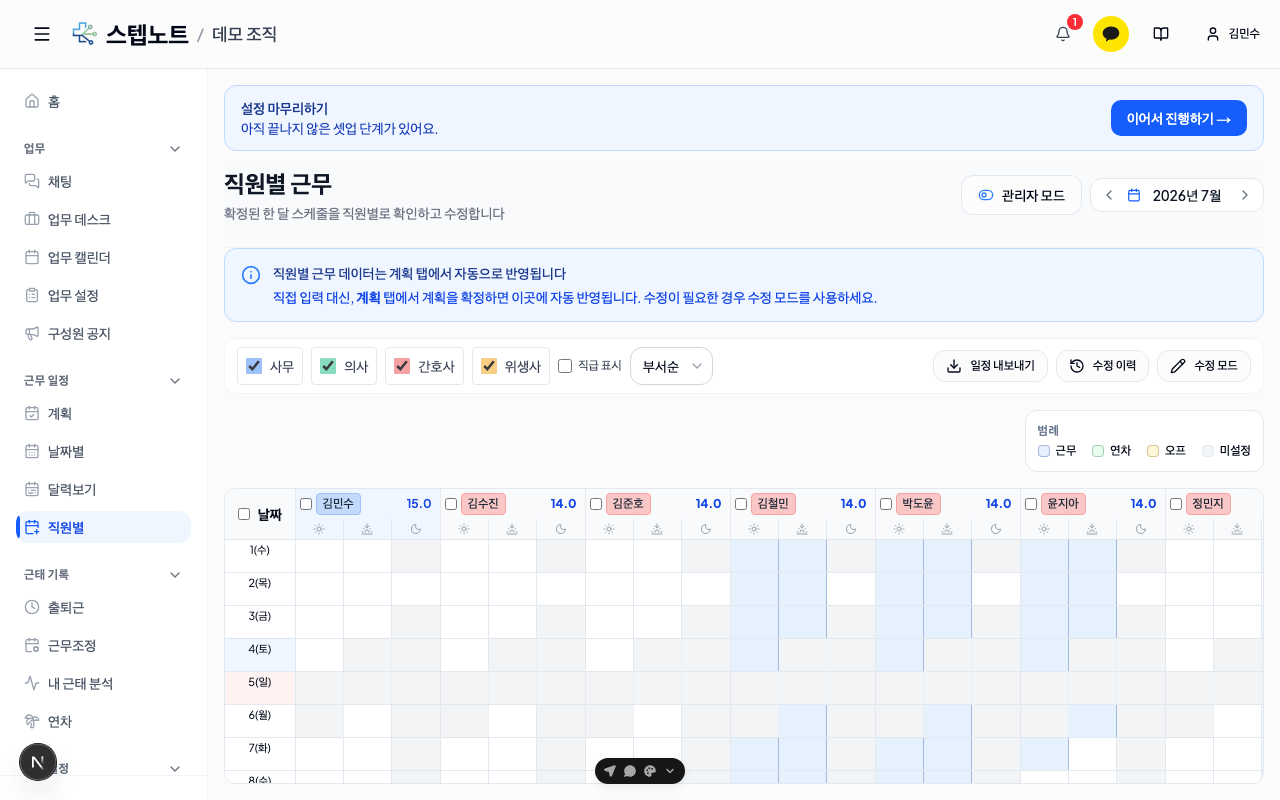
As the notice at the top of the screen says, the standard flow is to confirm plans in the Plan tab and let them flow in here automatically, rather than entering directly. Use the steps below only when exceptional touch-ups are needed.
- Press the Edit mode button at the top right to switch it ON
- Choose what to enter from the Shift / Annual leave / Off options that appear
- Click grid cells to enter or clear (pending changes accumulate)
- Press Review changes to save (or Discard changes to revert)
In edit mode, a warning banner reads "Changes are recorded along with a reason," and past changes can be reviewed via the Edit history button at the top.
💡 On mobile, a staff list appears instead of the grid. Tap a staff member to see their date list, then tap a date to open a bottom-sheet editor for choosing shift/annual leave/off. Saving works the same way. Details: 3.4 Editing on Mobile
4. View by date and print
Go to Work schedule → Daily view in the left menu. The confirmed monthly schedule is shown as a table by date and time block.
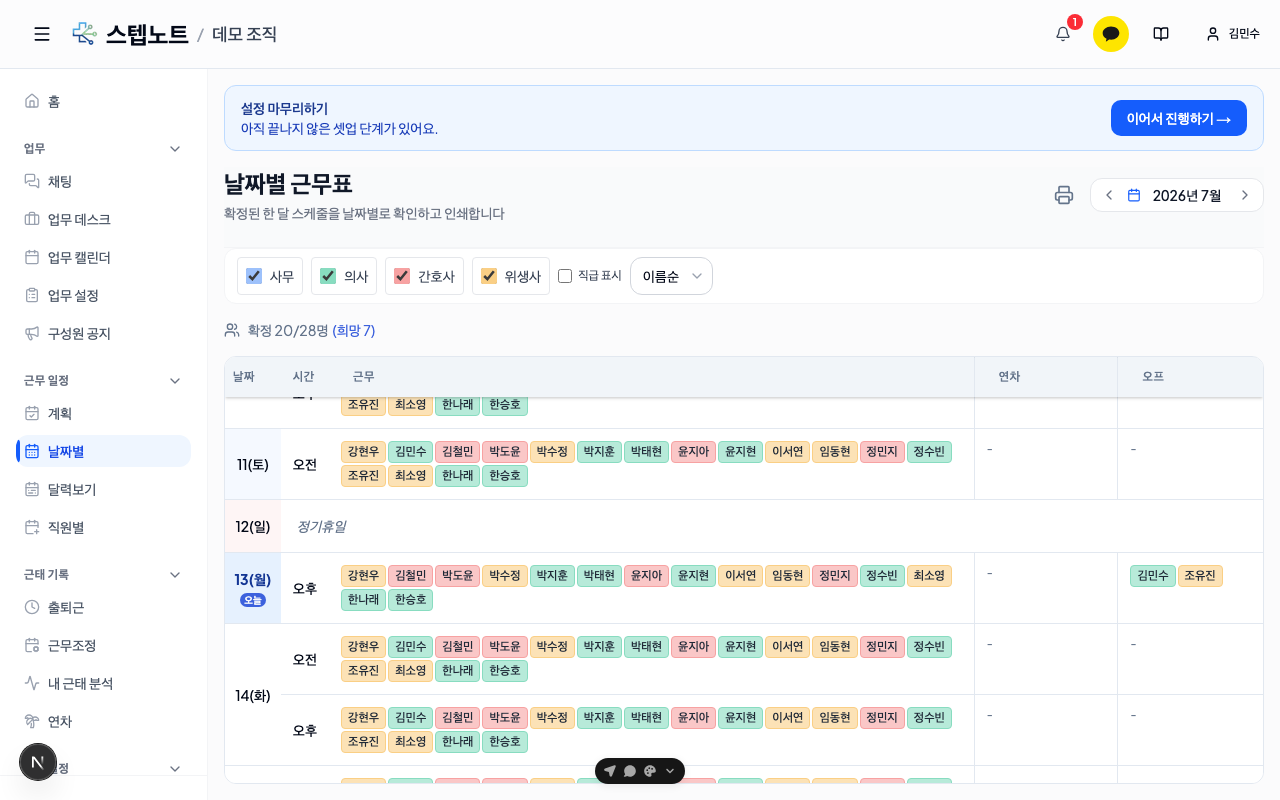
- The department checkboxes at the top let you show only specific departments, and setting the sort order to By department adds divider lines at department boundaries.
- Press the Print button at the top right (a 🖨 icon on mobile) to open a print preview, where you can set date-range printing (start–end dates), exclude holidays, and department filters before printing.
- To see the same data as a calendar, go to Work schedule → Calendar view in the left menu.
- The same color coding applies on every screen: shift (blue) · annual leave (green) · off (orange) · unset (gray).