3. Managing work schedules
3. Managing Work Schedules
Audience: Clinic directors, clinic administrators, members
Purpose
Systematically manage the work schedules, annual leave usage, and days off of the members in your organization. Shift management in StepNote follows a three-step process: Plan → Approve → Operate.
Process Overview
| Step | Tab | Who | Description |
|---|---|---|---|
| Step 1 | Plan | Member | Enter and submit next month's off/annual leave plan |
| Step 2 | Plan | Administrator | Review the submitted plan and confirm or reject it |
| Step 3 | By Member | Administrator | View the confirmed schedule and switch to Edit Mode when changes are needed |
Key principle: Whenever a confirmed schedule is modified, an edit reason must be entered, and every change is recorded in the history.
Shared Feature: Show Positions Toggle
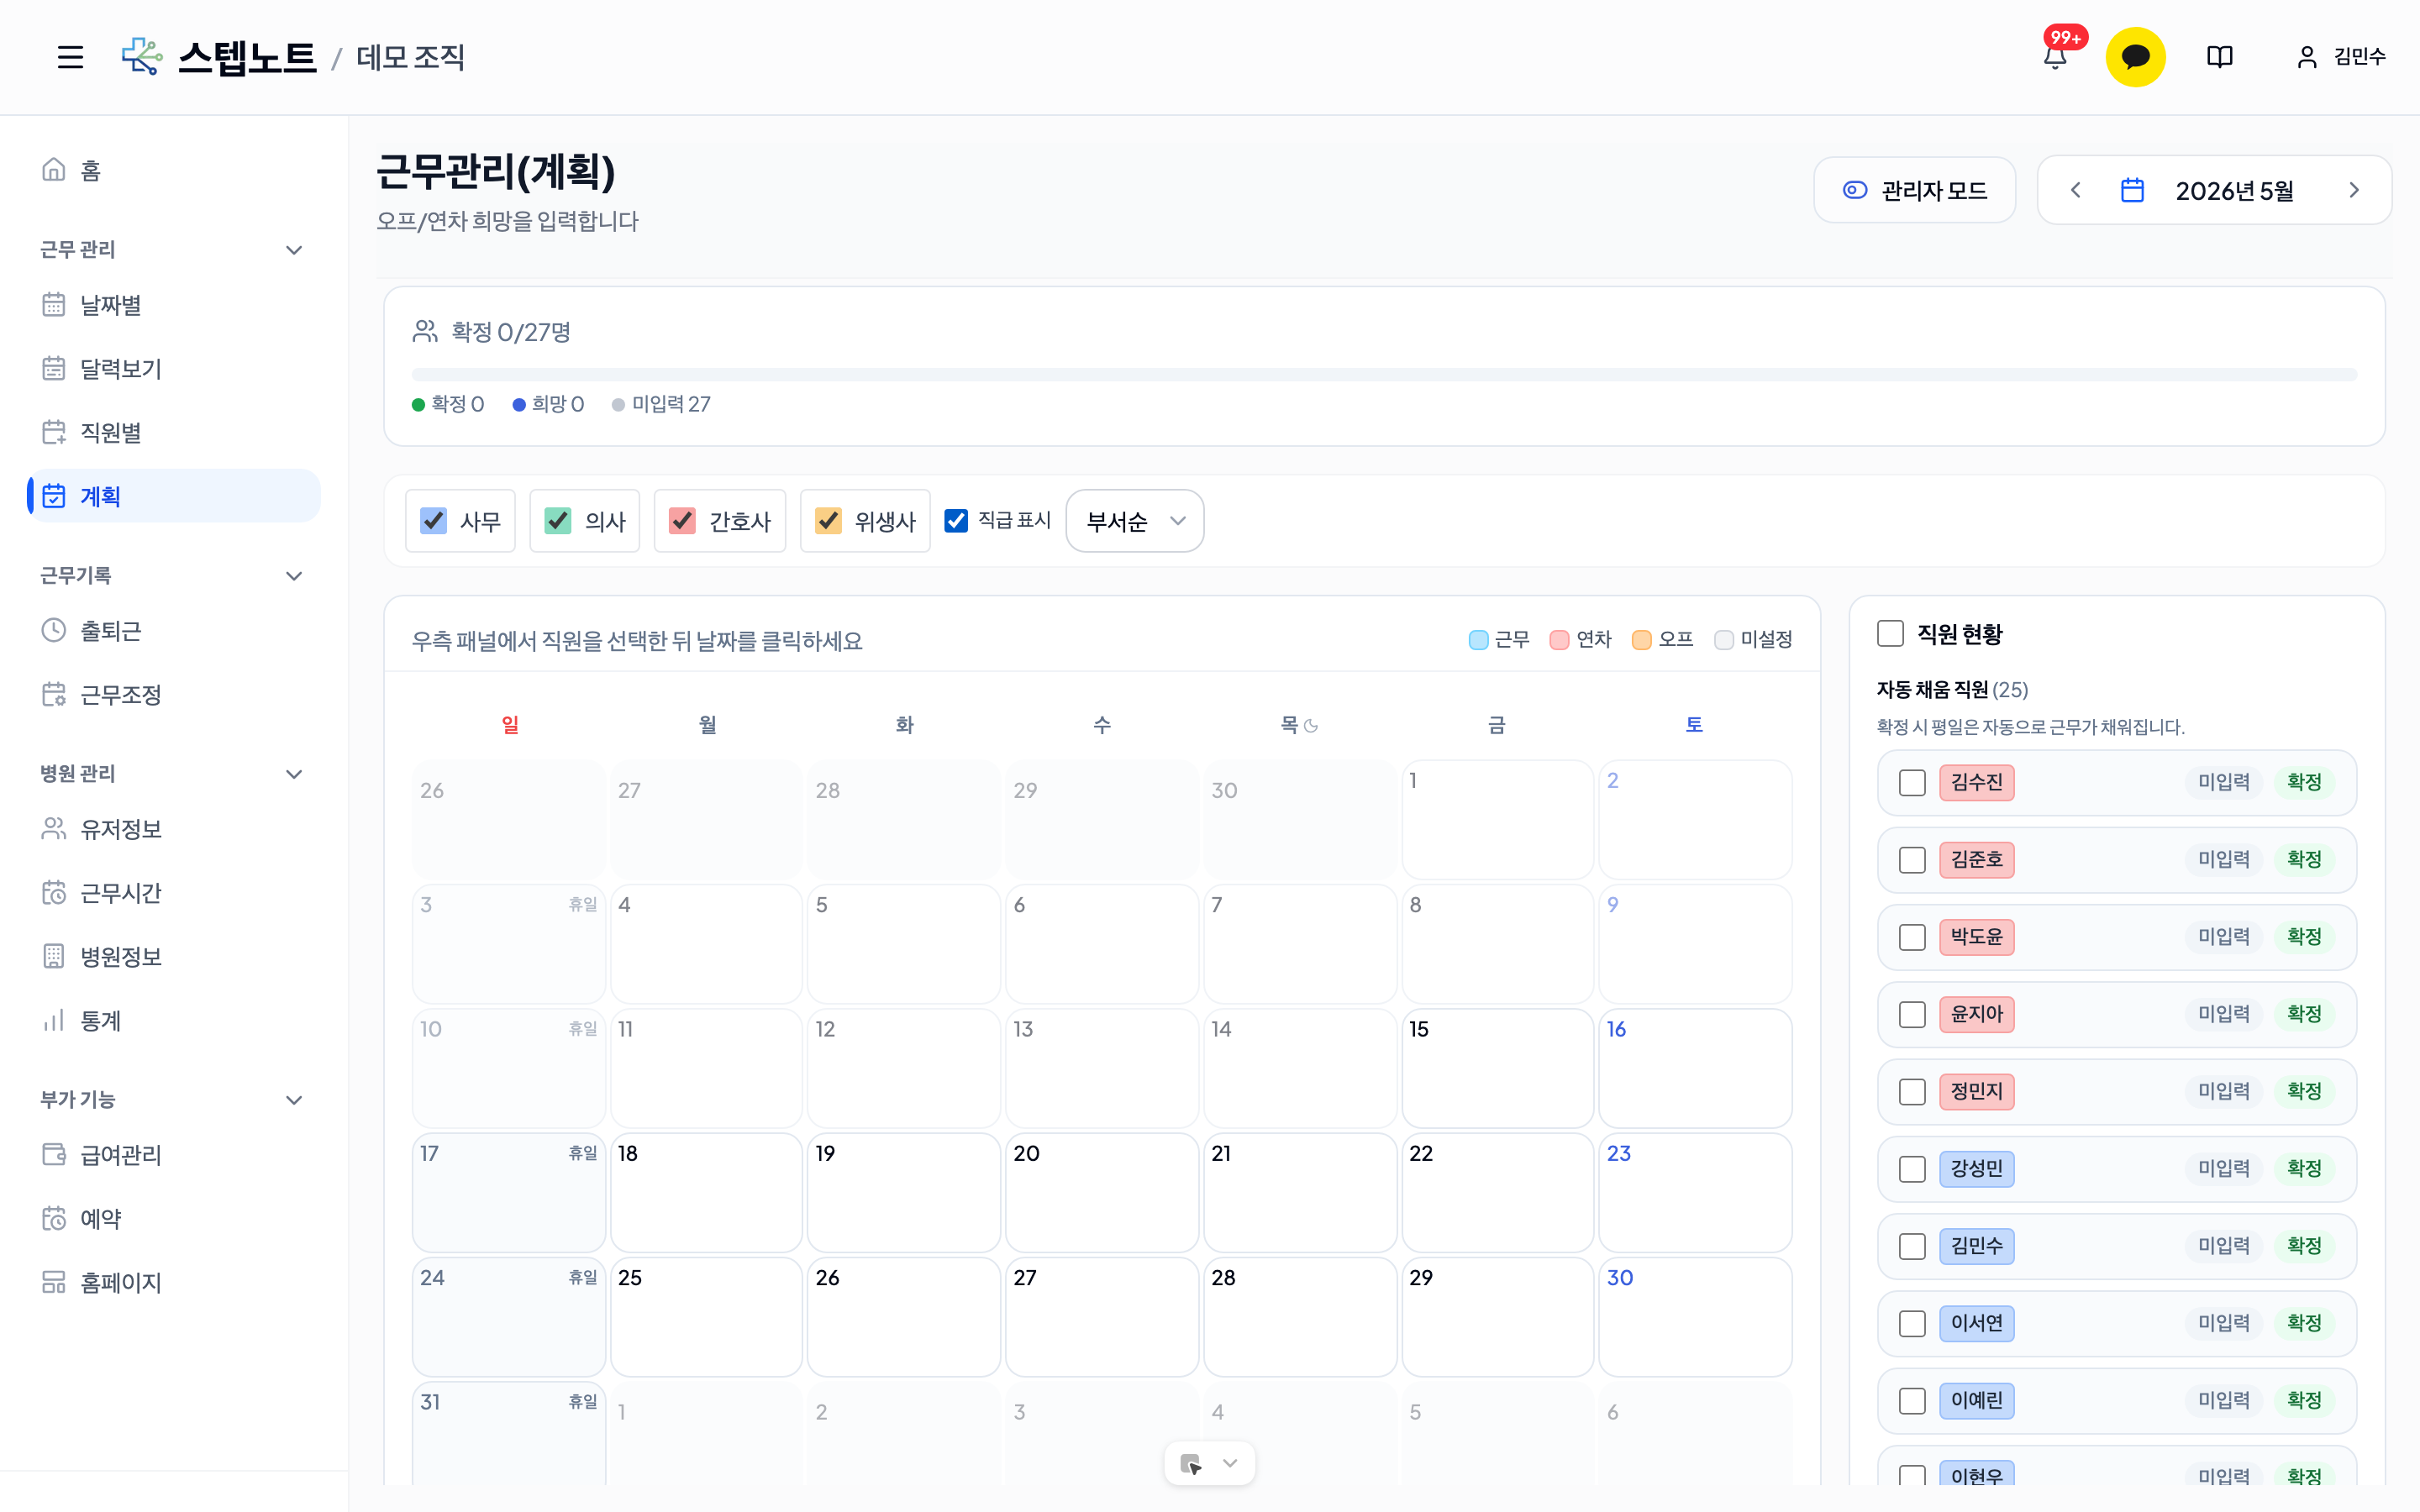
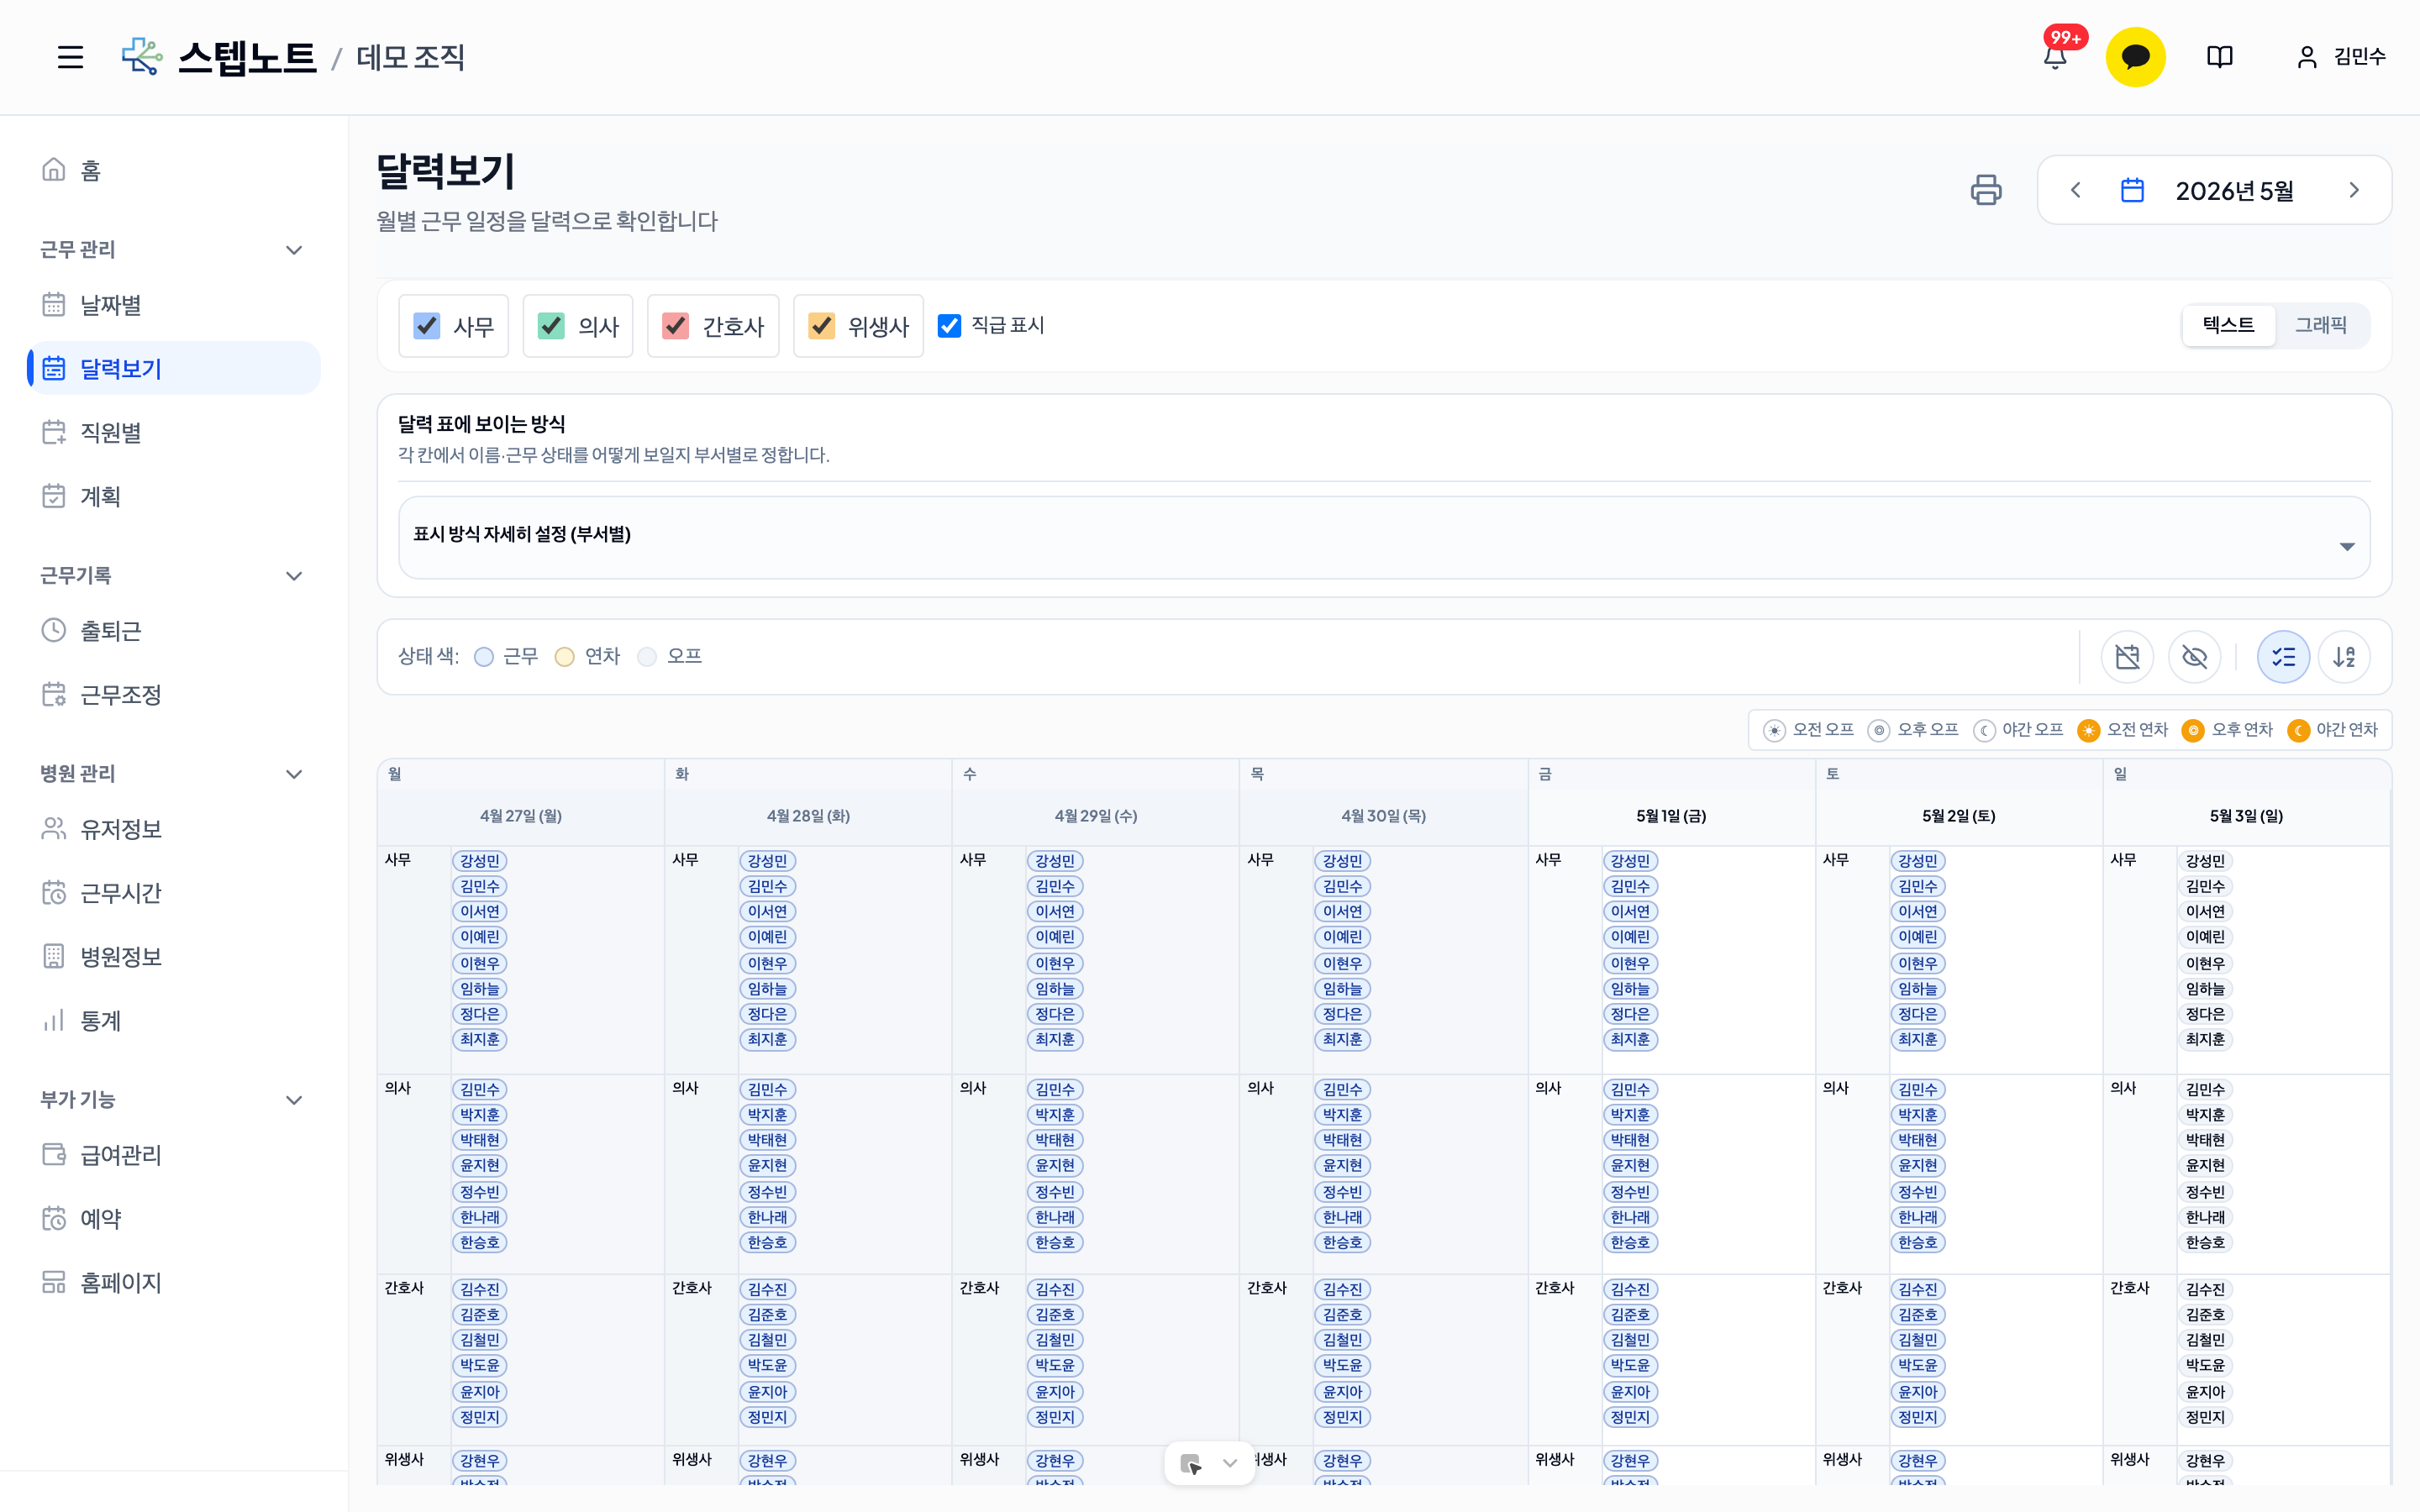
Every screen that displays work schedules (Plan, By Date, Calendar View, and the per-member work hours in the Work Hours tab) has a "Show positions" checkbox next to the department filter.
- When checked, each member's position appears in small text above their name.
- Positions are set together with departments in Member Management → Edit member info.
- The toggle state is saved automatically per organization and persists on your next visit.
This is handy when you want to see at a glance how many senior members are working on a given day.
3.1 Plan — Members Enter Their Plans
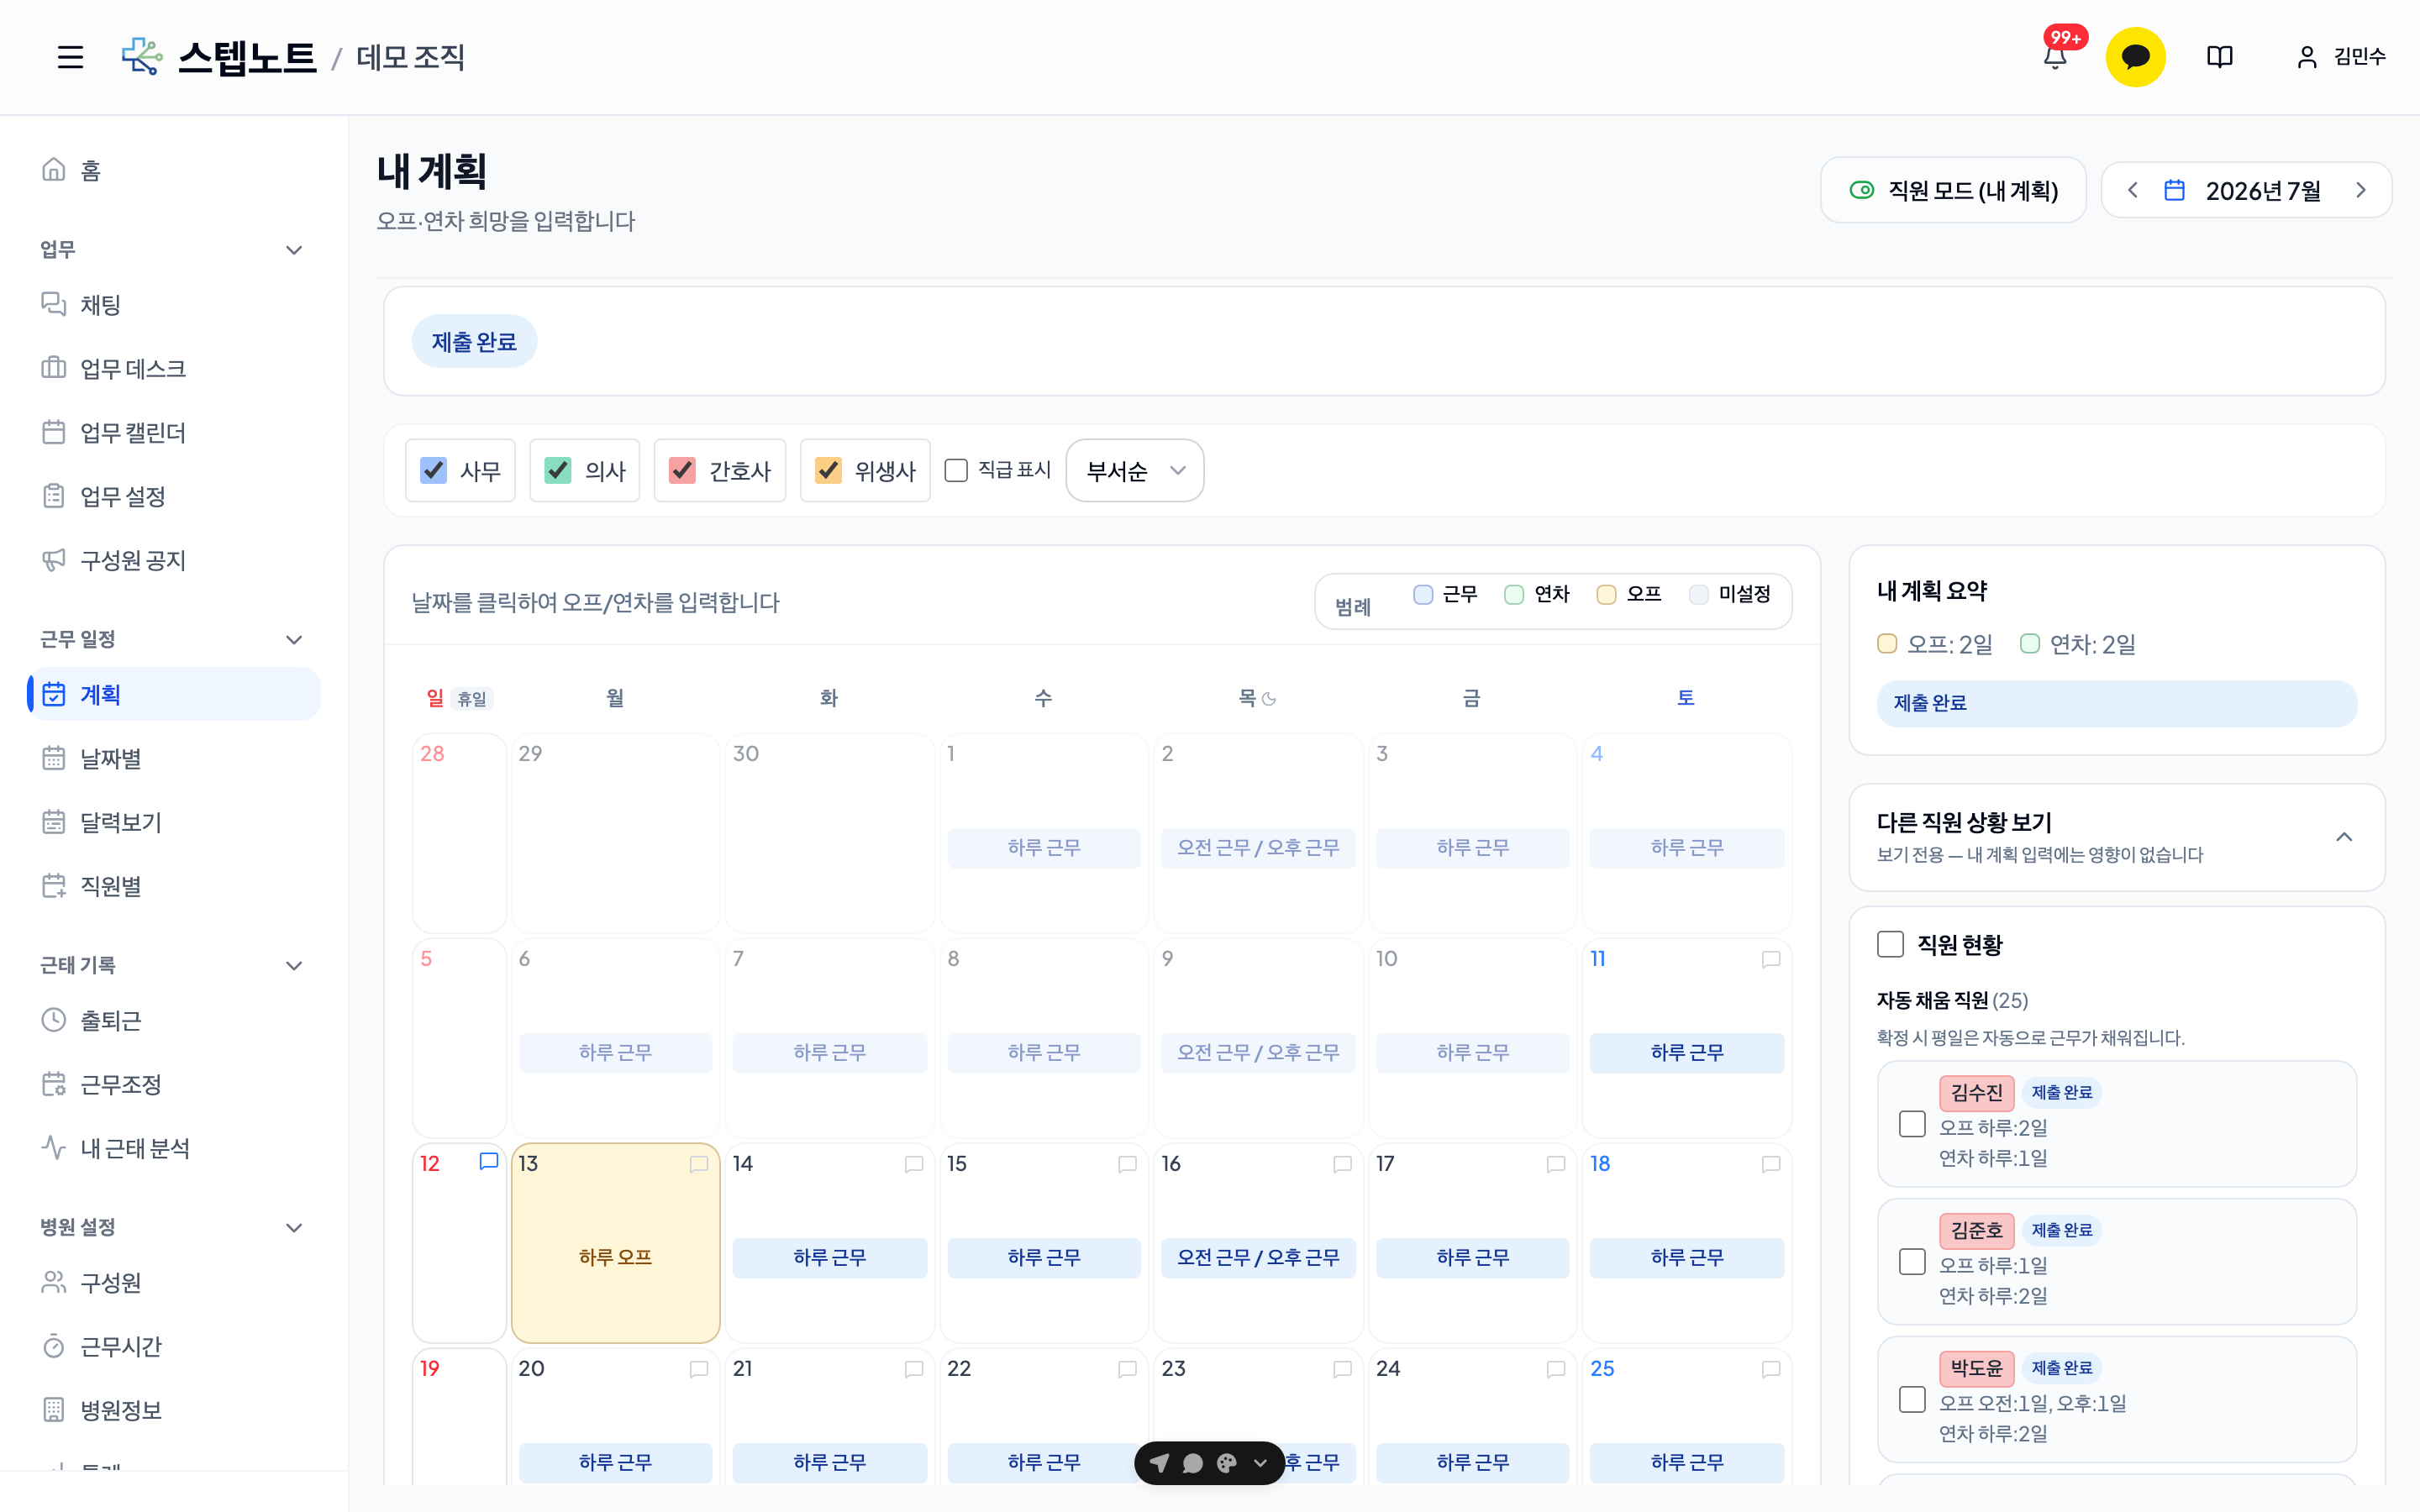
Click the "Plan" tab in the sidebar.
How to Enter a Plan
-
Select a month
- Use the ← / → buttons at the top to choose the month you want to plan
- Members usually enter next month's plan in advance
-
Enter offs and annual leave
- Click a date on the calendar to enter it
- Off: Marks the date as off (no annual leave deducted)
- Annual leave: Marks the date as annual leave (deducted from the annual leave balance)
- Morning only → morning half-day leave (0.5 days)
- Afternoon only → afternoon half-day leave (0.5 days)
- Both morning and afternoon → full-day annual leave (1.0 days)
- Dates left blank are automatically treated as workdays
- Unpaid leave cannot be entered by members themselves — an admin enters it in admin mode (see 3.2)
-
Add a memo (optional)
- Click the memo icon next to a date to leave a note of up to 200 characters
- Examples: "Family event", "Hospital appointment"
-
Auto-fill feature
- Click the auto-fill (magic wand icon) button at the top
- It automatically enters morning/afternoon shifts based on the member's preset personal weekly pattern
- Annual leave that has already been entered is preserved
- Night shifts are not auto-filled and must be entered manually
Date-specific custom indicator (New): If the clinic's business hours are temporarily changed for a specific date, a small orange dot appears next to the date number. This lets you see in advance that a day will run on different hours than usual, before you fill in your plan.
Submitting a Plan
- Once the plan is complete, click the "Submit" button
- After submission, the status changes to "Submitted" (blue)
- The plan cannot be edited after submission
Withdrawing a Submission
- As long as the administrator has not yet confirmed it, you can withdraw the plan with the "Cancel Submission" button
- After withdrawing, you can edit the plan and submit it again
Plan Statuses
| Status | Color | Description |
|---|---|---|
| Not submitted | Gray | Not yet submitted; can be edited freely |
| Submitted | Blue | Sent to the administrator; cannot be edited |
| Confirmed | Green | Approved and confirmed by the administrator; read-only |
| Rejected | Red | Rejected by the administrator; check the reason, revise, and resubmit |
Viewing Other Members' Status (Member Mode)
Expand "View other members' status" at the bottom of the Plan tab to see the plan status of other members in your organization.
- It is collapsed by default — the list only appears when you expand it explicitly, so the checkboxes are not mistaken for something that affects your own plan entry
- It is view-only; selecting another member here has no effect on your own plan entry
3.2 Plan — Administrators Approve Plans
Administrators click the "Admin Mode" button to see the submission status of all members.
Under the screen title is a one-line description, "Add days off & leave, then confirm — that's the schedule", and on your first visit a "How to make the schedule" guide card shows the order — ① put days off and leave on the calendar (staff can add their own in the app, or you can add them for them) → ② pick staff on the right and press [Confirm] (weekdays left blank become 'work' automatically) → ③ if something changes after confirming, [Unconfirm] → fix it → ④ press [Confirm] again. Staff don't need an account — you can enter everything for them. Close it with Got it, close, and reopen it later with Show guide again.
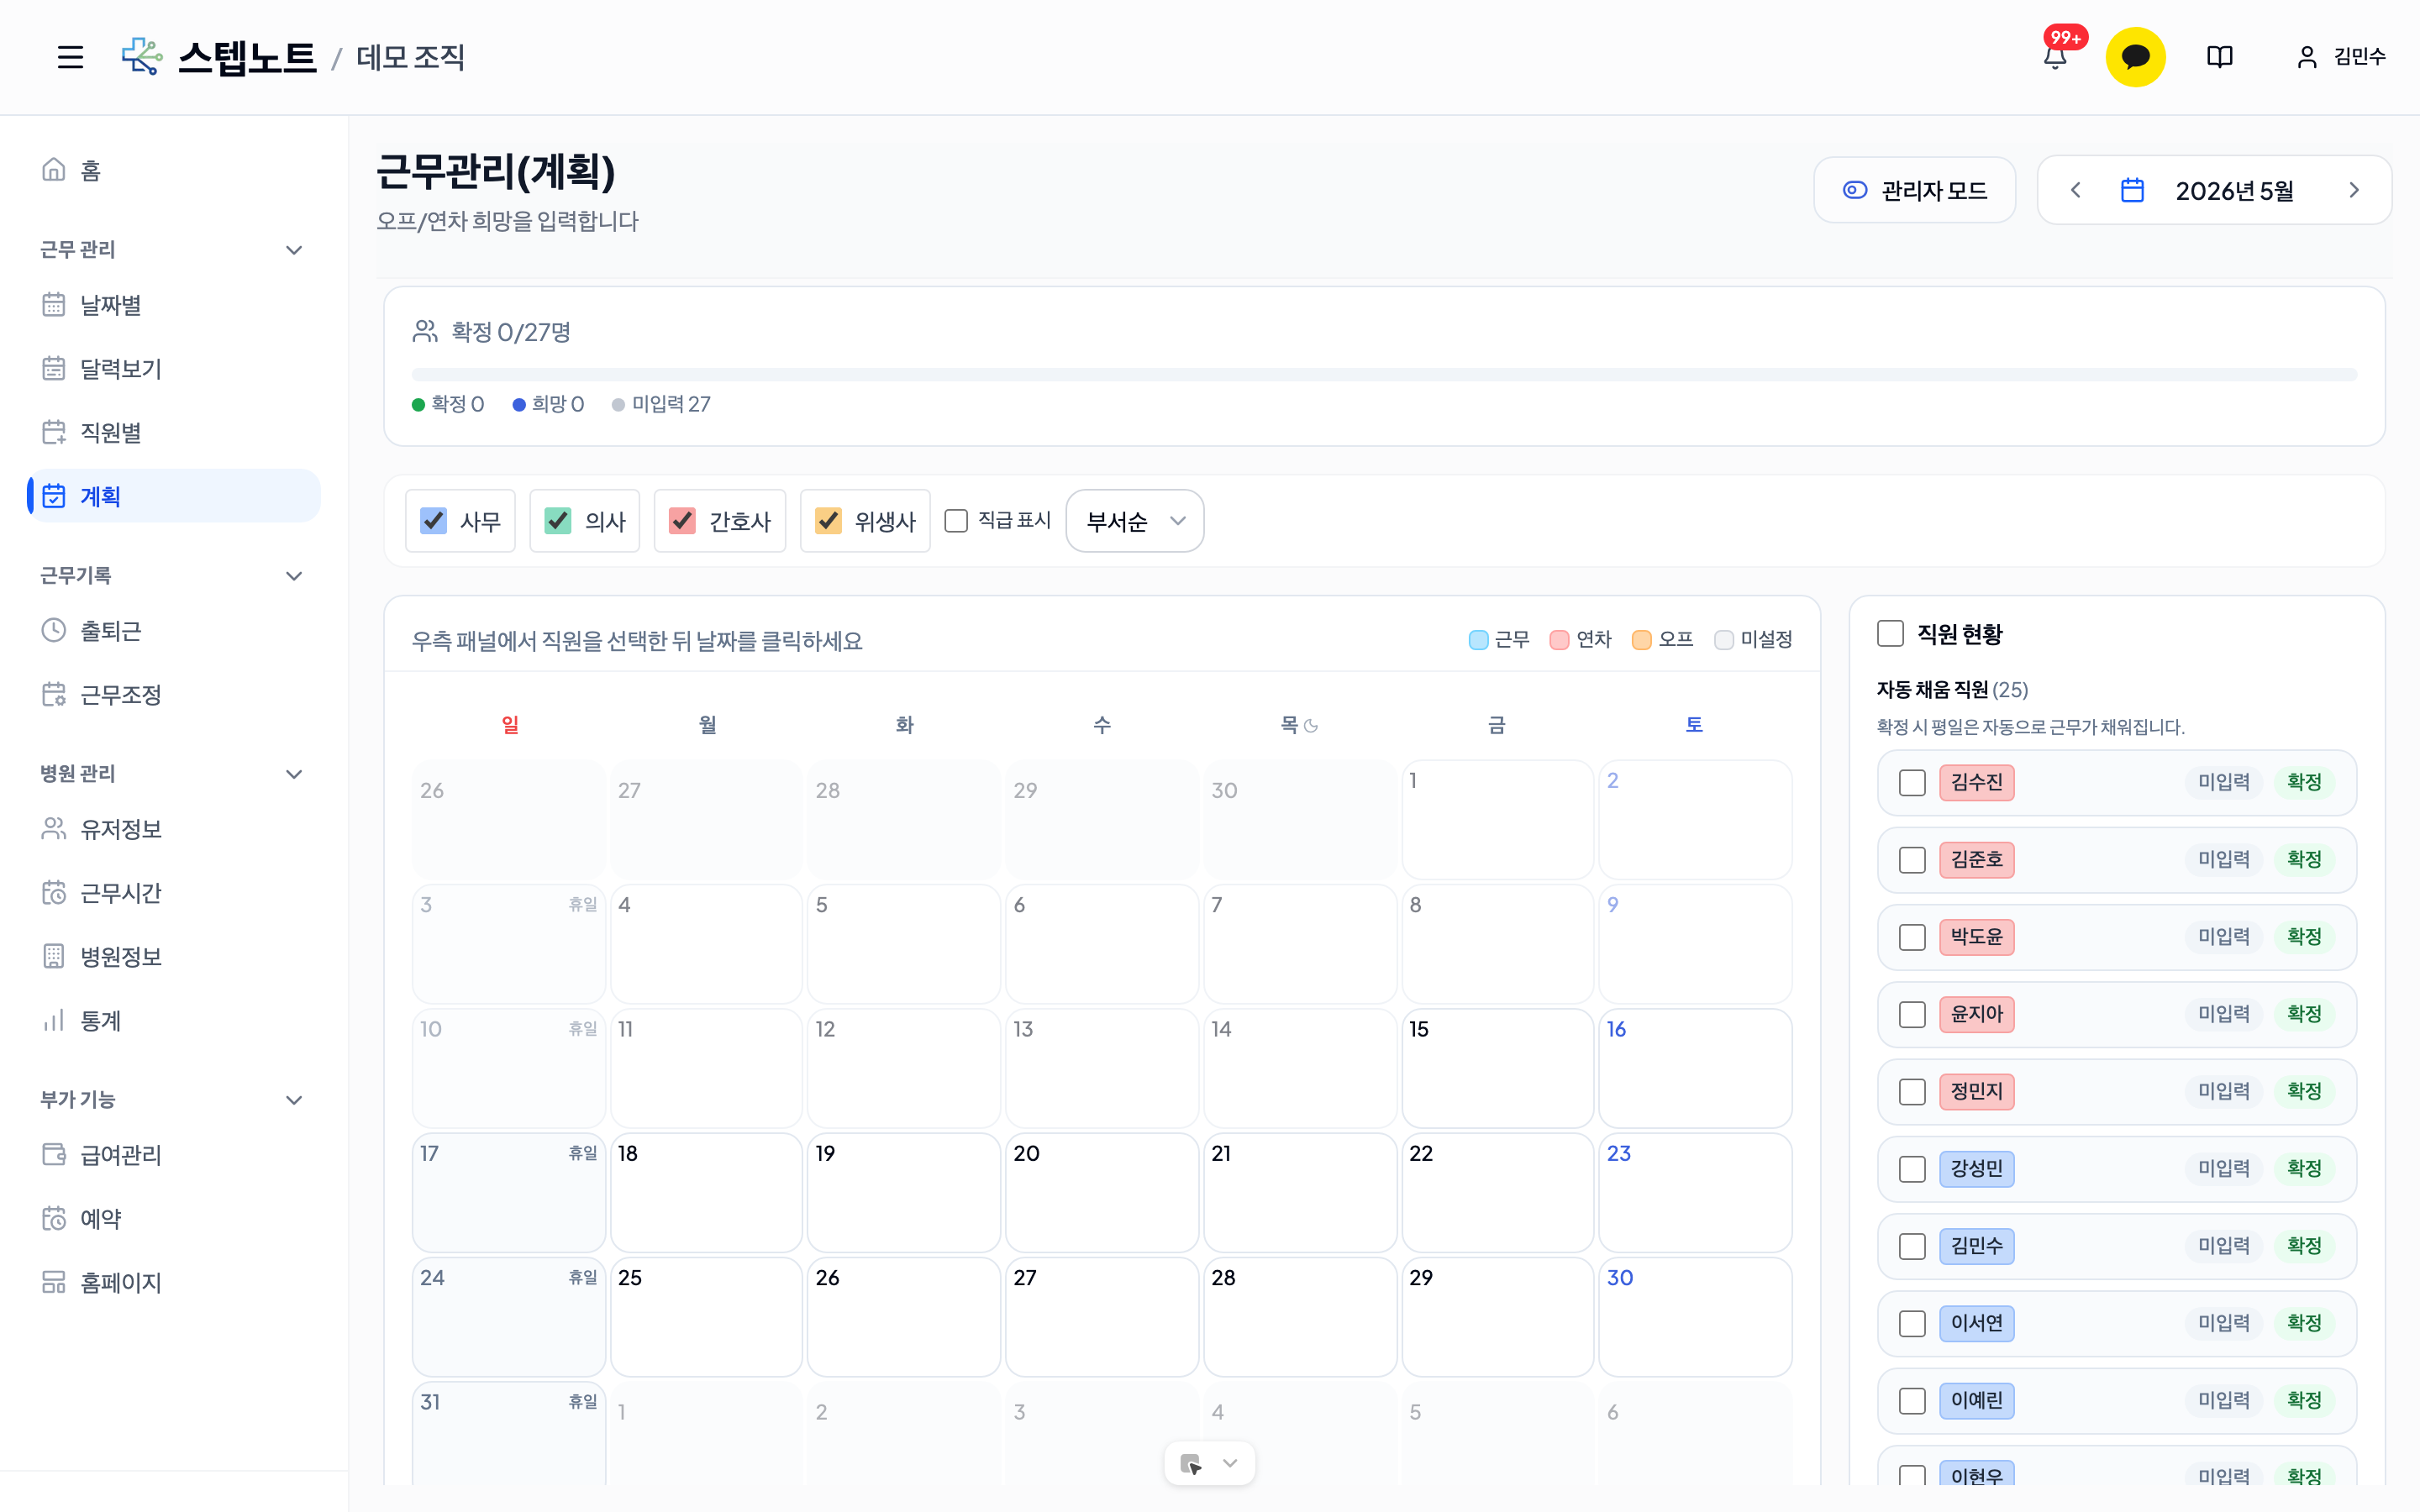
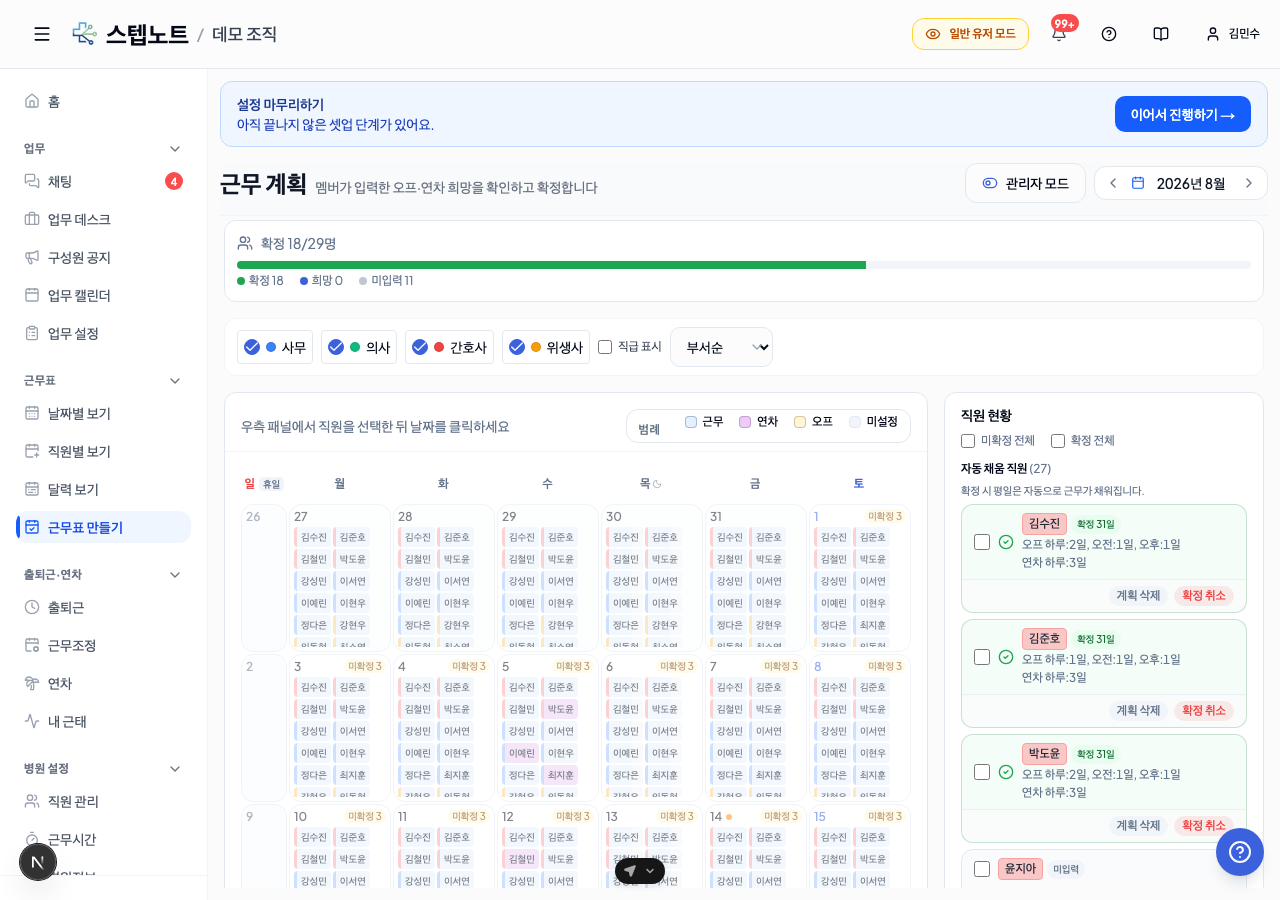
Screen Layout
- Left calendar: Shows the off/annual leave status of all members at a glance
- Right member list: Split into two groups, Weekdays auto-work / Only entered days (auto-fill mode and explicit-entry mode members respectively)
- A remaining leave badge appears next to each name — "Nd leave", "No leave" when nothing is left, or a red "Nd over" when more leave has been entered than remains
- The grouping is based on the auto-fill mode (
auto_schedule_mode) — the criterion is "how the schedule is filled on confirmation", not whether the member has an account - Each section header shows the member count and a note explaining what happens on confirmation
- Members without accounts show a gray "No account" badge on their row for easy identification (independent of the mode)
- Top: Progress summary (Confirmed N / Submitted N / Rejected N / Not submitted N)
- Department filter: Use the checkboxes to filter by specific departments
- Show positions toggle: Located next to the department filter — when checked, positions appear above names
- Member row badges: A status badge appears next to each name. Confirmed members show "Confirmed N days" (the actual number of confirmed dates); before confirmation, the submission status (Not entered / Requested / Submitted / Rejected) is shown
- If some dates exist in the plan but are not yet confirmed, an orange "Unconfirmed N days" badge appears next to "Confirmed N days" — this prevents the misunderstanding of "I confirmed, but it looks incomplete"
- Member row buttons: Below each row are Delete Plan / Unconfirm buttons, plus a Confirm button that appears only while unconfirmed dates remain (Unconfirm appears only when confirmed dates exist). When confirming the remaining dates of a member who is already partially confirmed, the button label changes to "Confirm More". When the number of unconfirmed dates reaches zero (fully confirmed), the Confirm button disappears entirely
- Unconfirmed badges on the left calendar: In a month where confirmation has started at least once, each calendar date shows an "Unconfirmed N" badge with the number of members still unconfirmed for that date
- Date-specific custom indicator (New): If a date has temporarily changed clinic-wide business hours (Work Hours tab → Temporary Closures & Hour Changes → "Clinic"), a small orange dot appears next to the date number — so you can spot days that run on different hours at a glance
Confirmation Differences: Auto-Fill vs. Explicit Entry
| Item | Weekdays auto-work (auto-fill) | Only entered days (explicit entry) |
|---|---|---|
| Weekday shifts auto-filled | Yes — filled automatically per pattern | No |
| Entered offs and annual leave | Applied | Applied |
| Dates without entries | Filled with pattern shifts | Left blank |
Regular members are always auto-fill. Members without accounts default to explicit entry, but can be switched to auto-fill in the user info edit modal (see 2.6 for details).
→ Even if you confirm both groups at once, the confirmation results differ. To prevent explicit-entry members from ending up with empty schedules, assign their workdays in advance with explicit entries such as "single-day shift".
When Leave Runs Short — Warning Dialog (New)
When you add leave in admin mode and the member doesn't have enough leave left, a warning dialog appears instead of adding it right away. The title changes with the situation — "○○ has no leave available yet", "○○ only has Nd of leave left", or "○○ and N others don't have enough leave" when adding for several members at once — and the body says "Adding it anyway puts the balance at -Nd. Granting leave later fills it back in."
| Button | What happens |
|---|---|
| Add leave anyway | The leave is added. The balance goes negative and the badge turns into a red "Nd over". Granting leave later fills it back in |
| Grant leave first | (admins only) Opens the grant-leave dialog for that member right away. Grant it, then add the leave again |
| Add as unpaid leave | Adds unpaid leave instead of annual leave (see below) |
| Cancel | Nothing is added |
- Required leave is counted as 1 day for full-day leave and 0.5 day for a morning or afternoon half day. Night leave doesn't deduct anything, so no warning appears.
- The warning only applies to members listed in the leave overview. For members missing from it because they have no start date, first press Add start date in the banner on the Annual leave tab.
Adding Unpaid Leave (admin mode, new)
Unpaid leave — time off that does not use annual leave — is entered per member from the admin-mode calendar. It is not deducted from annual leave and is entered in whole days only (no half days).
- Tick the checkbox of the target member(s) in the member list on the right (multiple members can be selected)
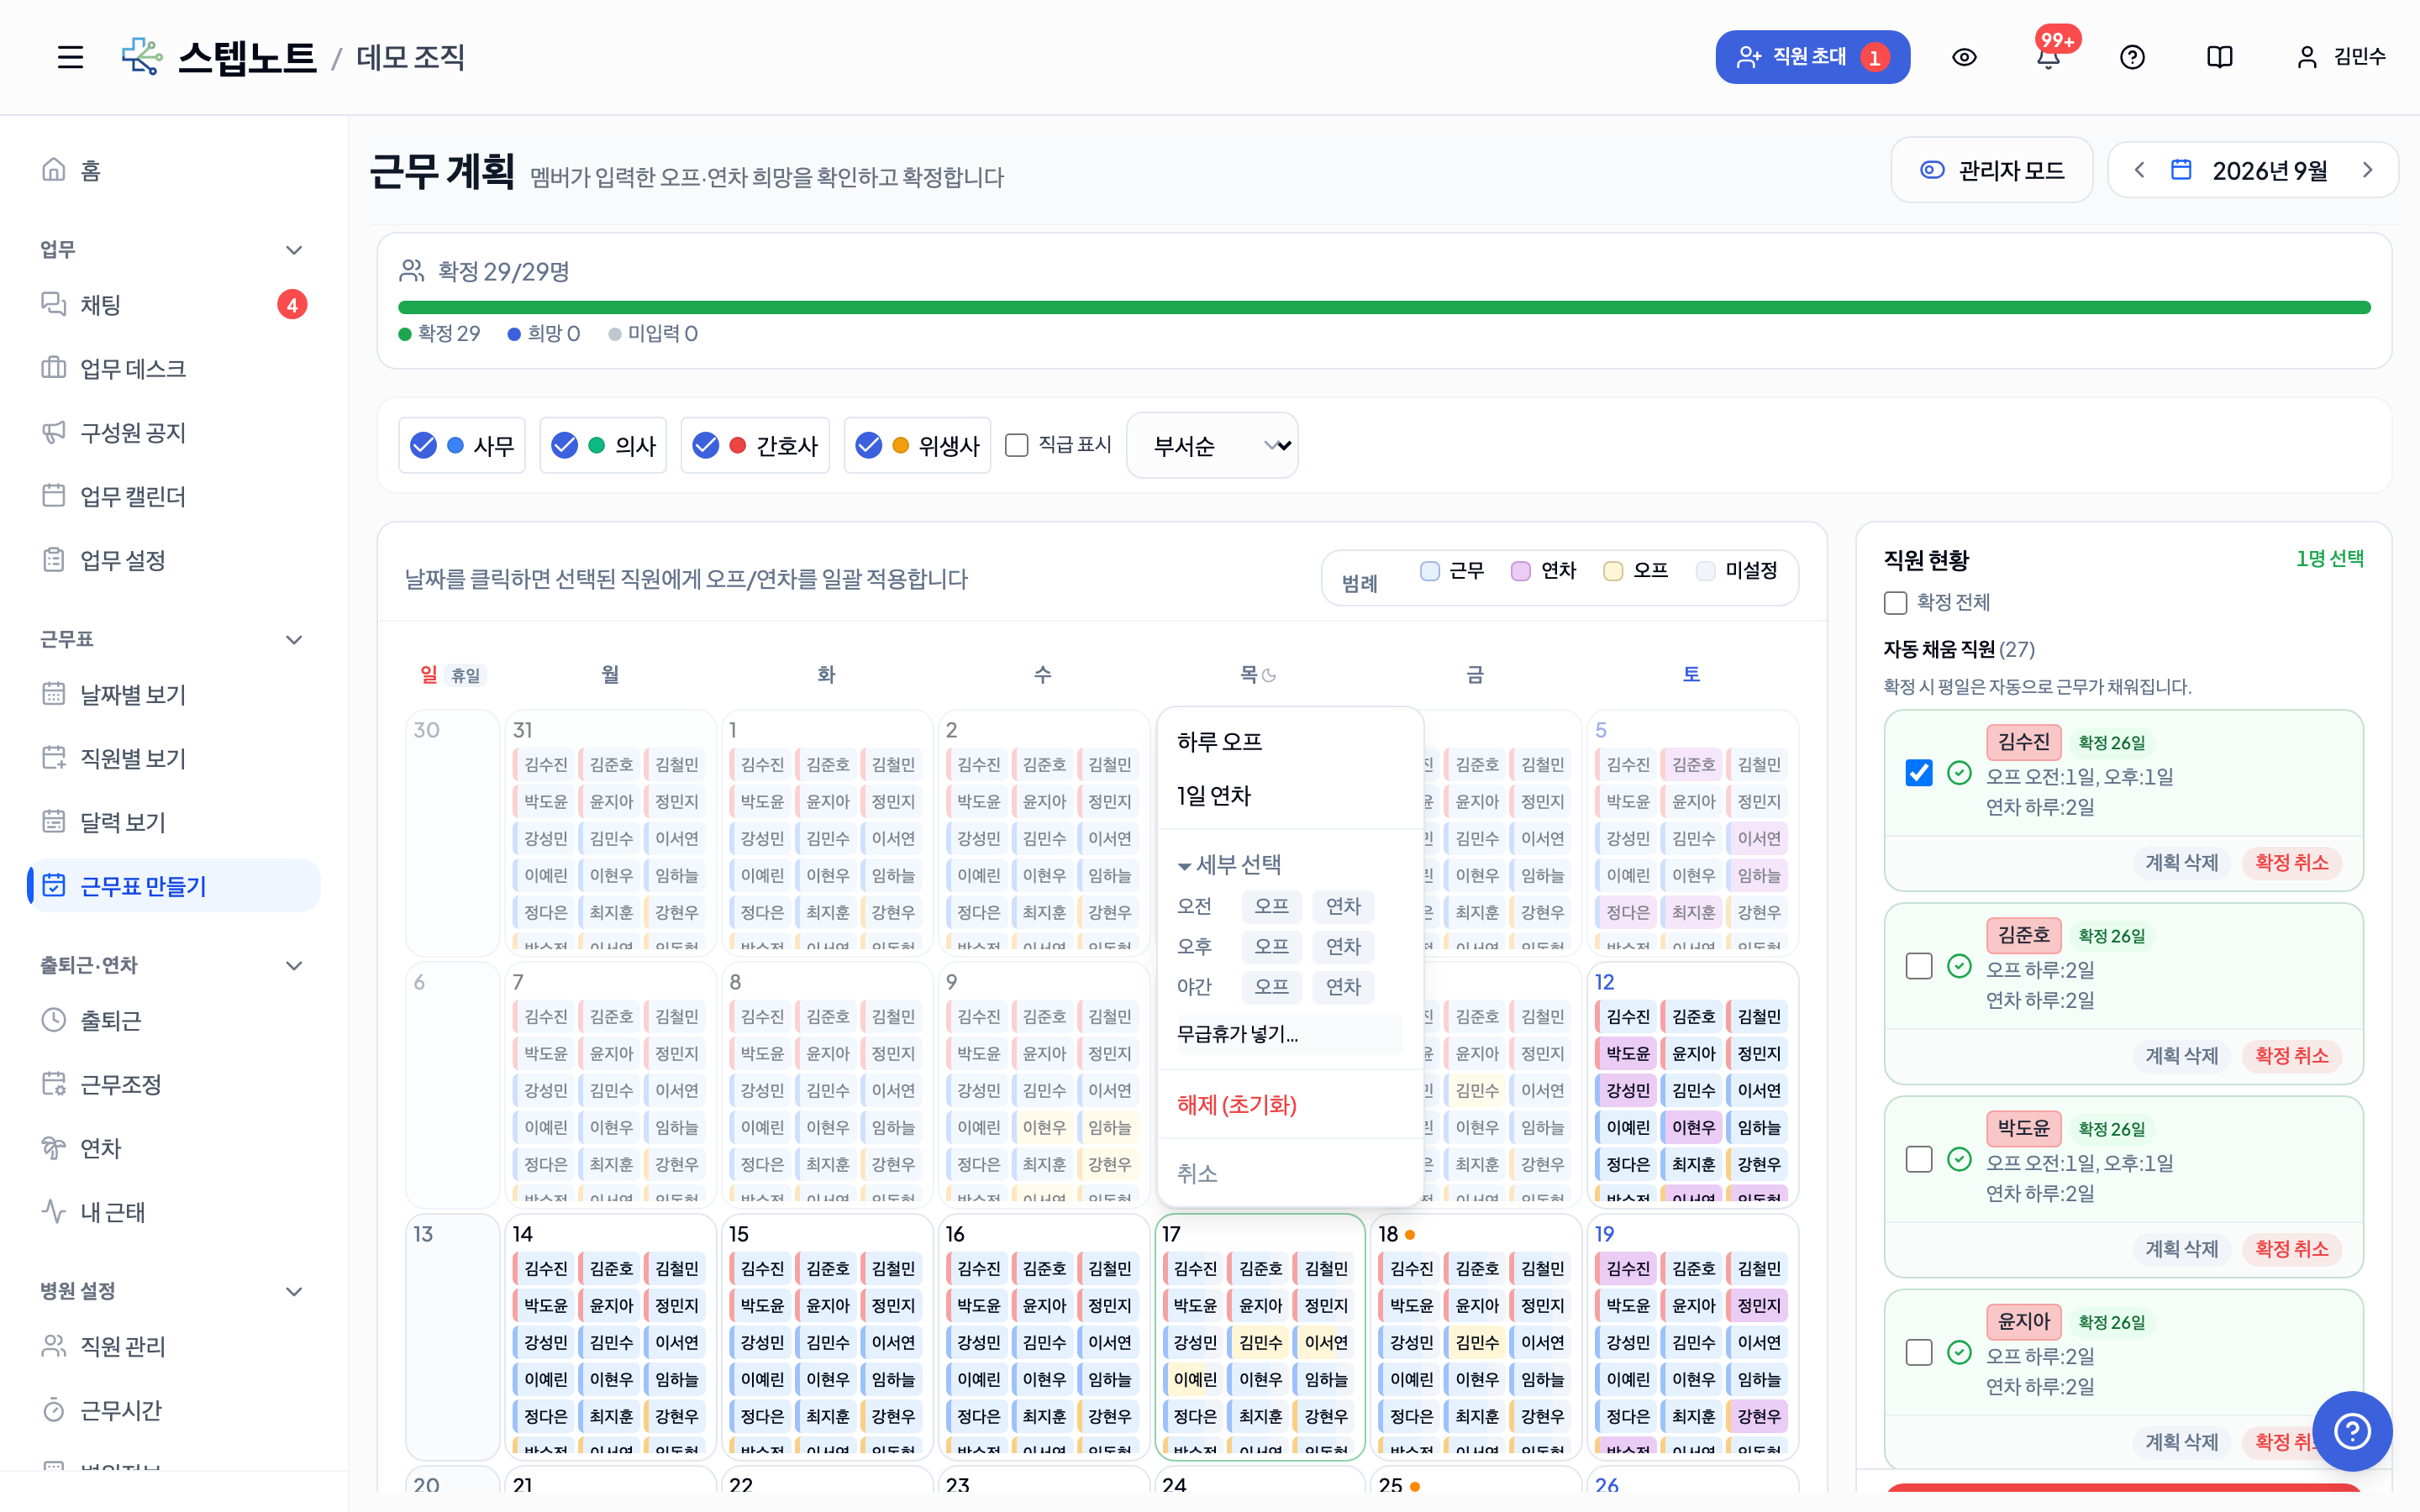
- Click the day number in the calendar on the left to open the popover — below Full-day off / Full-day leave / Full-day shift, expand "Detailed selection"
- Click "Add unpaid leave…" to open the reason dialog
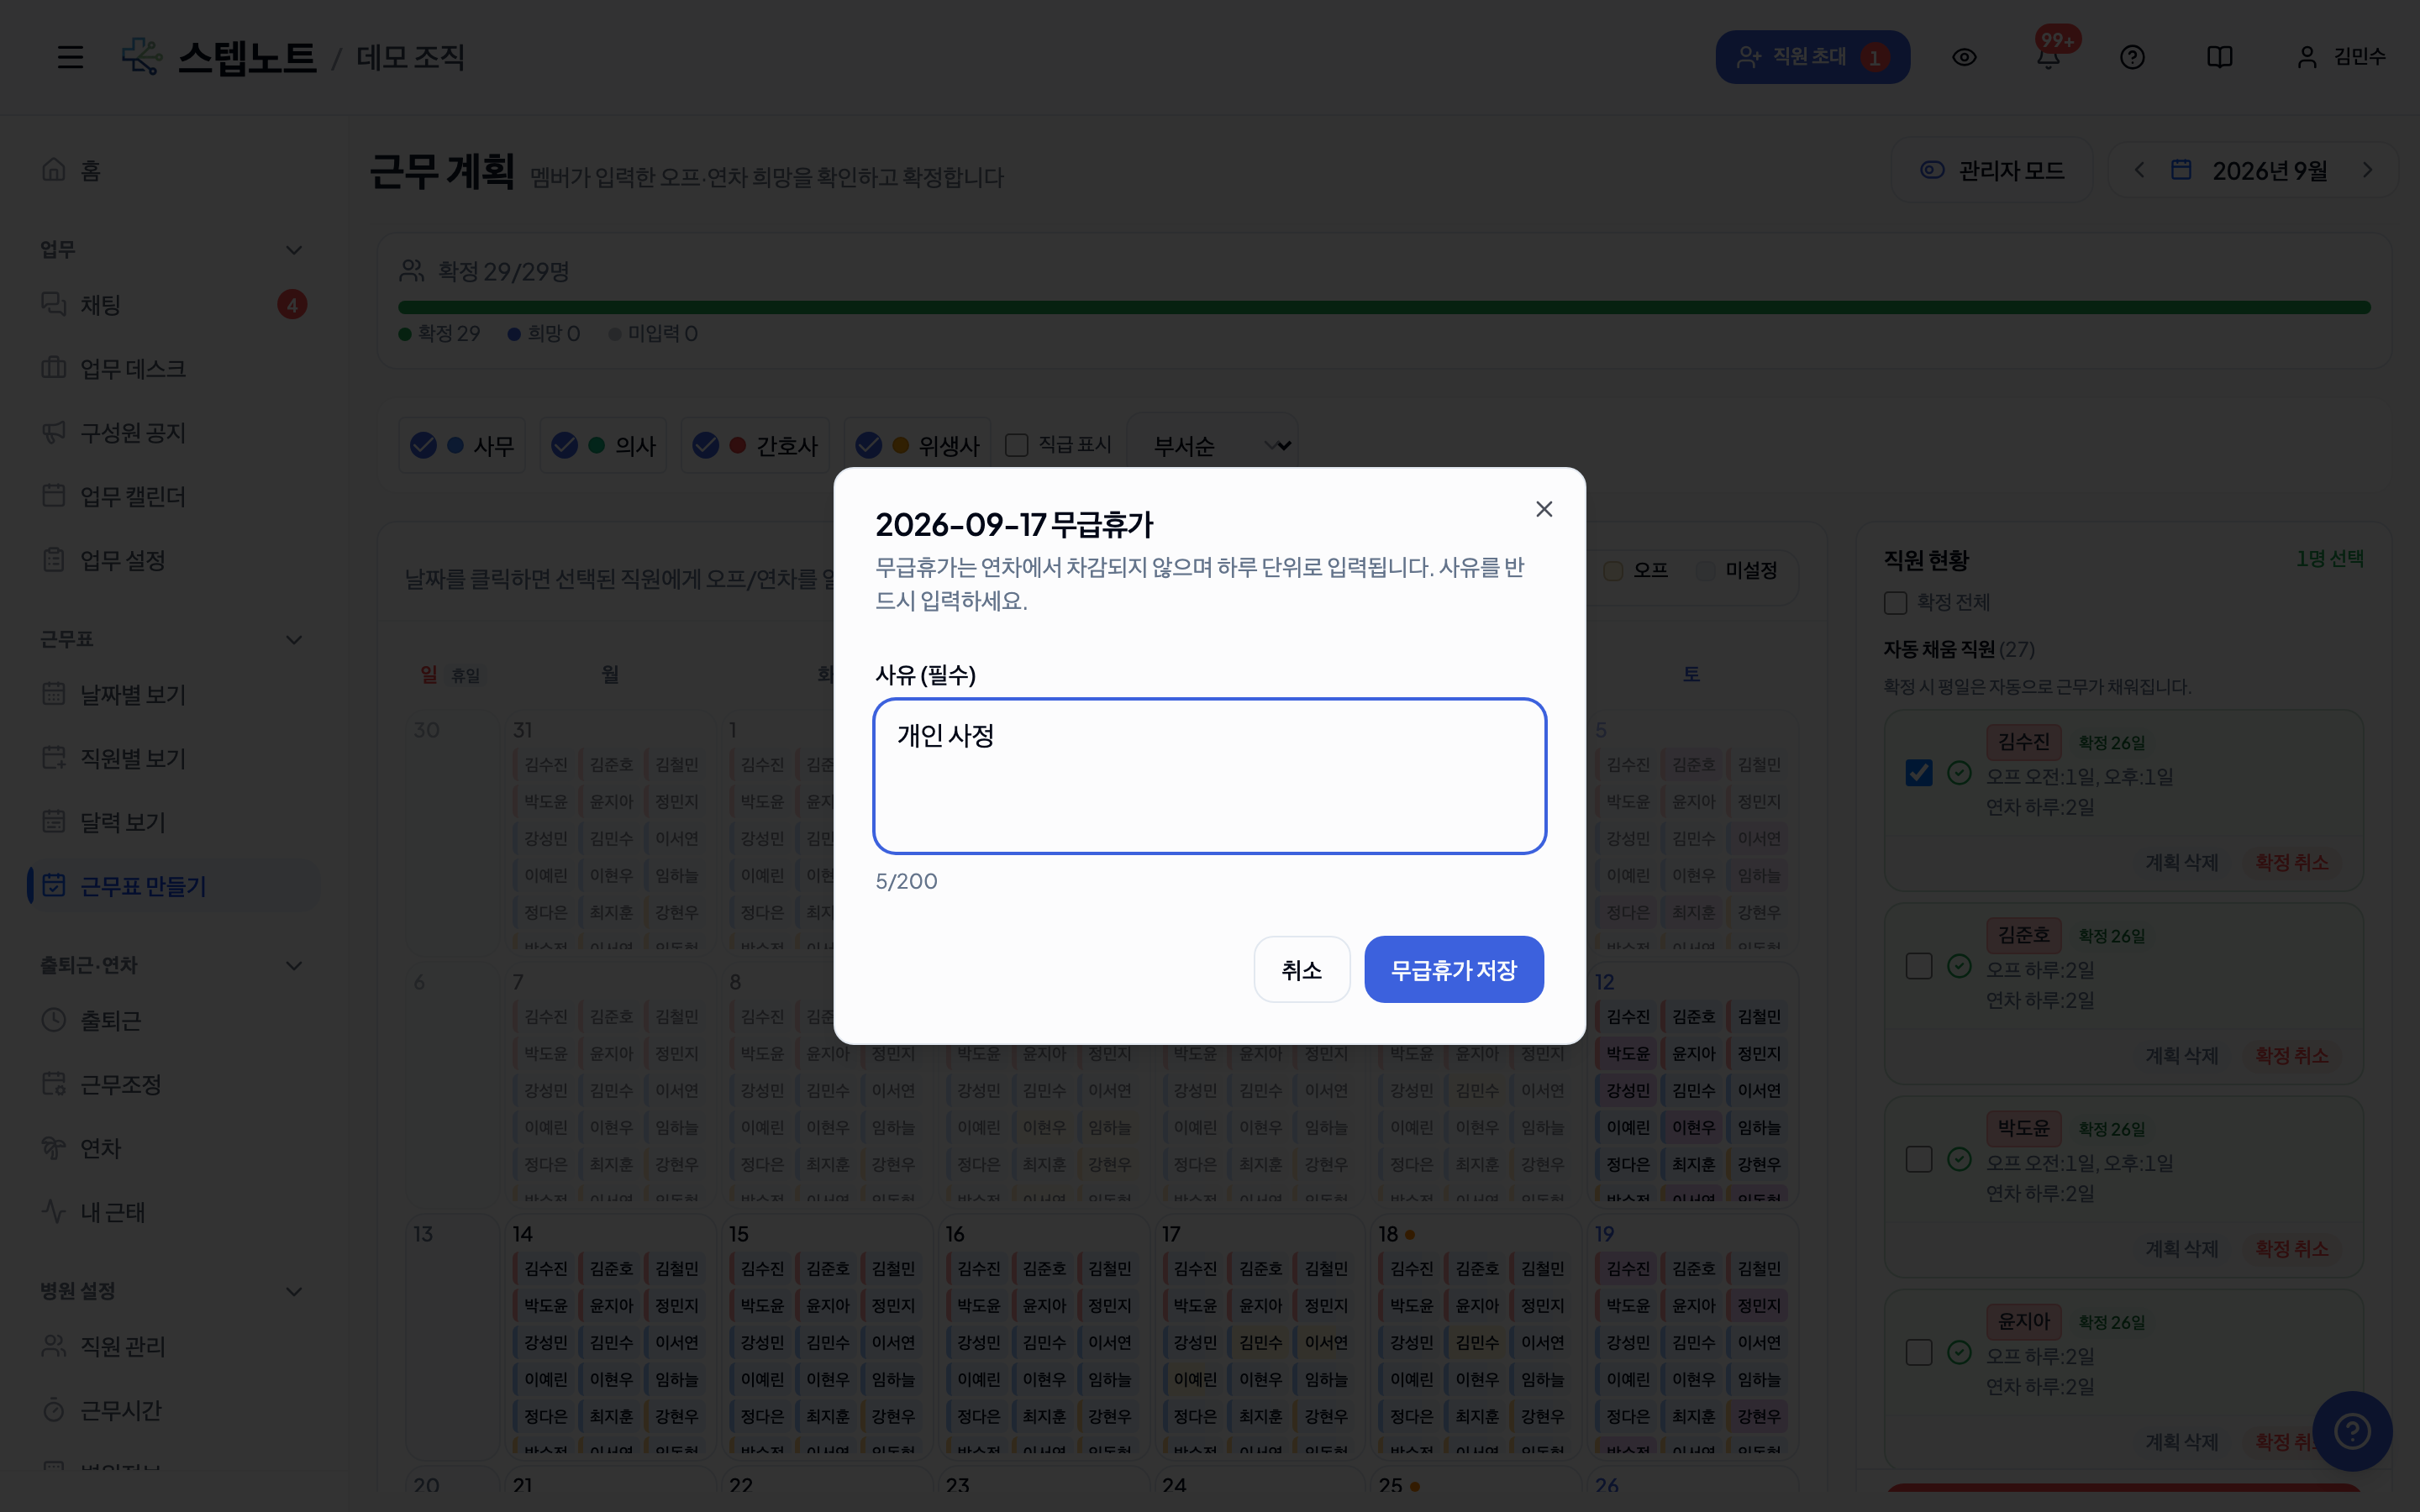
- Enter a reason (required, up to 200 characters) and click "Save unpaid leave" — that date is saved as unpaid leave for every selected member
- On a date that already has unpaid leave, the popover item changes to "Unpaid leave (edit reason)" so only the reason can be changed
- On non-working days (closures, public holidays) a notice says the date is not a working day and unpaid leave cannot be added
- To remove unpaid leave, use "Clear (reset)" in the same popover or overwrite it with another type (off, leave, work)
- See 3.6 "Input Rules" for how unpaid leave differs from off and annual leave
Individual Approval/Rejection
- Click a member's name → view that member's plan details
- "Confirm" button → confirm the plan (status: Confirmed)
- "Reject" button → select a rejection reason, enter any notes, and reject
Example rejection reasons:
- Schedule coordination needed
- Too many off days
- Does not match the pattern
- Other (free text)
Single Confirmation — Explicit-Entry Count Preview
When you confirm a single explicit-entry member, the dialog previews the number of explicitly entered shift, off, and annual leave days.
- If there are zero explicit entries, a ⚠️ warning appears — confirming as-is will leave that member's schedule empty
- For auto-fill members, no preview is shown; only a "weekdays will be auto-filled" note appears
Batch Confirmation of Selected Members — Per-Group Preview
Select multiple members with the checkboxes and click "Confirm Selected"; the dialog previews the selected members split again into two sections, auto-fill members / explicit-entry members.
- Auto-fill members section: shown as name badges (with a gray no-account badge next to members without accounts)
- Explicit-entry members section: shows per-member counts of Shifts N · Offs N · Annual leave N; members with zero explicit entries are highlighted with an amber background + ⚠️ AlertTriangle
- A total warning appears at the bottom: "N members have zero explicit entries"
→ Before batch confirming, you can see at a glance who would be confirmed with an empty schedule.
Confirm All
- The "Confirm all N submitted" button confirms every currently submitted plan at once
- Confirmed plans are automatically reflected in the By Member tab
Confirmation Dialog — Specify a Period (Optional)
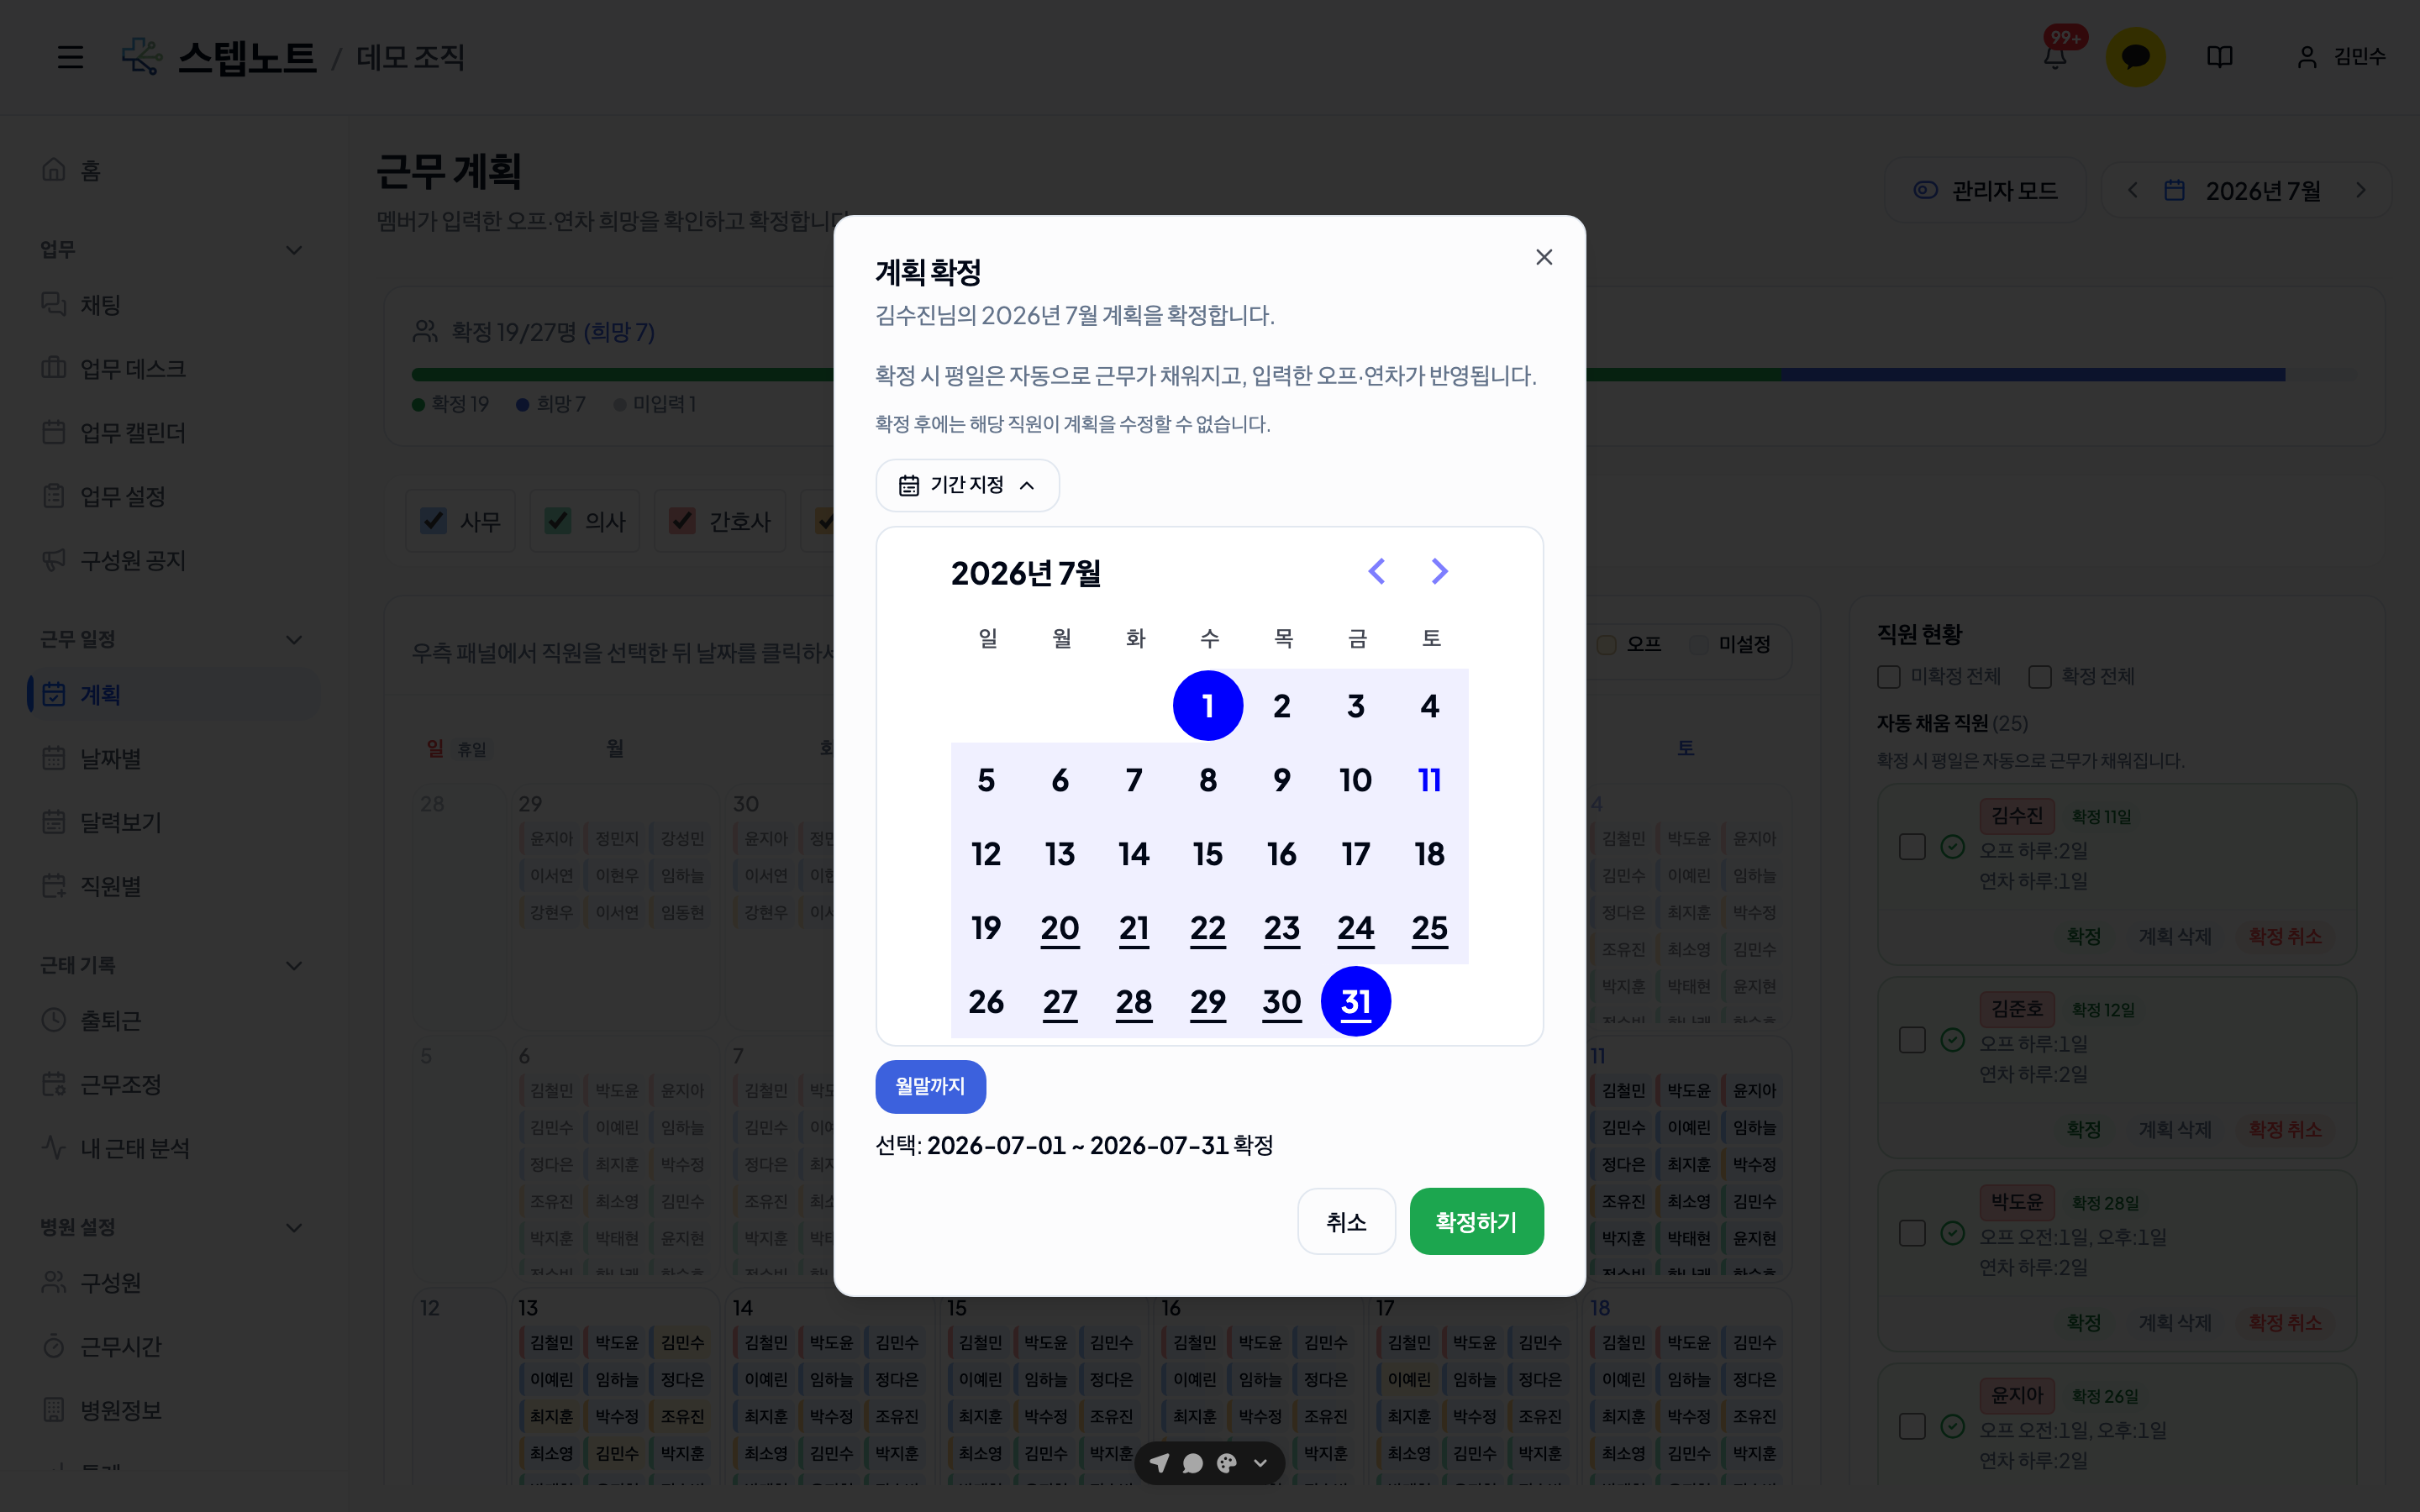
The individual and batch confirmation dialogs include a "Specify Period" button.
- It is collapsed by default, in which case the entire month is confirmed
- Expand "Specify Period" to reveal a calendar where you can confirm only the range you want (e.g., confirm only through this week first)
- Even when confirming in split periods, the member status badge shows the actual number of confirmed dates as "Confirmed N days"
Unconfirming — Everything From Today at Once, or a Chosen Period
Administrators can also unconfirm a confirmed schedule. The entered plans stay after unconfirming, so fix them and confirm again.
- Click the "Unconfirm" button on a confirmed member (you can also select multiple members and use "Unconfirm Selected" — the "All confirmed" checkbox at the bottom selects all confirmed members at once)
- The Unconfirm dialog opens. The default is "Cancel all N confirmed days from today" — press "Unconfirm" without choosing a period and every confirmed date from today onward is released, while past records stay untouched. This is the fastest way when next month's schedule has to be redone.
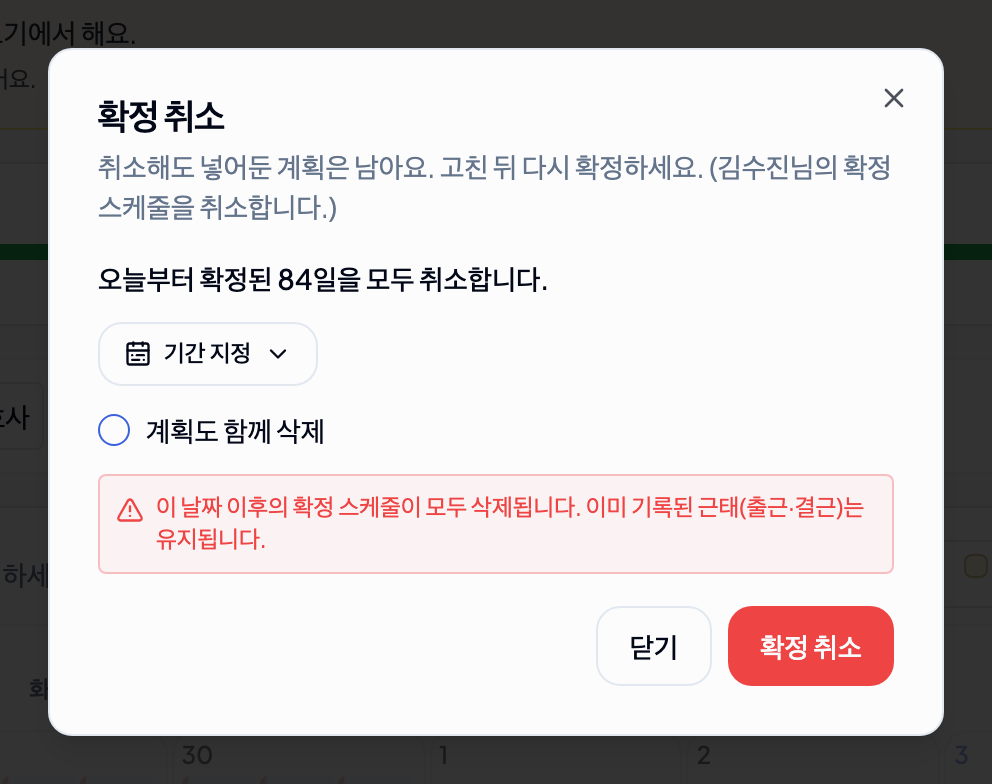
- To cancel only part of the range, or past dates, press the "Choose period" button under "Which period do you want to cancel?" to expand the calendar. Confirmable dates are shown in bold; clicking a start date automatically selects through the end of that month, and clicking another date afterwards narrows the range to that end date
- Use the "Through end of month" / "To the end (all)" chips to select a range quickly
- To delete the plan as well, turn on the "Also delete plan" checkbox — if enabled, the plan must be re-entered before re-confirming
- Click the "Unconfirm" button to delete the confirmed schedule for the selected period
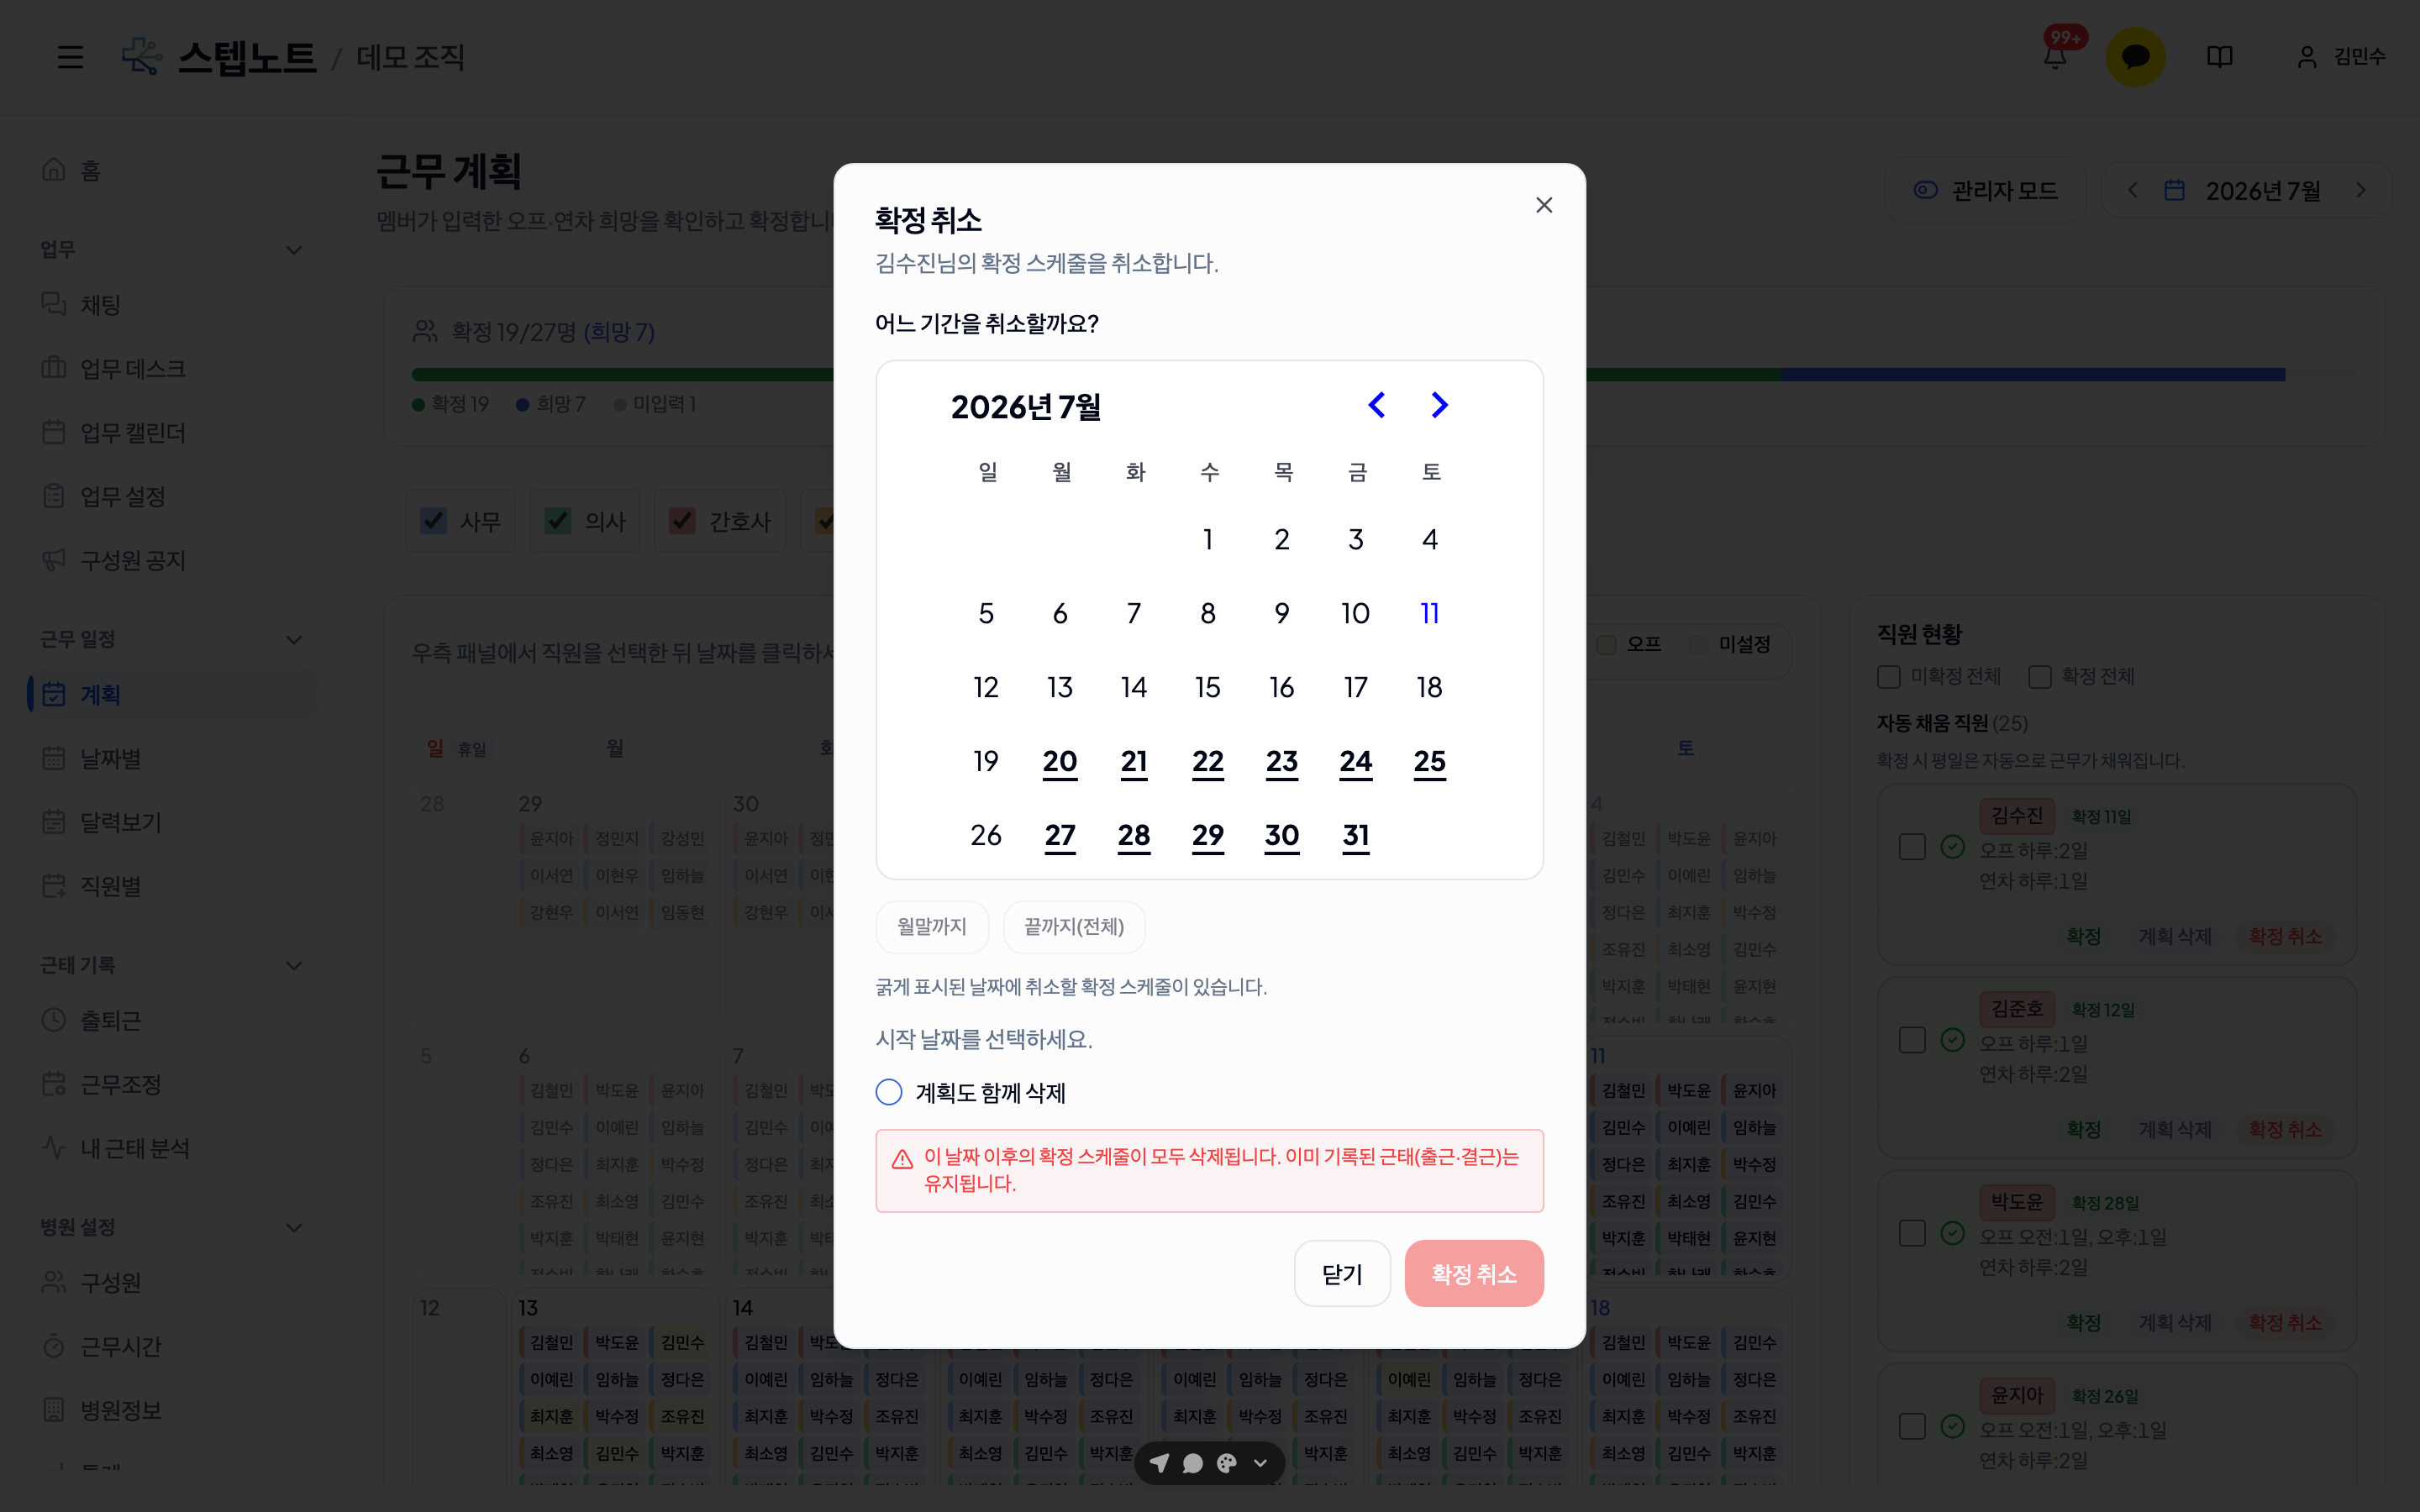
Attendance records that already exist (clock-ins and absences) are not deleted. Unconfirming only cancels scheduled shifts. If no confirmed dates remain from today onward, the dialog says "There are no confirmed dates from today. Choose a period to cancel confirmation for past dates." — use Choose period and pick the past dates yourself. Selecting past dates shows a ⚠️ warning — canceling past shifts may change attendance and no-show statistics.
Deleting Plans — Bulk-Delete Plans Entered by Members
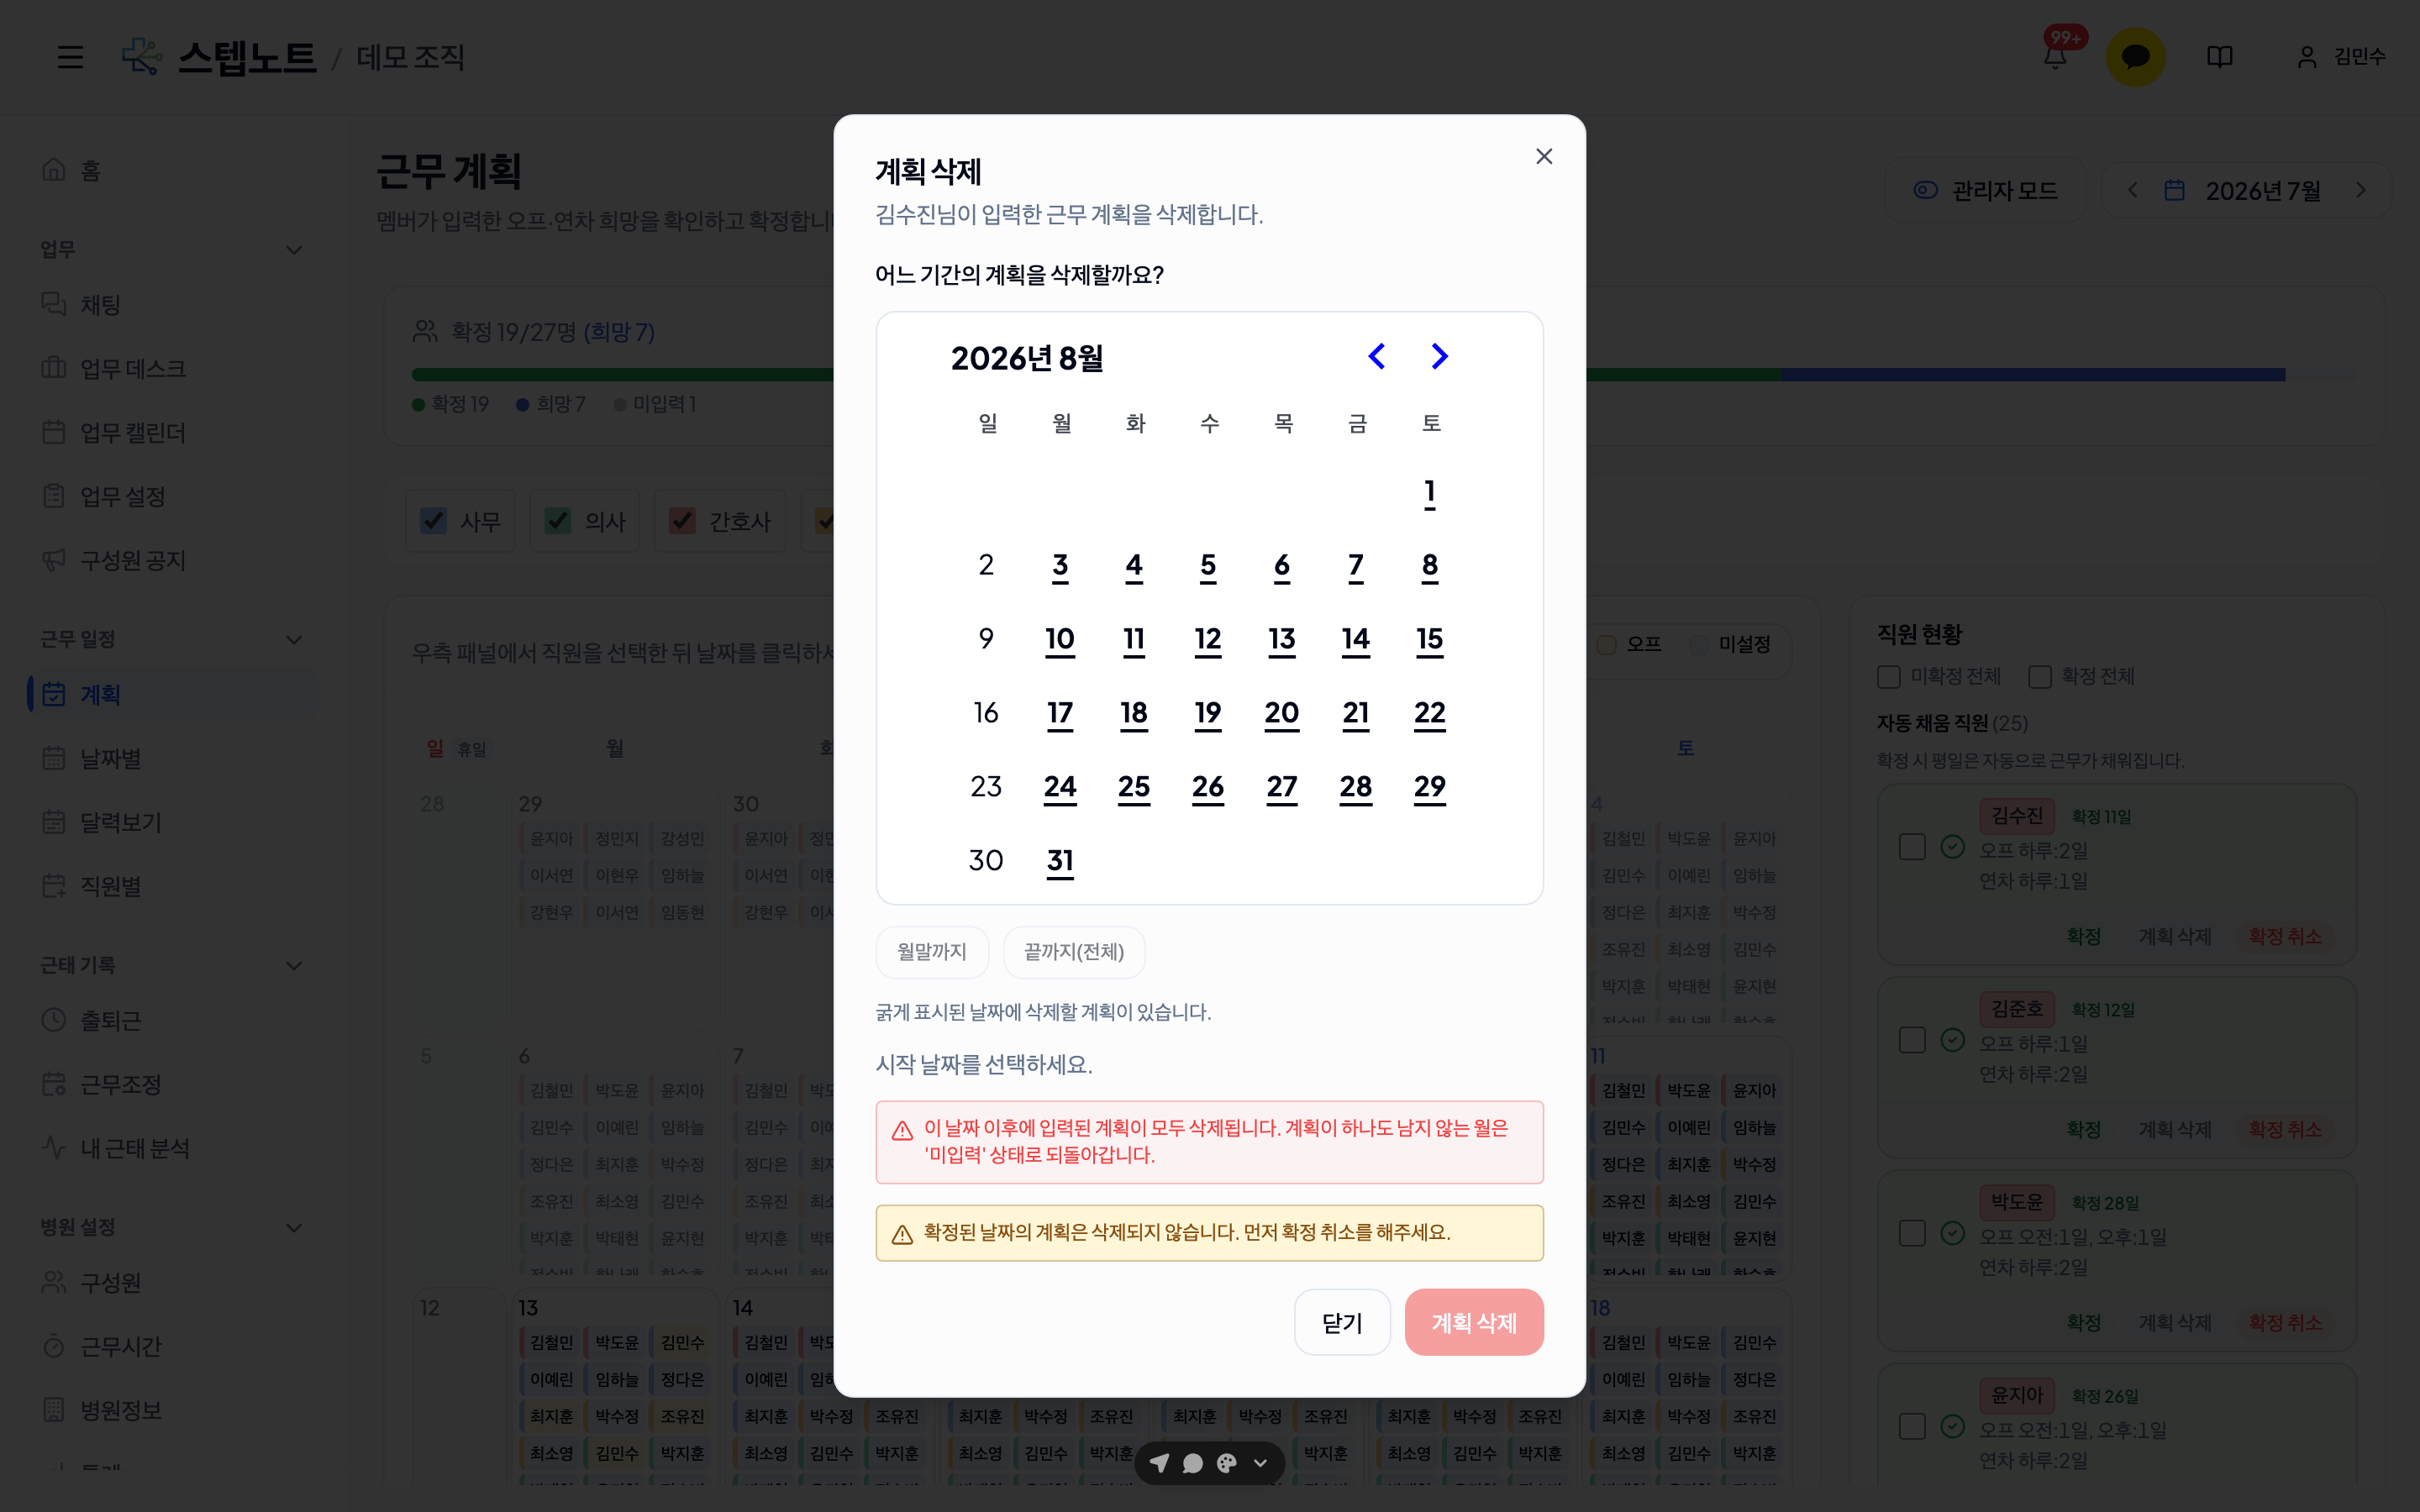
Administrators can bulk-delete plans entered by members (off, annual leave, and shift entries) for a specified period. Because this deletes the plan itself, it can be used at any time, regardless of confirmation status.
- Click the "Delete Plan" button in the member list (you can also select multiple members and use "Delete Selected Plans")
- Select the period to delete on the calendar (the controls work the same as Unconfirm)
- Click the "Delete Plan" button to delete the plans for the selected period
- If no plans remain for that month after deletion, the member's status automatically reverts to "Not entered"
Plans on confirmed dates are not deleted. You must first unconfirm those dates (see above) before their plans can be deleted.
3.3 By Member — Viewing Confirmed Schedules
Click the "By Member" tab in the sidebar.
Screen Layout
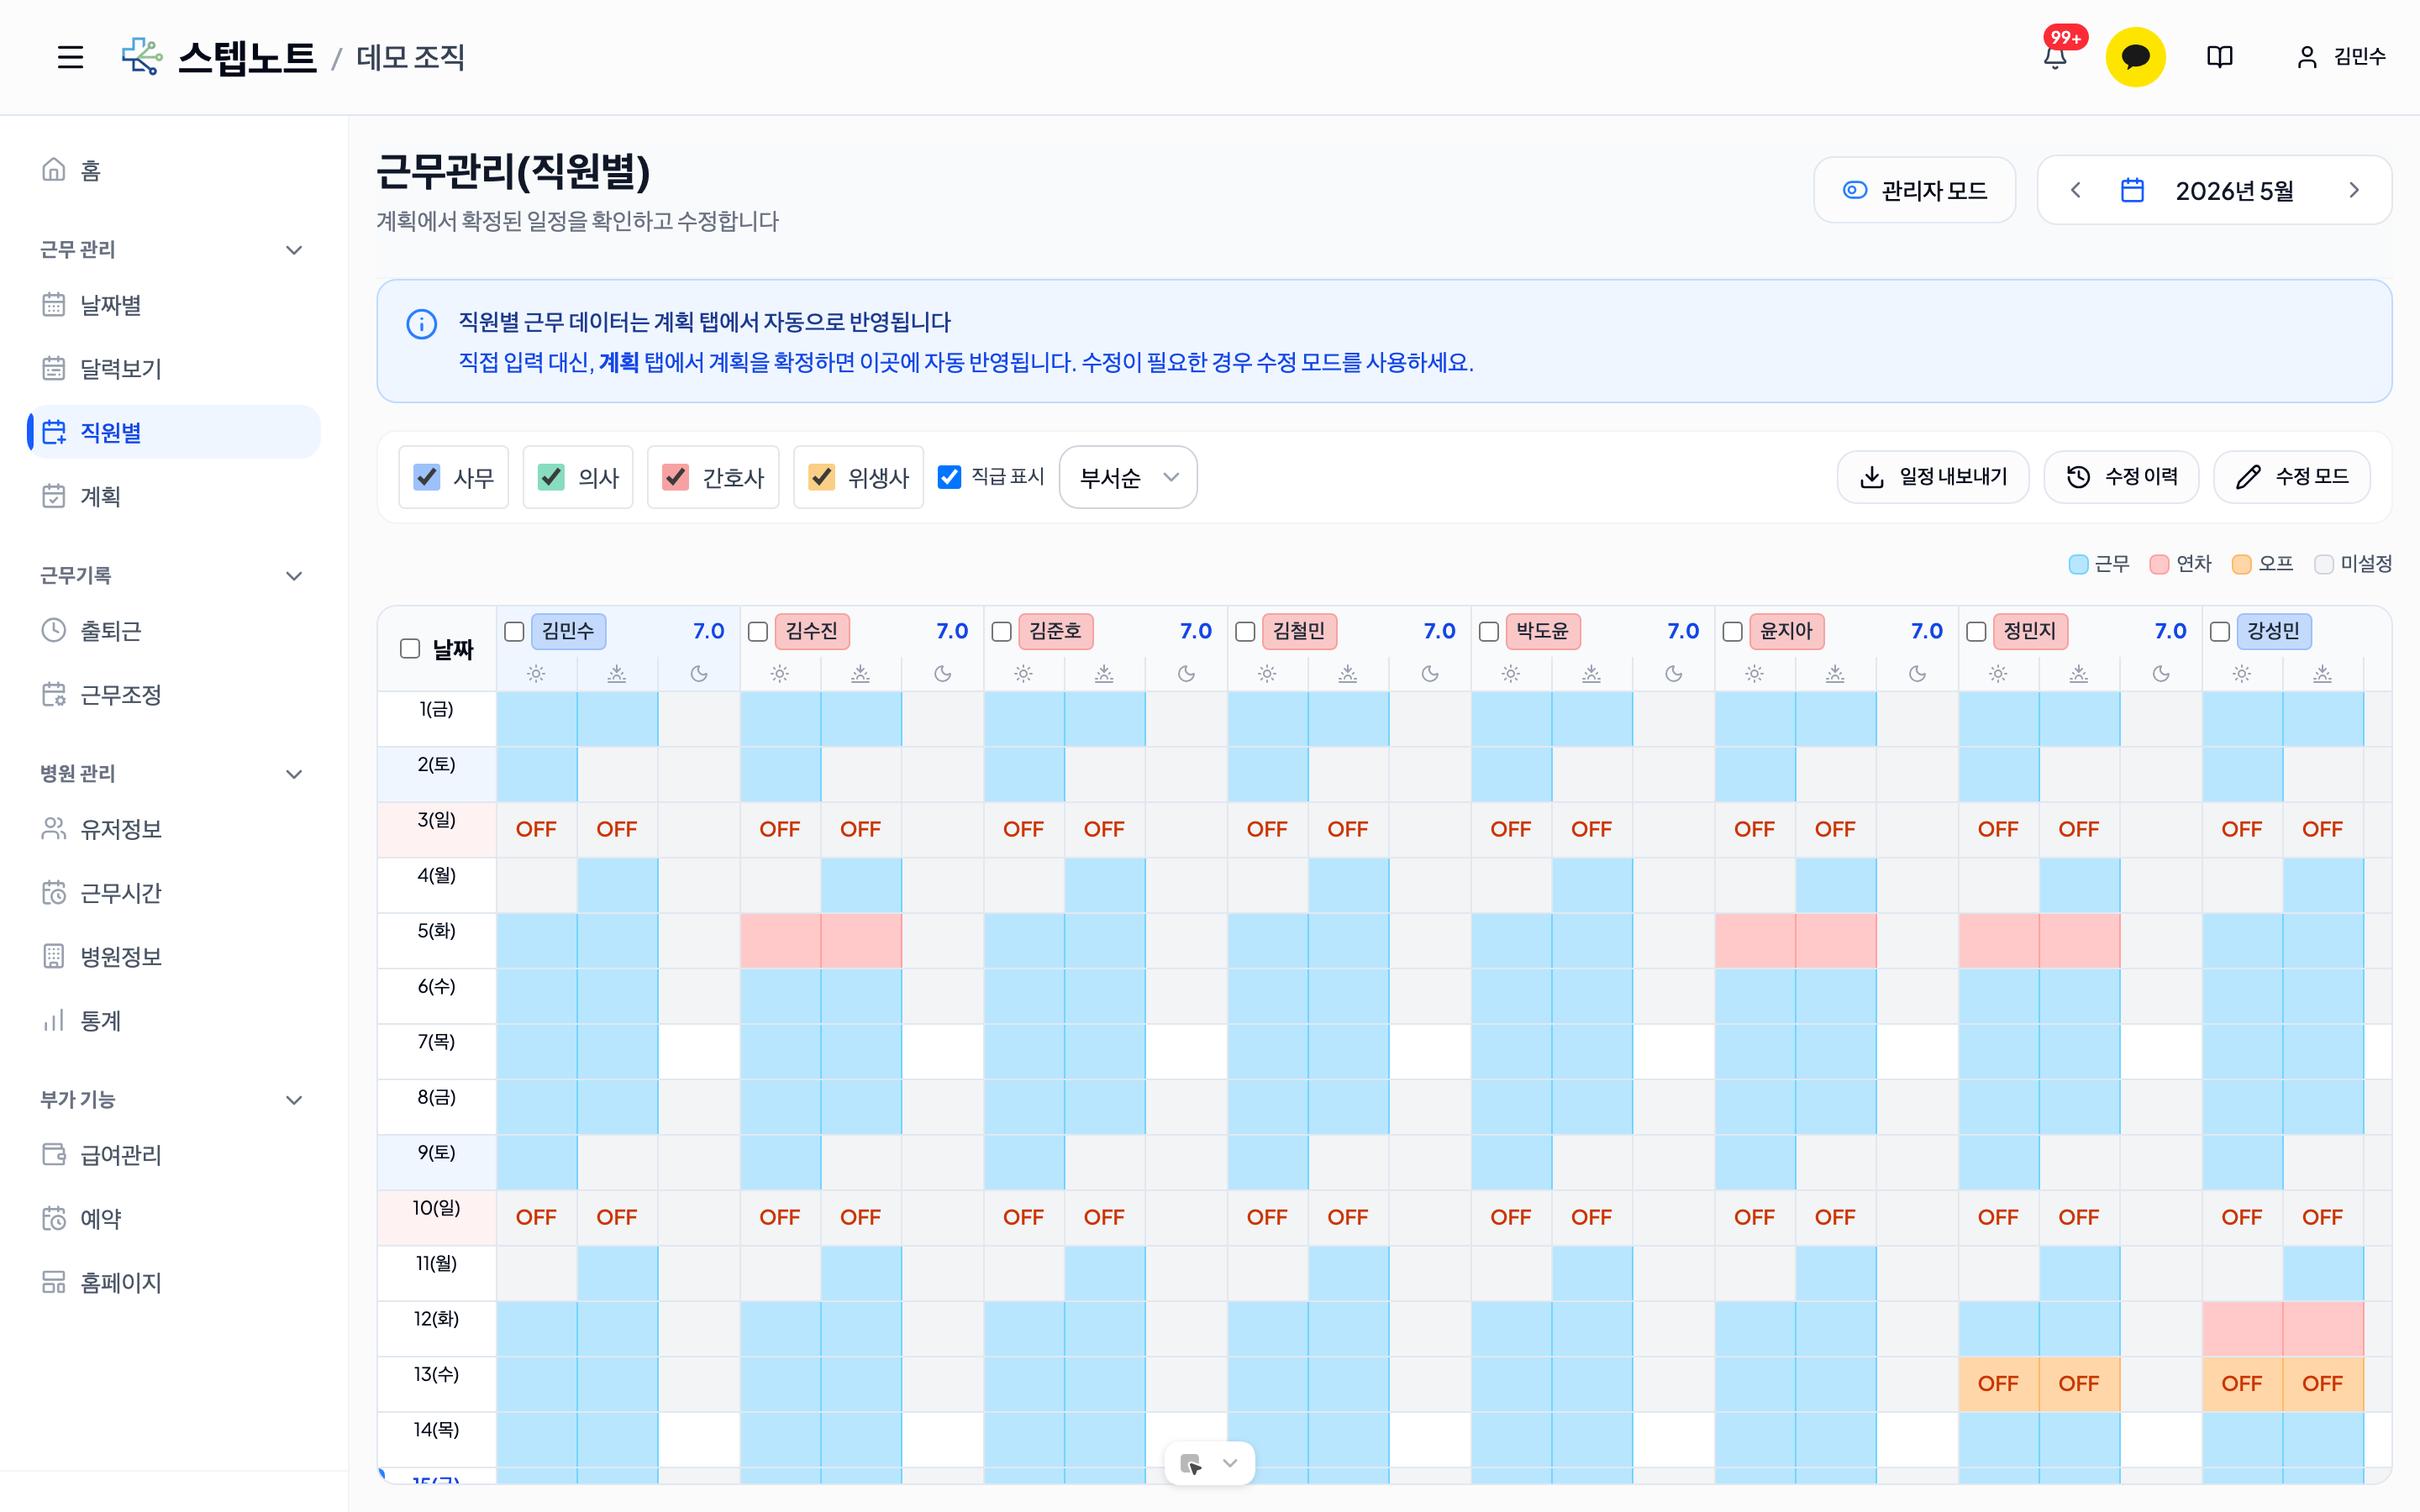
- Left: Member list (color-coded by department, with remaining annual leave shown)
- Center: Monthly schedule grid
- Each member × date is divided into three cells: Morning / Afternoon / Night
- Blue: shift / Green: annual leave / Orange: off / Gray: not set
- Colors follow the organization design system (semantic tokens) and keep the same meaning in dark mode
- Top: Month navigation (← →), department filter, sort options
- Legend: Color meanings shown at the top right
Read-Only by Default
- The By Member tab is read-only by default
- Clicking a cell does nothing
- This prevents confirmed schedules from being changed by accident
Holiday Labels on Date Cells
- Holiday names appear in small red text below the date cell (e.g.,
Lunar New Yearbelow20 (Mon)) - Holidays are set in Work Hours tab → Temporary Closures & Hour Changes (clicking a date cell no longer sets them)
Date-Specific Custom Hours Indicator (New)
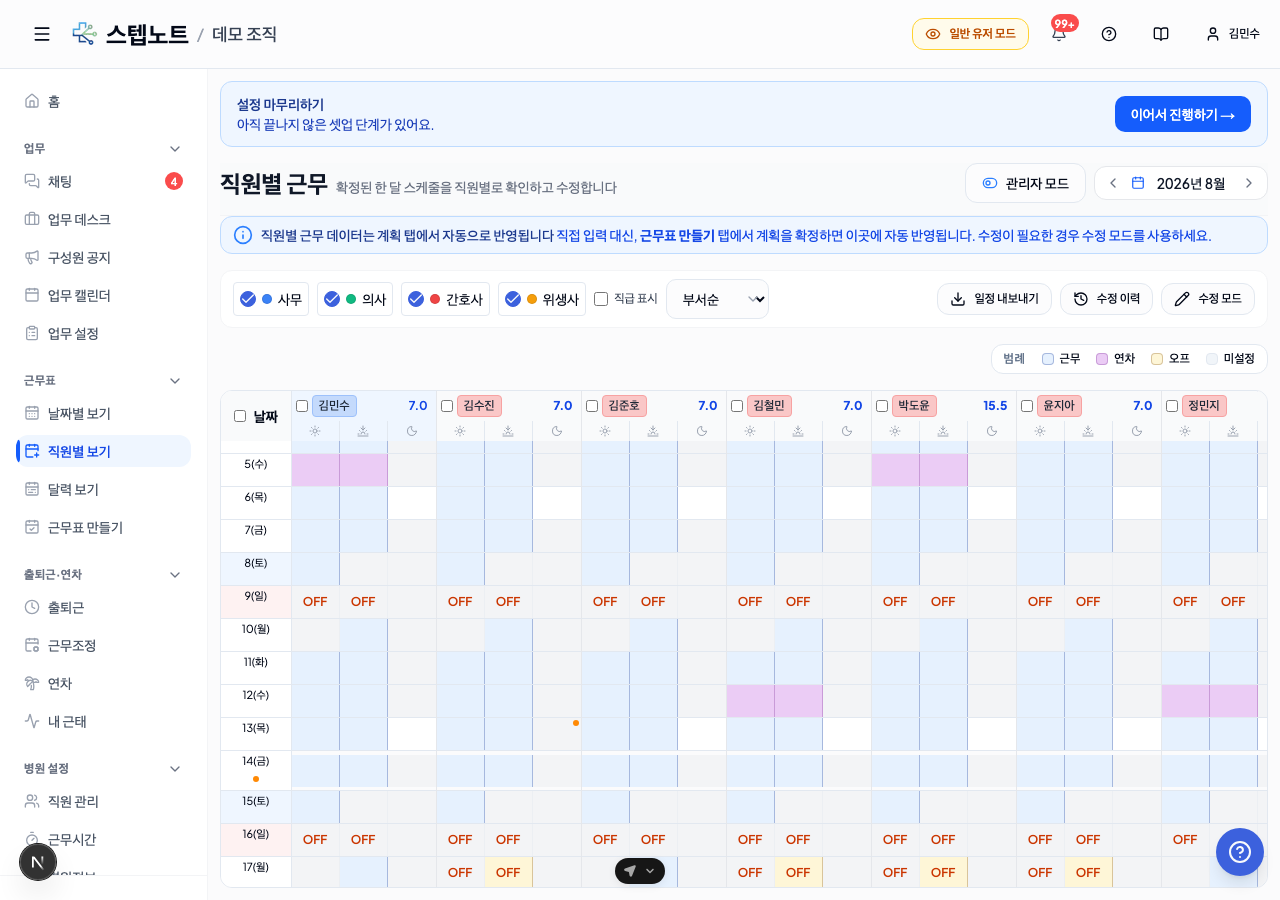
When a specific date has custom hours set via Temporary Closures & Hour Changes — either clinic-wide or for an individual — a small orange dot appears.
- Dot on the date header: clinic-wide business hours are temporarily changed for that date
- Dot on the top-right of an individual cell: that member has custom hours set for that specific date only
Hover over a dot to see a tooltip explaining which custom setting applies.
3.4 By Member — Changing Schedules in Edit Mode
When a confirmed schedule needs to be changed, only administrators can activate Edit Mode.
Activating Edit Mode
- Click the "Edit Mode" button at the top
- The button changes to "Edit Mode ON" (orange)
- A warning banner appears: "Edit Mode — changes are recorded together with a reason"
- Input mode buttons appear: Shift / Annual Leave / Off / Pick per day (desktop only — on mobile, use the "Editing on Mobile" method below instead)
How to Edit a Schedule (per time slot)
- Select an input mode — choose Shift, Annual Leave, or Off
- Click a cell — click the date/time-slot cell of the member you want to change. One click sets that slot to the selected type; clicking again clears it
- Cells are not saved immediately — they are queued as pending changes. A "Confirm changes N" button appears at the top, and you can keep clicking other cells to batch them
- Click "Confirm changes" → the "Review changes" dialog lists each change as a row (member, date, time slot, change). You can enter a reason per row (optional — required only for unpaid-leave rows)
- Click "Confirm (save N)" → the changes are applied and recorded in the history. To throw them away instead, click "Discard changes"
Editing a Whole Day with Pick per day (new)
The Shift, Annual Leave and Off modes work one time-slot cell at a time. In Pick per day mode, clicking a single cell opens a popover that sets that member's entire day at once — the same popover used on the admin calendar of the Plan tab.
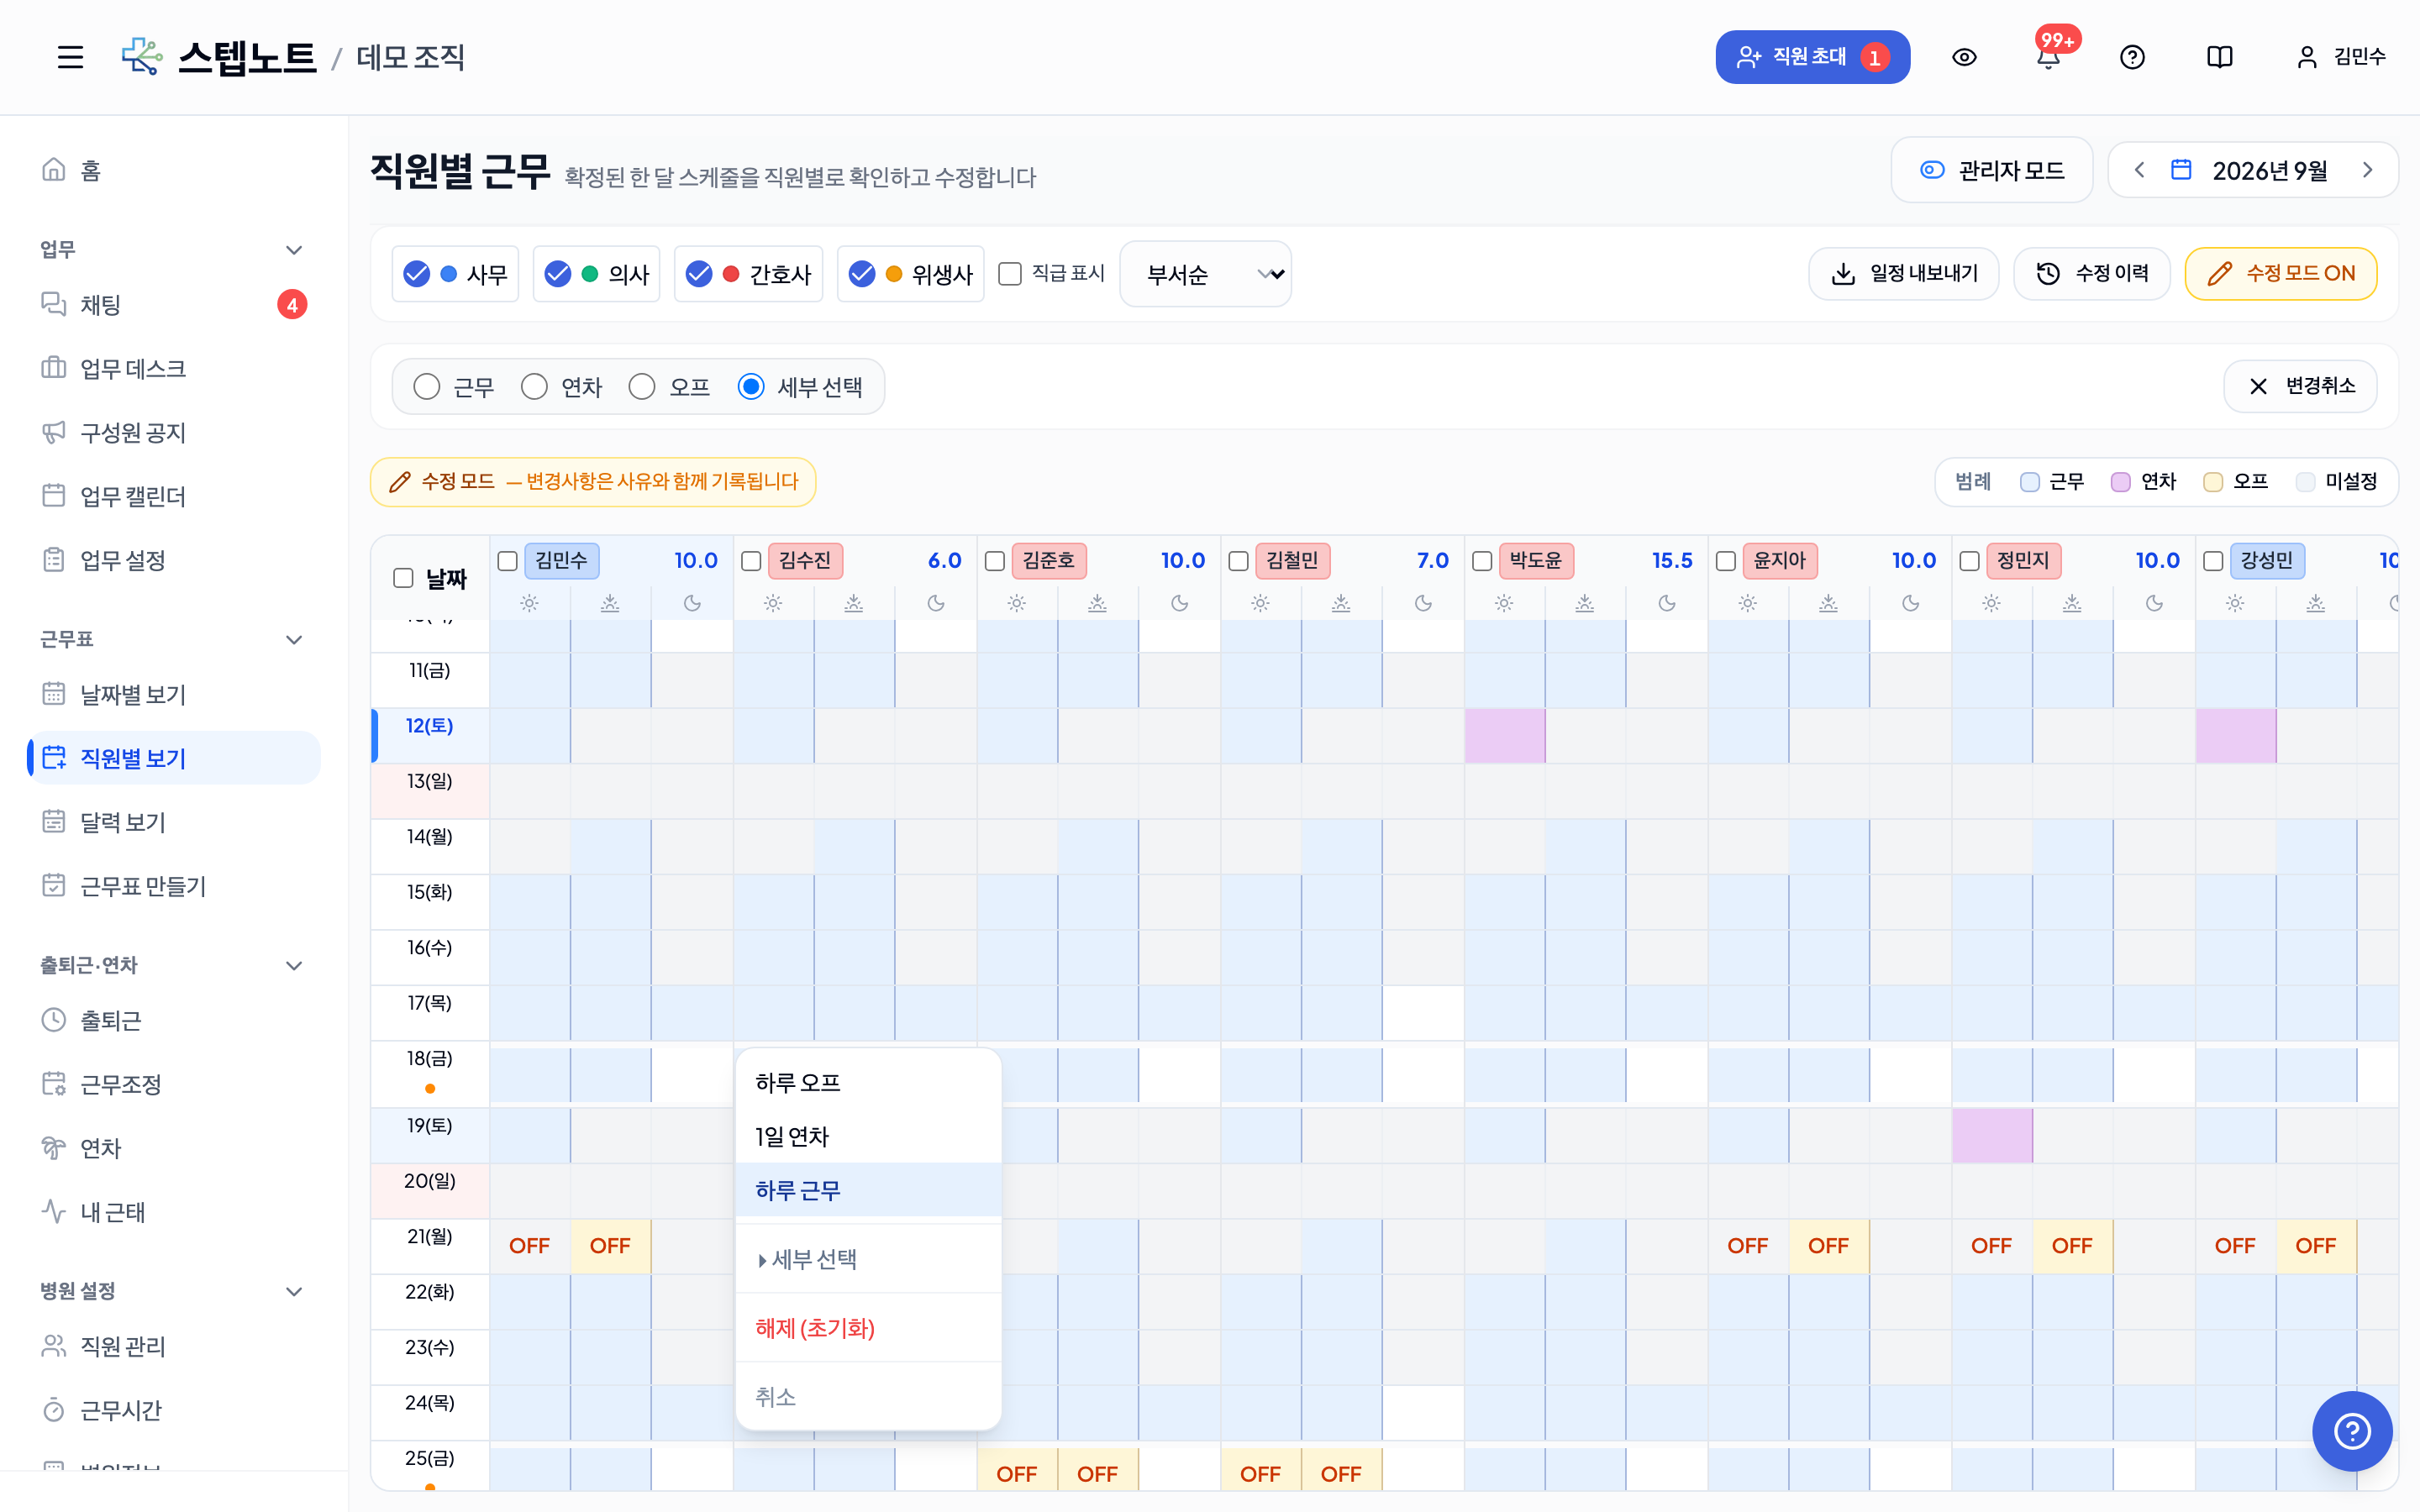
- Choose "Pick per day" as the input mode (hint: "Click a cell to open a per-day editor for work, leave, off, or unpaid leave")
- Click any of the member's cells for that date (morning, afternoon or night) — the popover opens next to the cell
- Pick an option:
- Full-day off / Full-day leave / Full-day shift — sets every open time slot of that day at once
- ▸ Detailed selection — expand to pick off, leave or work separately for morning / afternoon / night
- Add unpaid leave… — opens the reason dialog (see below)
- Clear (reset) — removes every entry for that day
- Your choice is queued as a pending change, exactly like per-slot edits, and is saved via "Confirm changes" → "Confirm (save N)"
The popover closes when you scroll the table or resize the window. Click the cell again to reopen it.
Adding Unpaid Leave
Unpaid leave is a whole-day leave that is not deducted from annual leave. Click "Add unpaid leave…" in the popover to open the reason dialog.
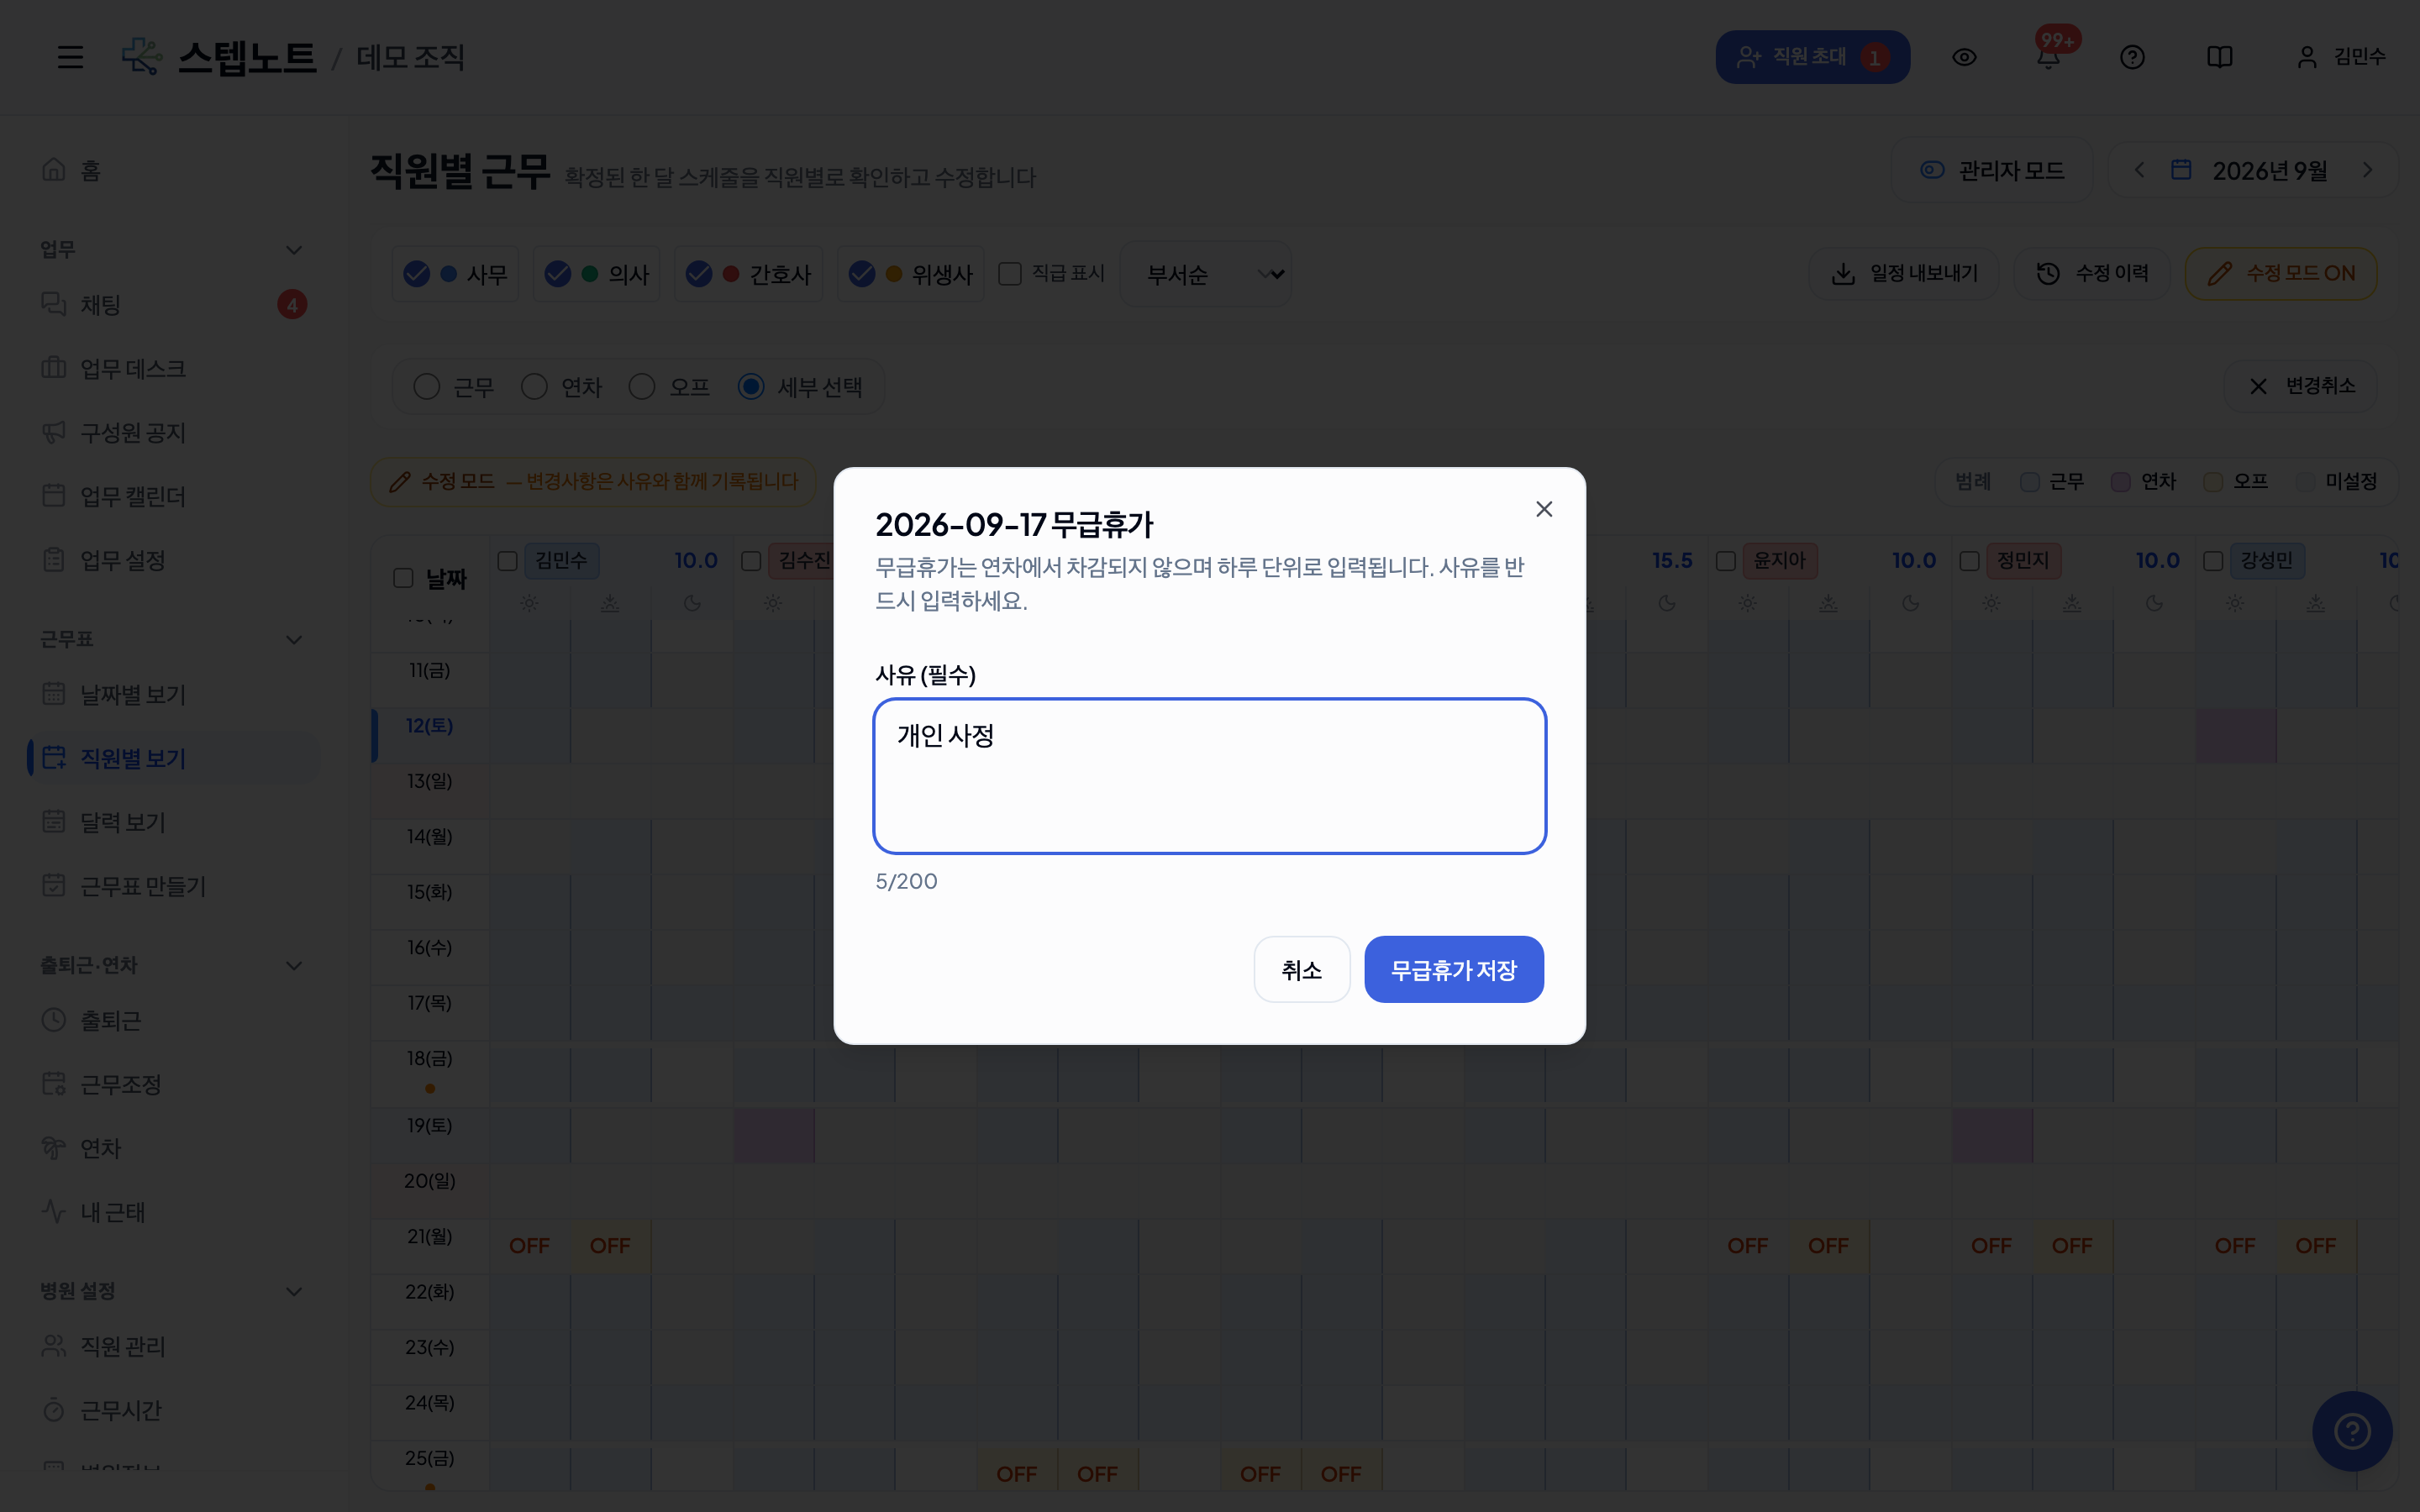
- Enter a reason (required, up to 200 characters) and click "Save unpaid leave" — the dialog closes, but nothing is saved yet; the change is queued as pending
- In the "Review changes" dialog the unpaid-leave row shows "Off(Unpaid)" as the change and the reason you entered is prefilled. The reason on this row cannot be left empty
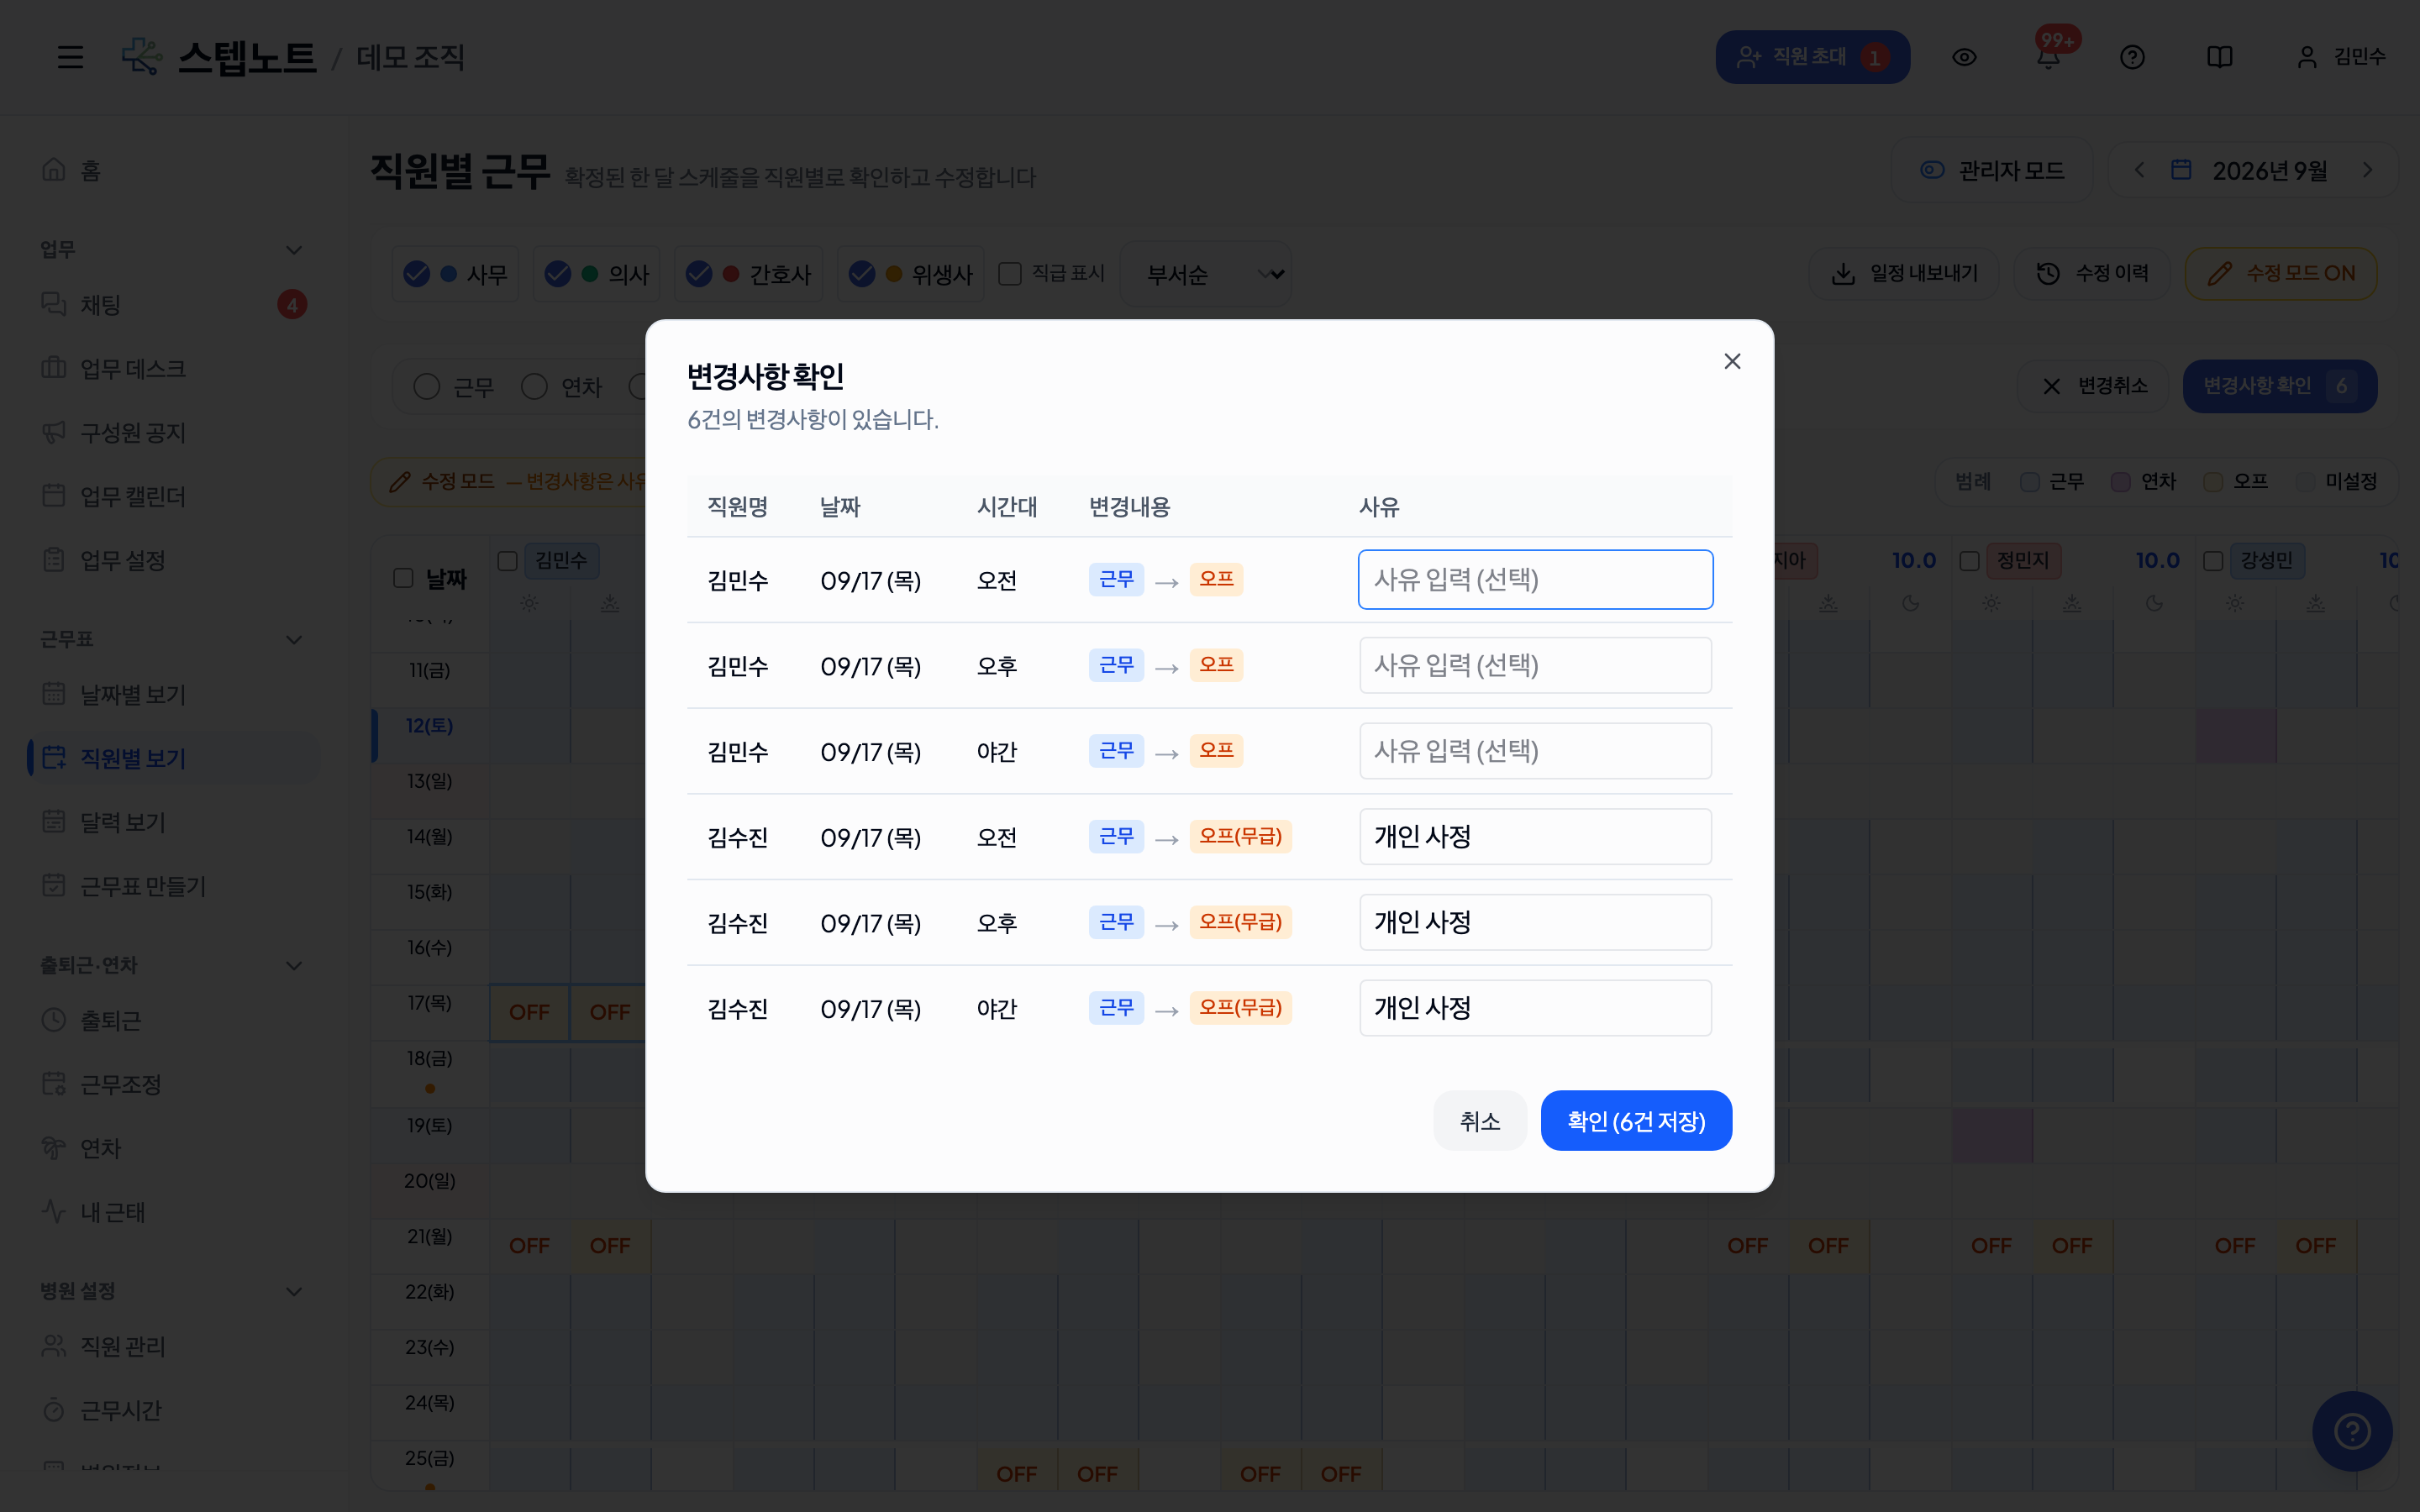
- Click "Confirm (save N)" to save. In the table, an "Unpaid" badge appears on the off cells
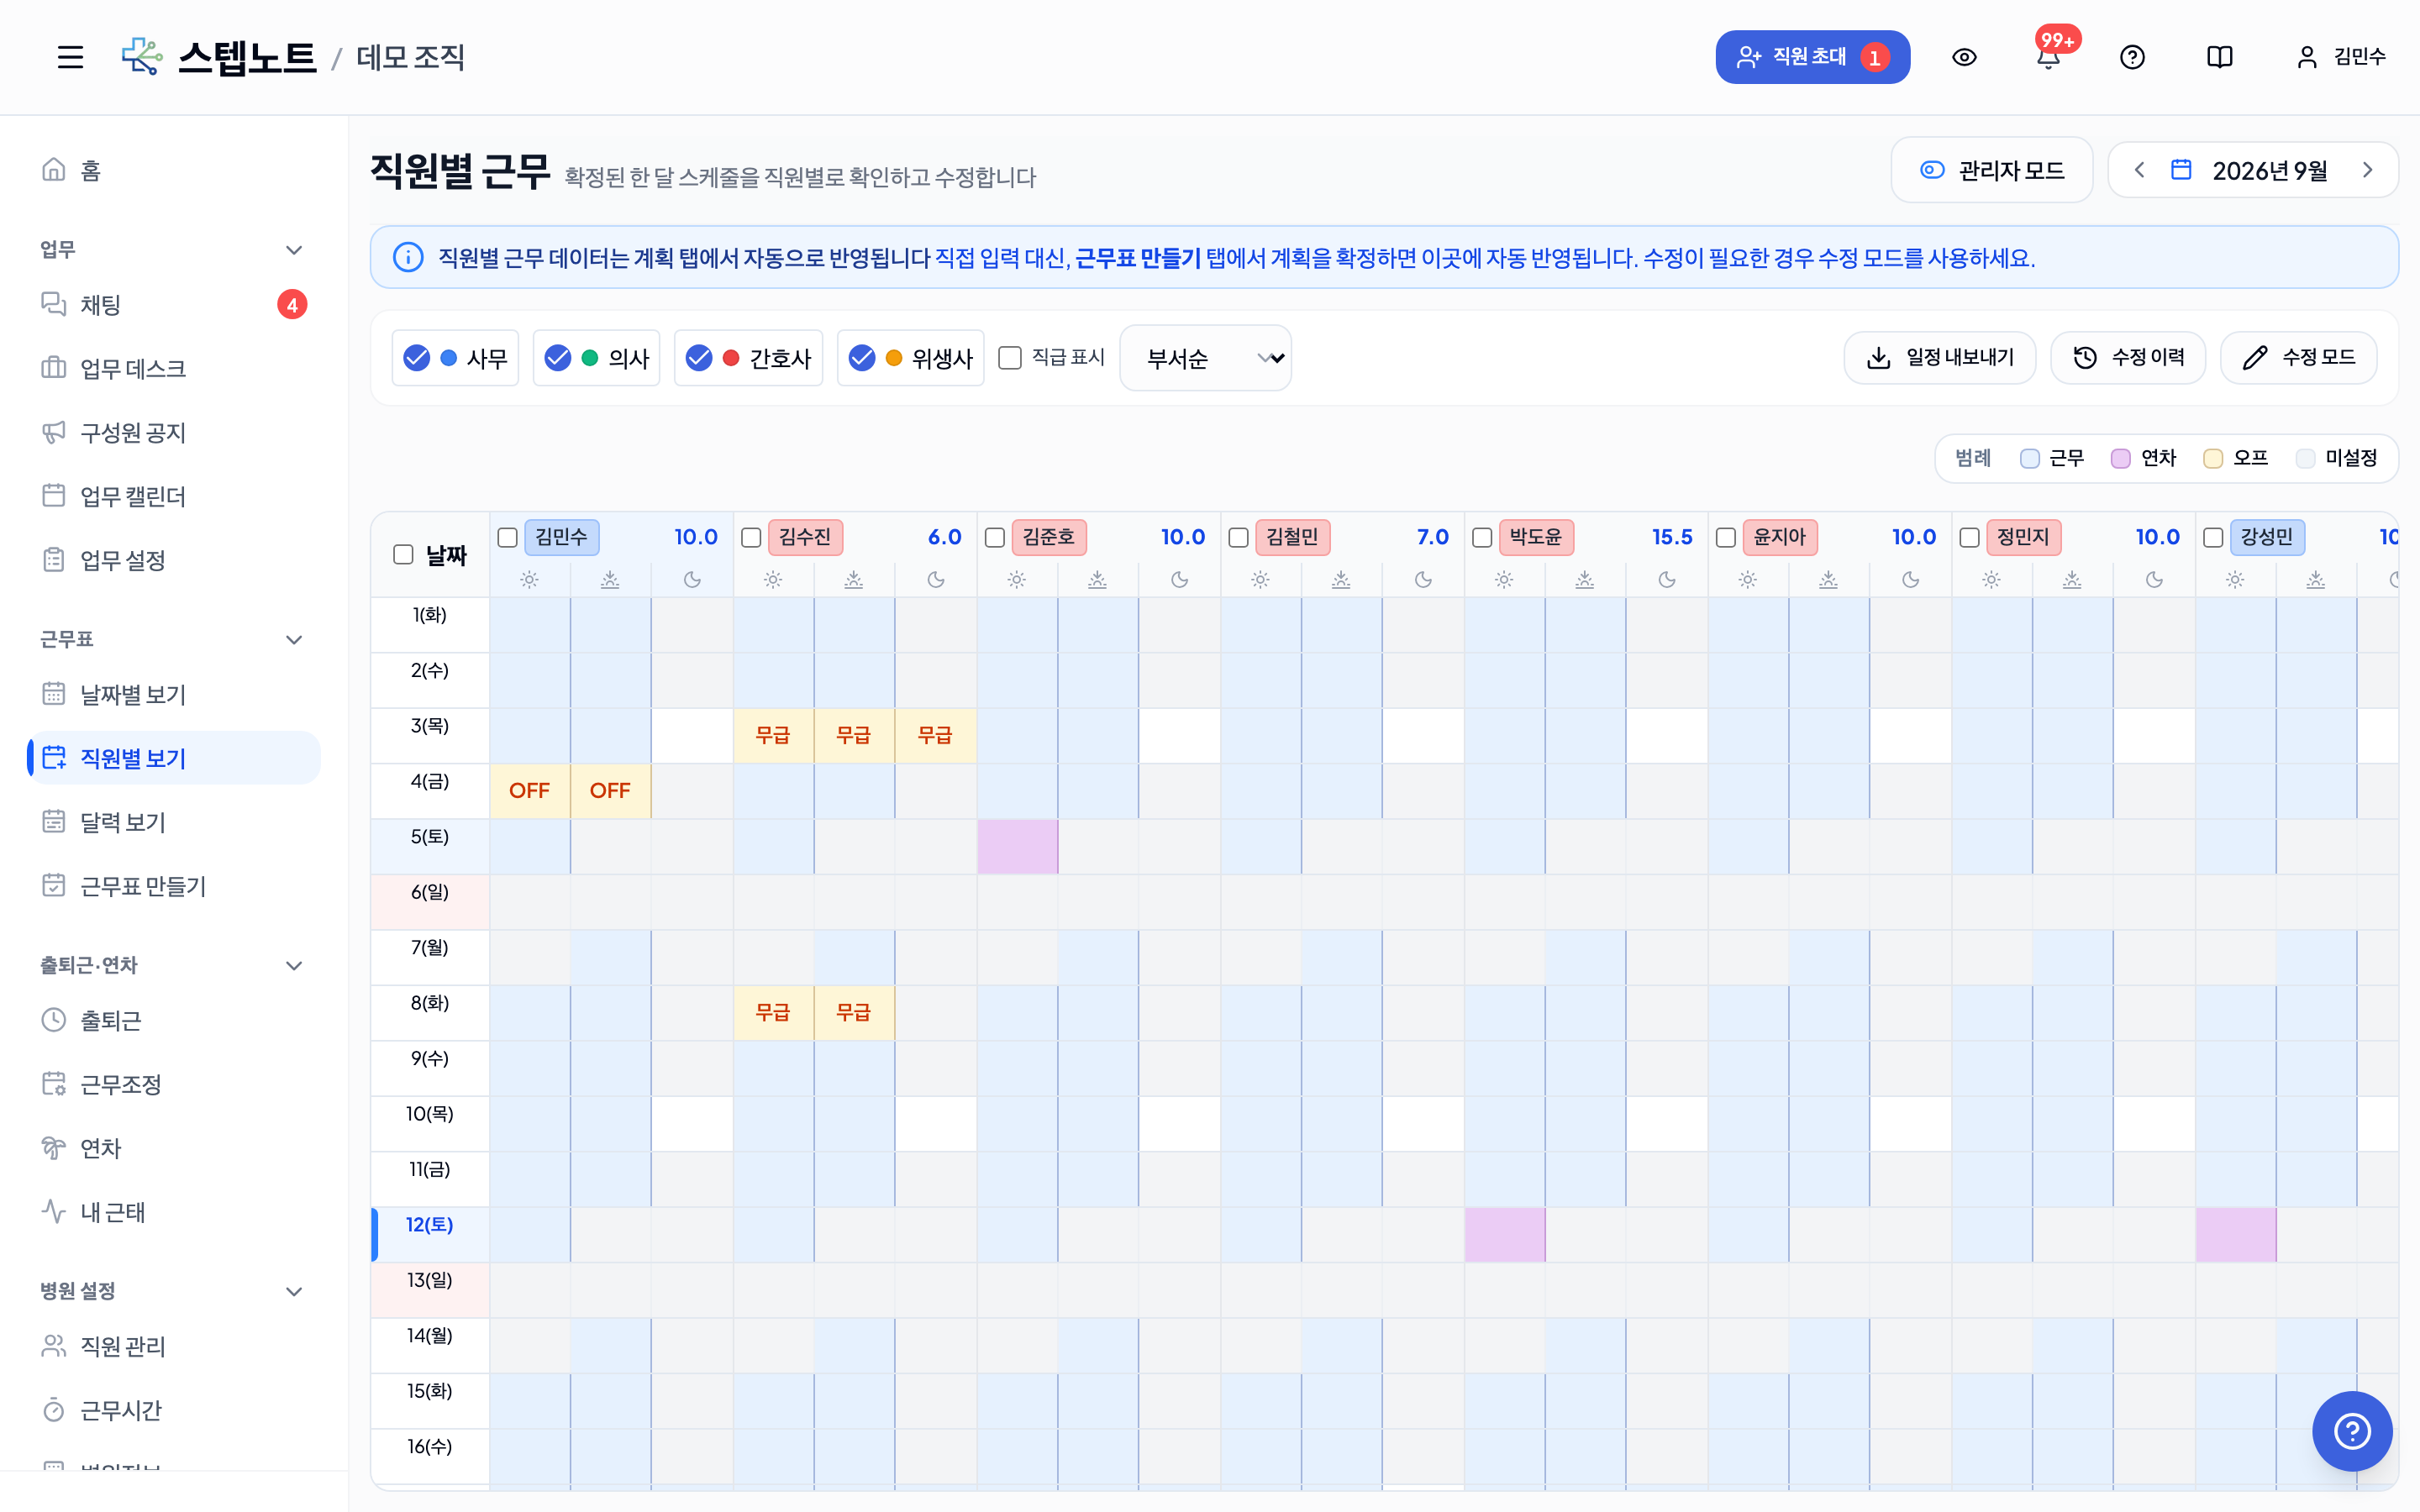
- On a date that already has unpaid leave, the popover shows "Unpaid leave (edit reason)". To change the reason, enter the new one and save it together with another change — a reason-only edit is not queued as a pending change
- On non-working days a notice says the date is not a working day and unpaid leave cannot be added
- To remove unpaid leave, use "Clear (reset)" in the popover or overwrite it with another type
Bulk Actions
You can also change multiple cells at once:
- Select the checkboxes next to member names to choose the target members
- Click the "Actions" button at the top
- Choose an action type:
- Bulk Shift Planner: enter shifts for the selected members in bulk
- Bulk Delete: delete the selected members' schedules in bulk
- An edit reason is also required for bulk actions
Exiting Edit Mode
- Click the "Edit Mode ON" button again to return to read-only
Editing on Mobile (New)
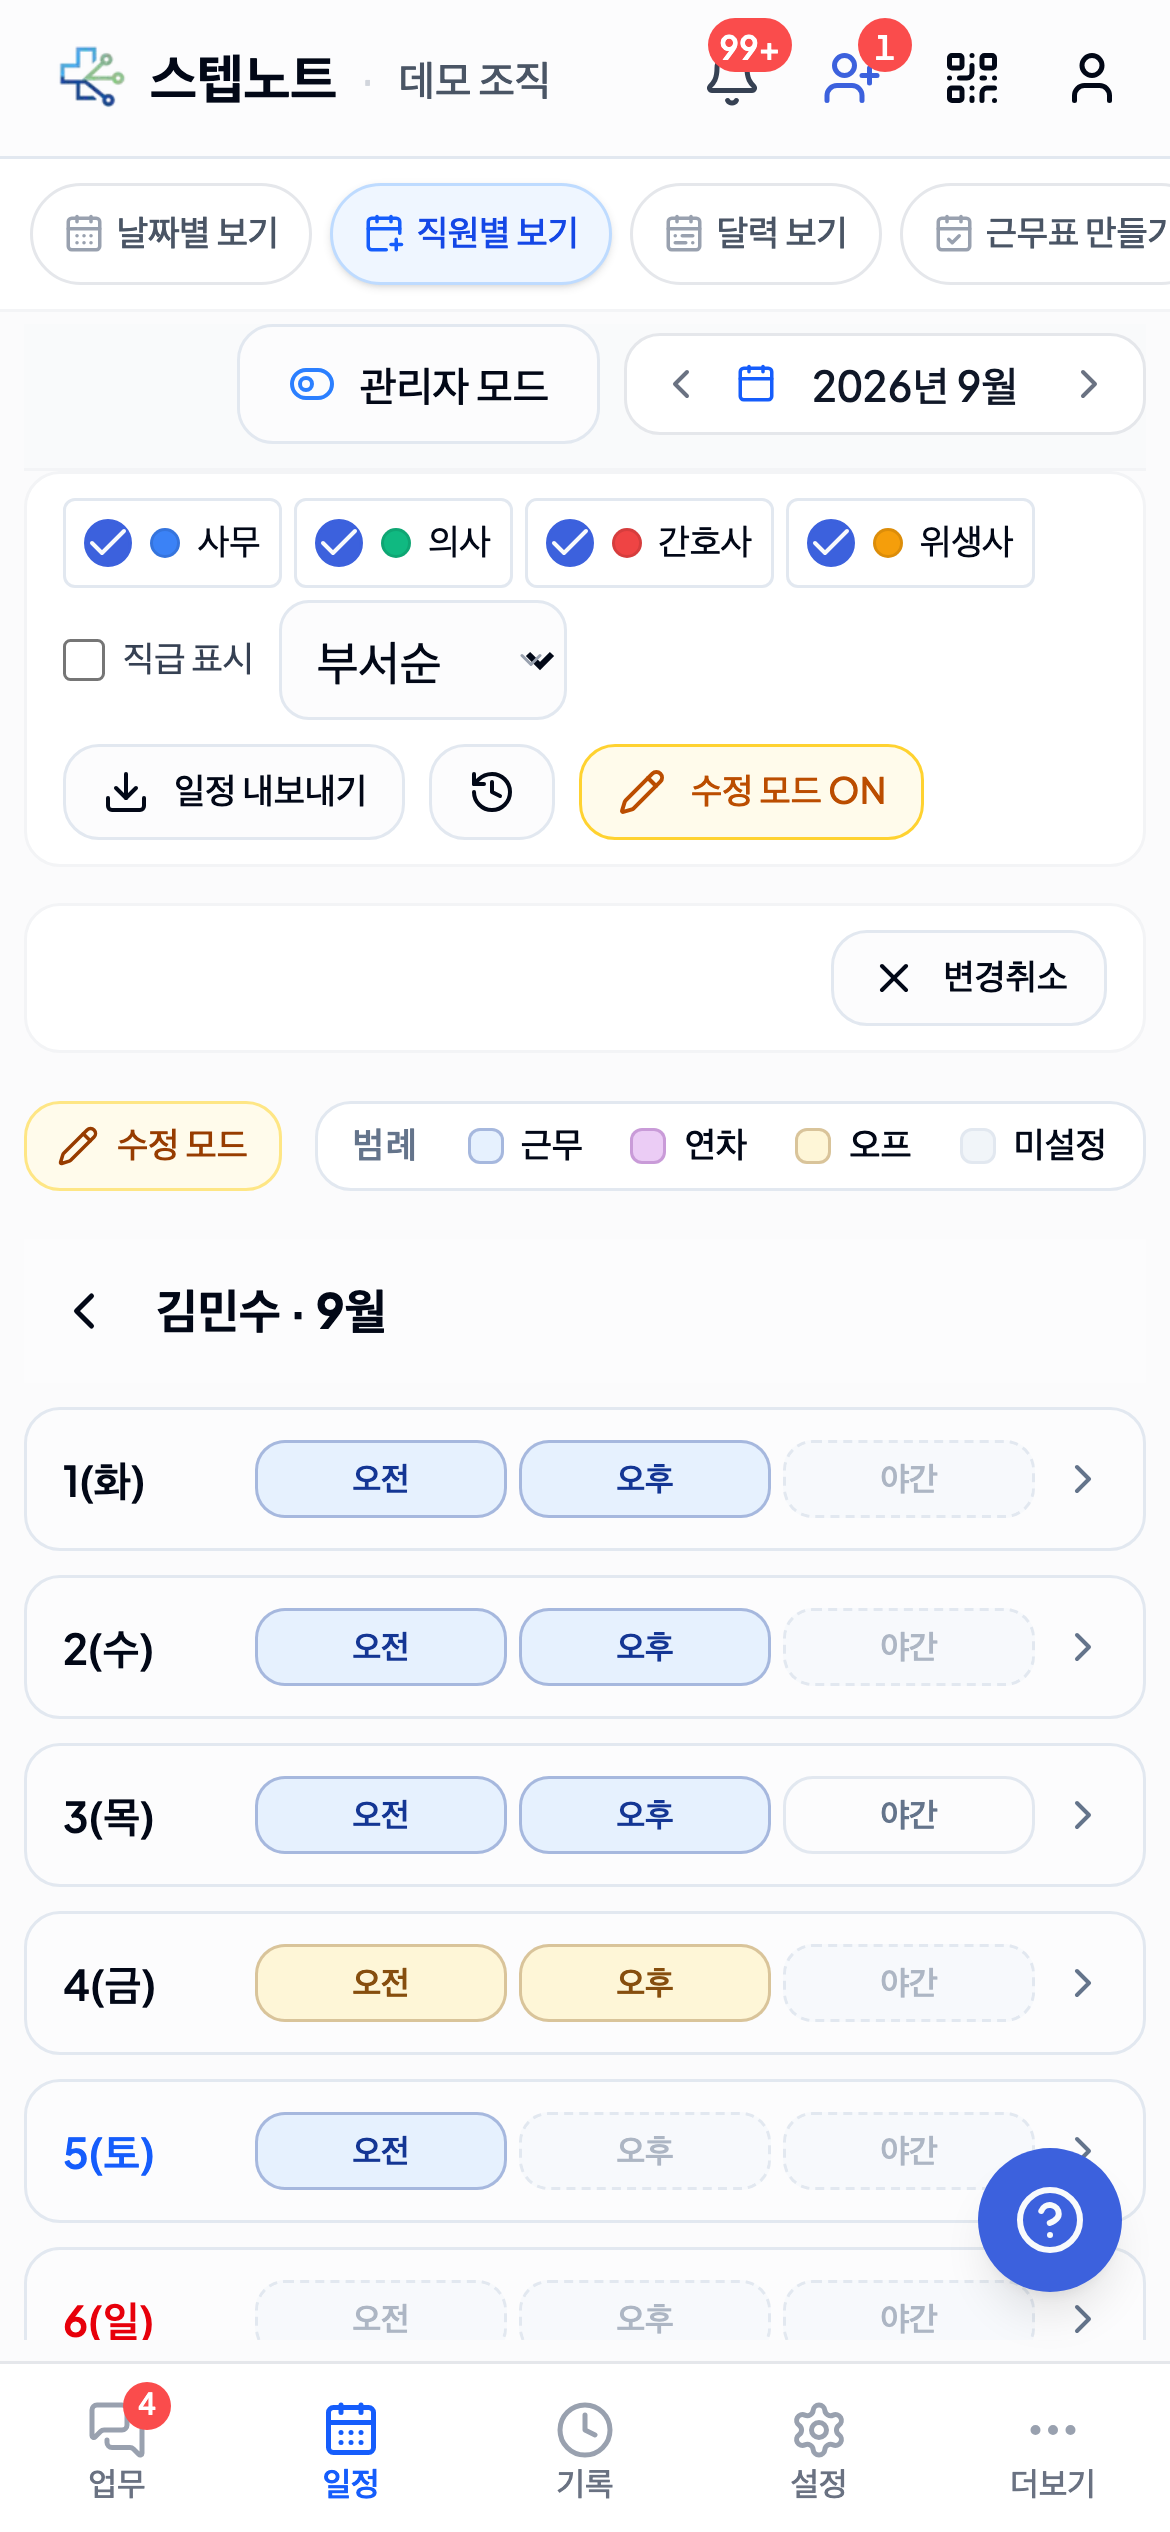
On narrow phone screens (under 768px), opening the By Member tab as an administrator shows a dedicated screen instead of the grid. You can browse this screen even with Edit Mode off, but tapping a date does nothing until Edit Mode is turned on.
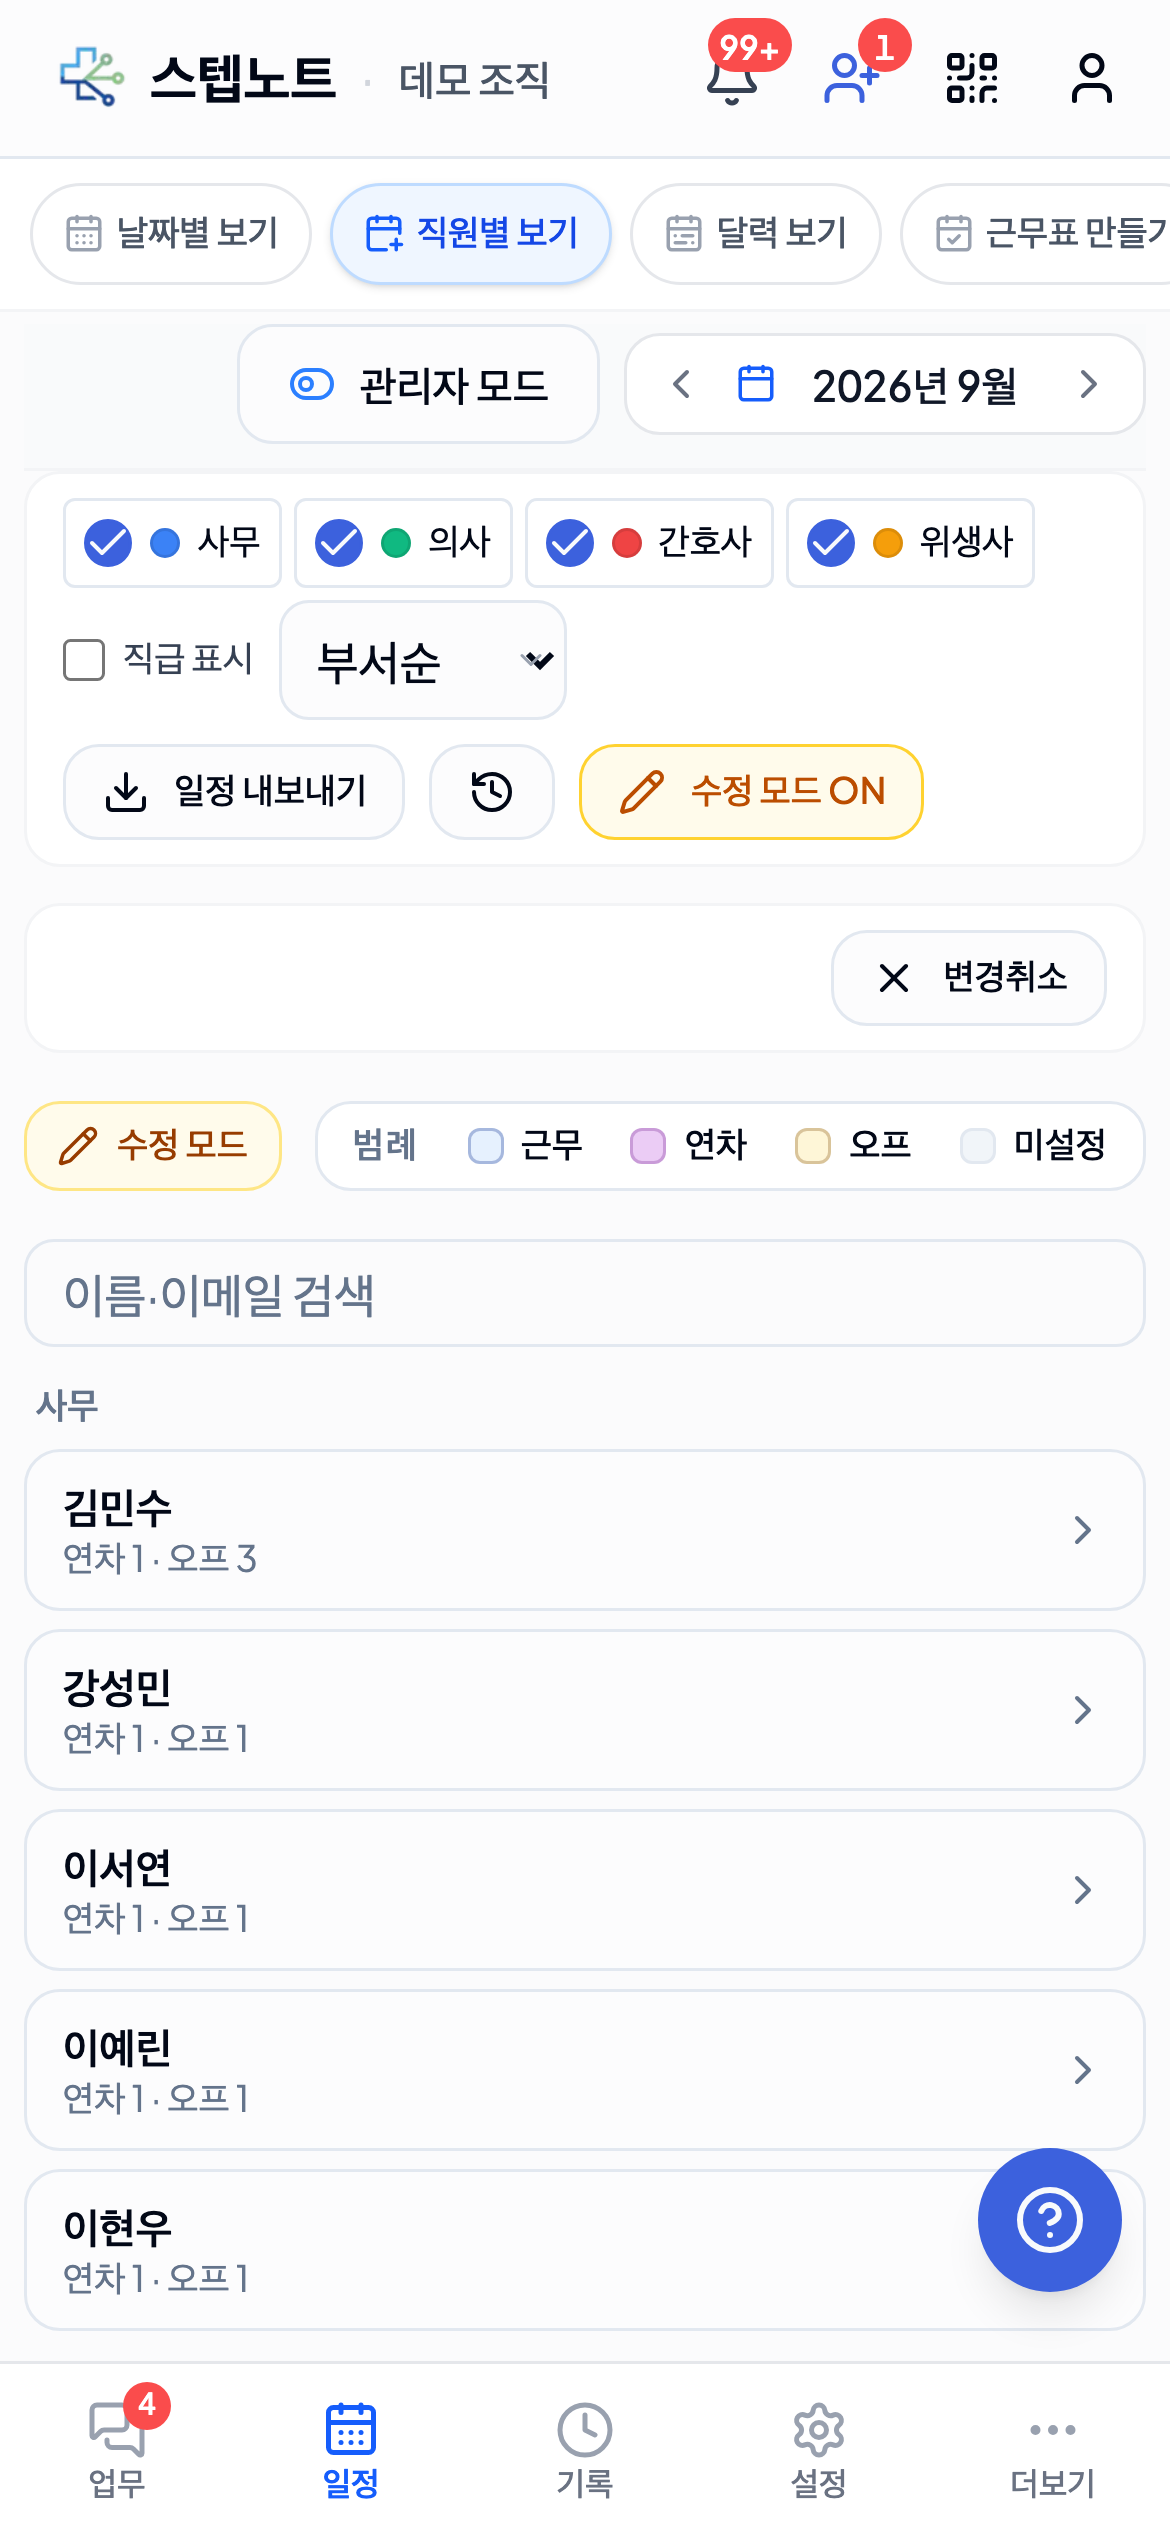
- Staff list — search by name or email, grouped by department. Each row shows this month's "N annual leave days · N off days", plus a "N changes" badge if there are unsaved changes.
- Tap a staff member to open that member's date list. Each day is one row, with Morning/Afternoon/Night chips colored for shift (blue), annual leave (green), off (orange), not set (gray border), or not operating (dashed). Holidays show the holiday name in red instead of a chip and can't be tapped.
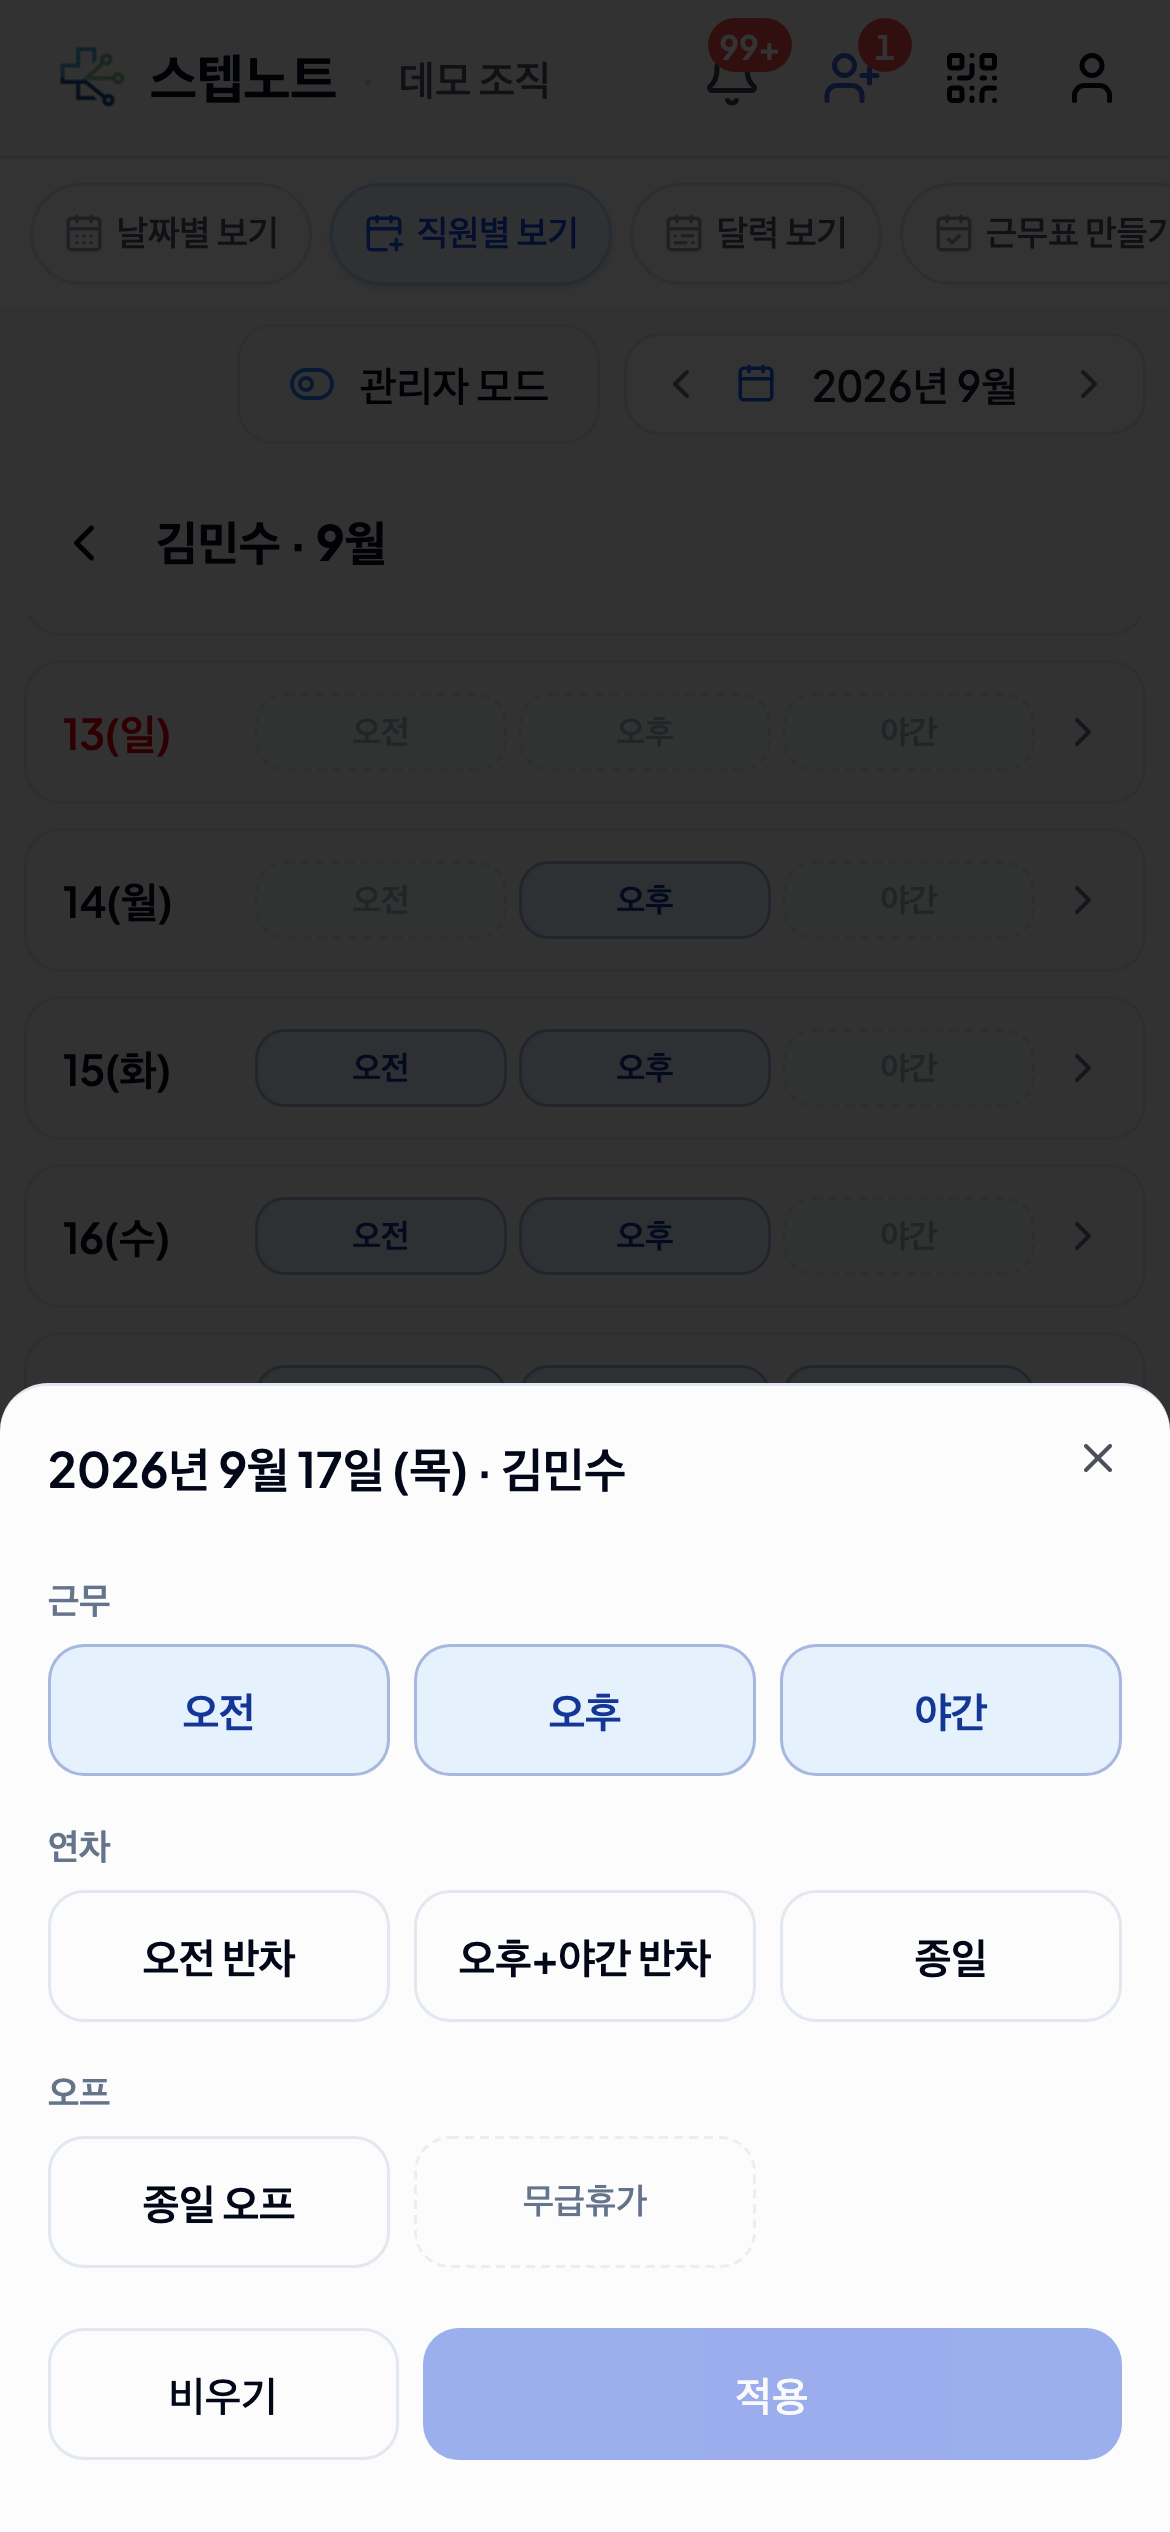
- In Edit Mode, tapping a date row opens a bottom-sheet editor.
- Shift — turn each time slot (Morning/Afternoon/Night) on or off individually.
- Annual Leave — choose among "Morning half-day / Afternoon half-day / Full day," or, on days with a night shift, "Morning half-day / Afternoon+Night half-day / Full day," depending on which time slots are open that day.
- Off — the "Off all day" button marks the entire day as off. Choosing "Unpaid leave" next to it reveals a Reason (required) field; you must enter a reason before applying.
- "Clear" removes all entries for that day, or "Apply" saves them.
- Applied changes queue up as pending changes, exactly as on desktop. The "Review Changes" button at the bottom → entering an edit reason → save flow is the same as desktop (see "How to Edit a Schedule" above).
The desktop grid itself, and how saving and history work, are unchanged by this update. Only the screen layout changes when you open the By Member tab on a phone.
3.5 Checking the Edit History
You can trace when, by whom, and why a schedule was changed.
Opening the History
- Click the "Edit History" button at the top
- The schedule edit history panel slides open on the right
History Details
Information shown for each history entry:
| Field | Description |
|---|---|
| Edit type | Shown as a badge: Created (green), Edited (blue), Deleted (red) |
| Member | The member whose schedule was changed |
| Schedule date | The date of the changed schedule |
| Change | Comparison of previous value → new value |
| Reason | The reason entered at the time of the edit |
| Edited by | The administrator who made the change |
| Edited at | When the change was made |
3.6 Entry Rules
Shift Time Slots
| Time slot | Icon | Typical hours | Notes |
|---|---|---|---|
| Morning | ☀️ | 09:00 - 13:00 | Morning practice |
| Afternoon | 🌅 | 14:00 - 18:00 | Afternoon practice |
| Night | 🌙 | 18:00 - 22:00 | Night practice |
Note: Actual working hours can be changed in the organization settings.
Annual Leave Deduction Rules
| Entry type | Days deducted | Notes |
|---|---|---|
| Morning half-day leave | 0.5 days | Morning off only |
| Afternoon half-day leave | 0.5 days | Afternoon off only |
| Full-day annual leave | 1.0 days | Entire day off |
- The remaining annual leave balance is deducted automatically when annual leave is entered
- If the remaining balance is insufficient, a warning appears and the entry is blocked
Off vs. Annual Leave vs. Unpaid Leave
| Item | Off | Annual leave | Unpaid leave |
|---|---|---|---|
| Annual leave deducted | No | Yes | No |
| Nature | A simple day off | Paid leave | Unpaid leave |
| Unit of entry | Time slot | Half day / full day | Whole days only |
| Reason | Optional | Optional | Required (up to 200 characters) |
| Who can enter | Members and admins | Members and admins | Admins only |
| Typical uses | Weekends, public holidays, regular closures | Personal vacation, sick leave | Leave after annual leave is used up, personal matters |
Unpaid Leave (new)
- Shown in the roster in the same color as Off, with an "Unpaid" badge
- Counted in Schedule Statistics → Attendance Summary (by member) as an "Unpaid leave" column, and exported as an "Unpaid leave (days)" column
- Not included in the Leave Pattern analysis (off/annual-leave usage patterns)
- Not yet linked to payroll — if it must affect pay, use the unpaid-leave day count from the statistics and handle it manually
- Where to enter it: Plan tab admin mode (3.2), Pick per day in the By Member tab's edit mode (3.4), and the mobile day edit sheet (3.4)
Preventing Duplicate Entries
- A shift and annual leave cannot be entered for the same date/time slot at the same time
- Changing to a different schedule type automatically replaces the existing entry
3.7 Shift Time Adjustments — Request · Approve · Notify
This feature records extra work (overtime) or reduced hours. An approval workflow applies: members submit requests themselves and administrators approve them. At every request, approval, and rejection, a push notification + AlimTalk (or SMS) is sent automatically.
Process Overview
| Step | Who | Screen | Result |
|---|---|---|---|
| Step 1 — Request | Member | [Request Adjustment] in the My Schedule tab | A "Pending" badge appears on the member's row; all administrators are notified |
| Step 2 — Review | Administrator | "Shift Adjustments" section in the By Member tab, Pending tab | Approve or reject |
| Step 3 — Notify | System | Push + AlimTalk/SMS | The requester is notified of the result |
When an administrator enters an adjustment directly: Adjustments entered by an administrator via the "Add Shift Adjustment" button are saved as immediately confirmed (no approval step). The approval flow in this section applies only to requests submitted by members via [Request Adjustment].
3.7.1 Members: Requesting an Adjustment
Members can request adjustments only for their own schedule.
-
Open the My Schedule tab
- Go to "My Schedule" in the sidebar, or to your own schedule screen.
-
Open the request form
- Click the [+ Request Adjustment] button at the top of the "Shift Adjustments" section.
- The request form expands. Since requests are made in your own name only, no member selection dropdown is shown.
-
Enter the adjustment details
Field Description Date The date to adjust (selectable only within the month currently displayed) Time (minutes) 1–600 minutes (in 1-minute increments) Adjustment type Extended shift / Reduced shift Memo Reason (optional — recommended) — e.g., "Handled an emergency patient" -
Click [Create]
- The request is submitted immediately.
- A gray "Pending" badge appears on your row.
- At the same moment, all administrators are notified (see 3.7.4 below).
-
Status changes
- When an administrator approves → the badge disappears and it becomes an official adjustment.
- When an administrator rejects → the badge changes to a red "Rejected" badge.
To cancel your own request, you can delete the row while it is still Pending. Once approved, only administrators can edit or delete it.
3.7.2 Administrators: Reviewing, Approving, and Rejecting Requests
Administrators (clinic directors / clinic administrators) review requests in the "Shift Adjustments" section of the By Member tab, or in that section's Pending tab.
Screen Layout
- Status filter tabs: 4 tabs — All / Pending / Approved / Rejected
- Group by member checkbox: ON by default — rows are grouped into one summary row per member
- In the Pending tab, grouping is automatically disabled and a flat table is shown (to help you find items to approve quickly)
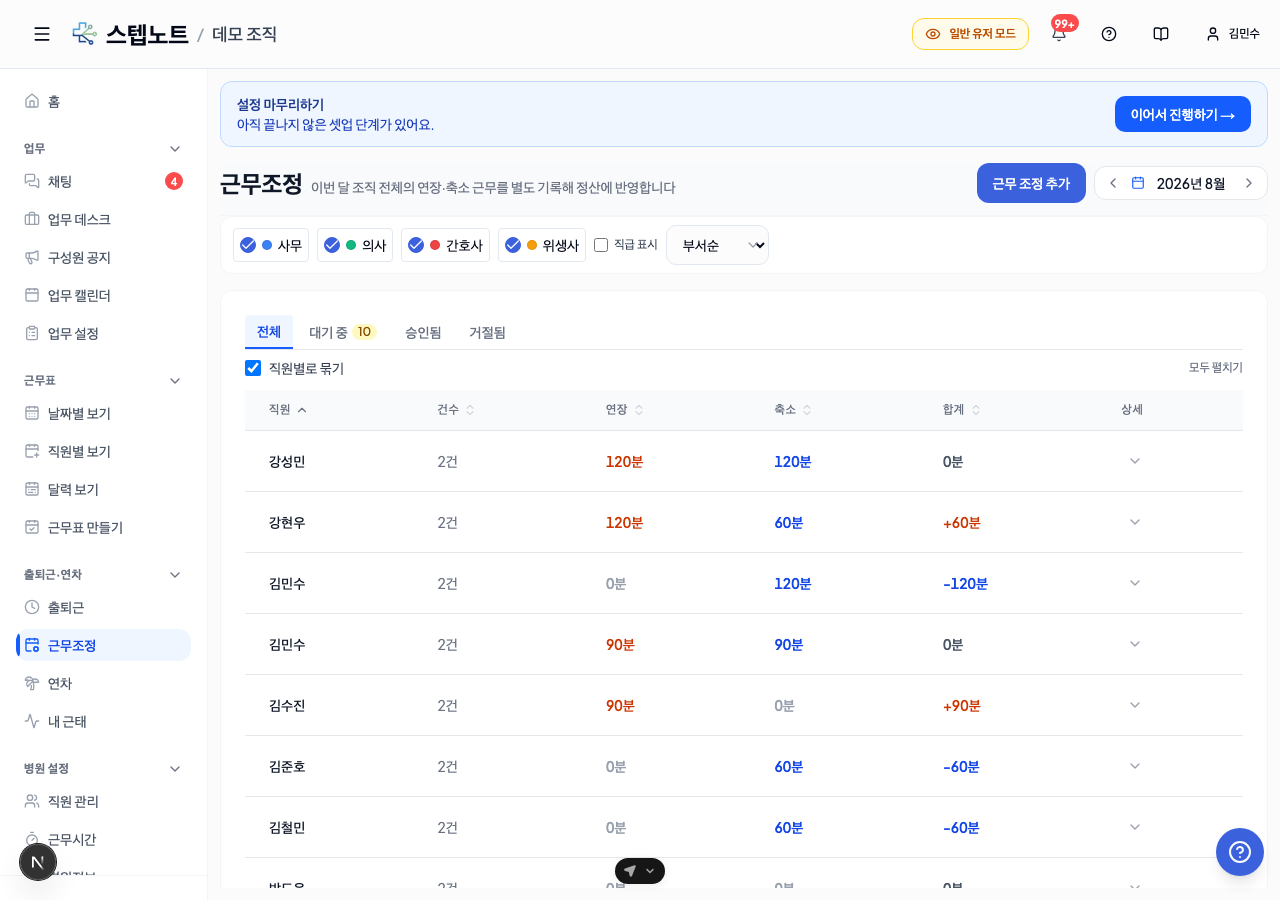
Group-by-member view — extension and reduction shown separately (Updated 2026-08)
When Group by member is on, each member is summarized in a table with the following columns.
| Column | Description |
|---|---|
| Staff | Member name |
| Count | Number of adjustment requests for this member |
| Extension | Total extra work minutes (orange) |
| Reduction | Total reduced work minutes (blue) |
| Total | Extension − Reduction (shown in orange if positive, blue if negative) |
| Details | Click to expand this member's individual adjustments below |
- Click a column header to sort by that column
- Previously extension and reduction were combined into a single total; now you can see them separately, making it easy to tell at a glance whether someone actually worked more or less overall
Approving
- Switch to the Pending tab.
- Click the [Approve] button on the row you want to review.
- It is processed immediately:
- The row moves to the Approved tab
- An automatic notification is sent to the requester (see 3.7.4 below)
- The adjustment is officially applied to that member's schedule
Rejecting
- Click the [Reject] button on a row in the Pending tab.
- The row moves to the Rejected tab.
- A rejection notification is sent to the requester.
Administrators are users with system administrator (systemAdmin) / clinic director (owner) / clinic administrator (admin) permissions. Regular members do not see the [Approve] / [Reject] buttons.
Badge Colors by Status
| Status | Badge | Color |
|---|---|---|
| Pending | "Pending" | Gray |
| Approved | (no badge) | — shown as an official adjustment |
| Rejected | "Rejected" | Red |
3.7.3 Adjustment Examples
| Situation | Adjustment type | Time | Memo |
|---|---|---|---|
| Overtime | Extended | 120 min | "Assisted with an emergency surgery" |
| Leaving early | Reduced | 60 min | "Personal reasons" |
| Extra work | Extended | 180 min | "Inventory count" |
| Shortened lunch break | Reduced | 30 min | "Morning practice ran long" |
3.7.4 Automatic Notifications — Push · AlimTalk · SMS
The system sends notifications automatically at each request, approval, and rejection. Administrators do not need to send messages separately.
Who receives them?
| Event | Recipients | When |
|---|---|---|
| Request (submitted) | The organization's clinic director + all clinic administrators (excluding the requester) | The moment the member clicks [Create] |
| Approval (approved) | The one member who made the request | The moment the administrator clicks [Approve] |
| Rejection (rejected) | The one member who made the request | The moment the administrator clicks [Reject] |
Even if the requester is an administrator (admin/owner), they do not receive notifications about their own requests.
Which channels are used?
Notifications go out through two parallel tracks.
① App push (FCM) — always sent
- A push notification arrives on the mobile app (iOS / Android)
- Only possible for users with a registered push token (requires at least one mobile app login)
- Tapping the push takes you straight to the relevant adjustment screen
② Message channel fallback chain — sent independently of push
- The following channels are tried in order, stopping at the first success:
- AlimTalk — Kakao business message (requires a registered phone number + Kakao AlimTalk consent)
- KakaoTalk — FriendTalk
- SMS — text message to the phone number
- Email — the sign-up email address
In short: push is always sent, and in addition one of AlimTalk/SMS/email will reach the recipient.
Example Notification Messages
| Event | Title | Body |
|---|---|---|
| Request | Shift adjustment requested | Minsu Kim requested a 60-min extension on May 13 |
| Approval | Shift adjustment approved | Your 60-min extension request for May 13 was approved |
| Rejection | Shift adjustment rejected | Your 60-min extension request for May 13 was rejected |
Not receiving notifications?
- Check mobile app push permissions — Device Settings → Notifications → make sure notifications are allowed for StepNote
- Check the phone number — in Member Management, confirm that your (or the recipient's) phone number is registered
- Email is the final fallback — if none of the above work, the notification arrives at the sign-up email (check the spam folder too)
- Retry policy — temporary delivery failures are retried automatically up to 5 times (at intervals of 30 sec → 2 min → 10 min → 30 min → 1 hour)
Notifications are enqueued at the same time as the request transaction, and a separate delivery worker processes the queue every minute. Delivery may therefore be delayed by up to about one minute.
3.7.5 Notification Center — Header Bell Icon
Even if you missed a push, AlimTalk, or SMS, or push permission is turned off, you can review your notifications at a glance via the bell icon on the right side of the web/app header.
Where is it?
- Desktop: right side of the header, next to the KakaoTalk inquiry button
- Mobile: right side of the header, next to the QR clock in/out icon

How does it work?
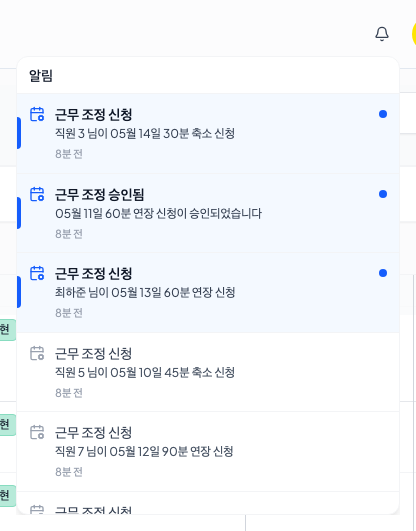
- Red badge — the number of unread notifications is shown at the top right of the bell icon (
99+when there are more than 99). - Real-time updates — when a new notification arrives, the badge count increases immediately without a page refresh (Supabase Realtime).
- Click → dropdown — clicking the bell shows up to 50 notifications from the last 30 days, newest first.
- Auto-read on open — the moment the dropdown opens, the unread notifications visible on screen are marked as read in bulk and the badge resets to 0.
- Just-read highlighting — while the dropdown is open, notifications you have "just seen for the first time" are highlighted with a light blue background + a blue bar on the left + a blue dot on the right, so you can visually tell which notifications are new.
- Click an item → go to details — clicking a notification takes you to the Shift Adjustment tab where that request is shown.
- Mark all as read — the [Mark All as Read] button at the top right of the dropdown marks everything as read at once.
Relationship to Push Notifications
| Item | Push notification | Notification center (bell) |
|---|---|---|
| When sent | Immediately on request/approval/rejection (worker runs every minute) | Stored immediately, at the same time as the request/approval/rejection |
| Who receives it | Same as 3.7.4 above (request → all administrators, approval/rejection → requester) | The same recipients as push |
| Retention | Kept temporarily in the device notification center (OS policy) | Kept for the last 30 days, up to 50 shown |
| Permissions required | Mobile app push permission + token registration | Just being logged in is enough |
| Read handling | None | Automatic when the dropdown opens |
Notifications land in the bell icon even if the push never arrives, so users who keep push permission off will not miss anything.
3.8 Work Hours Settings Tab
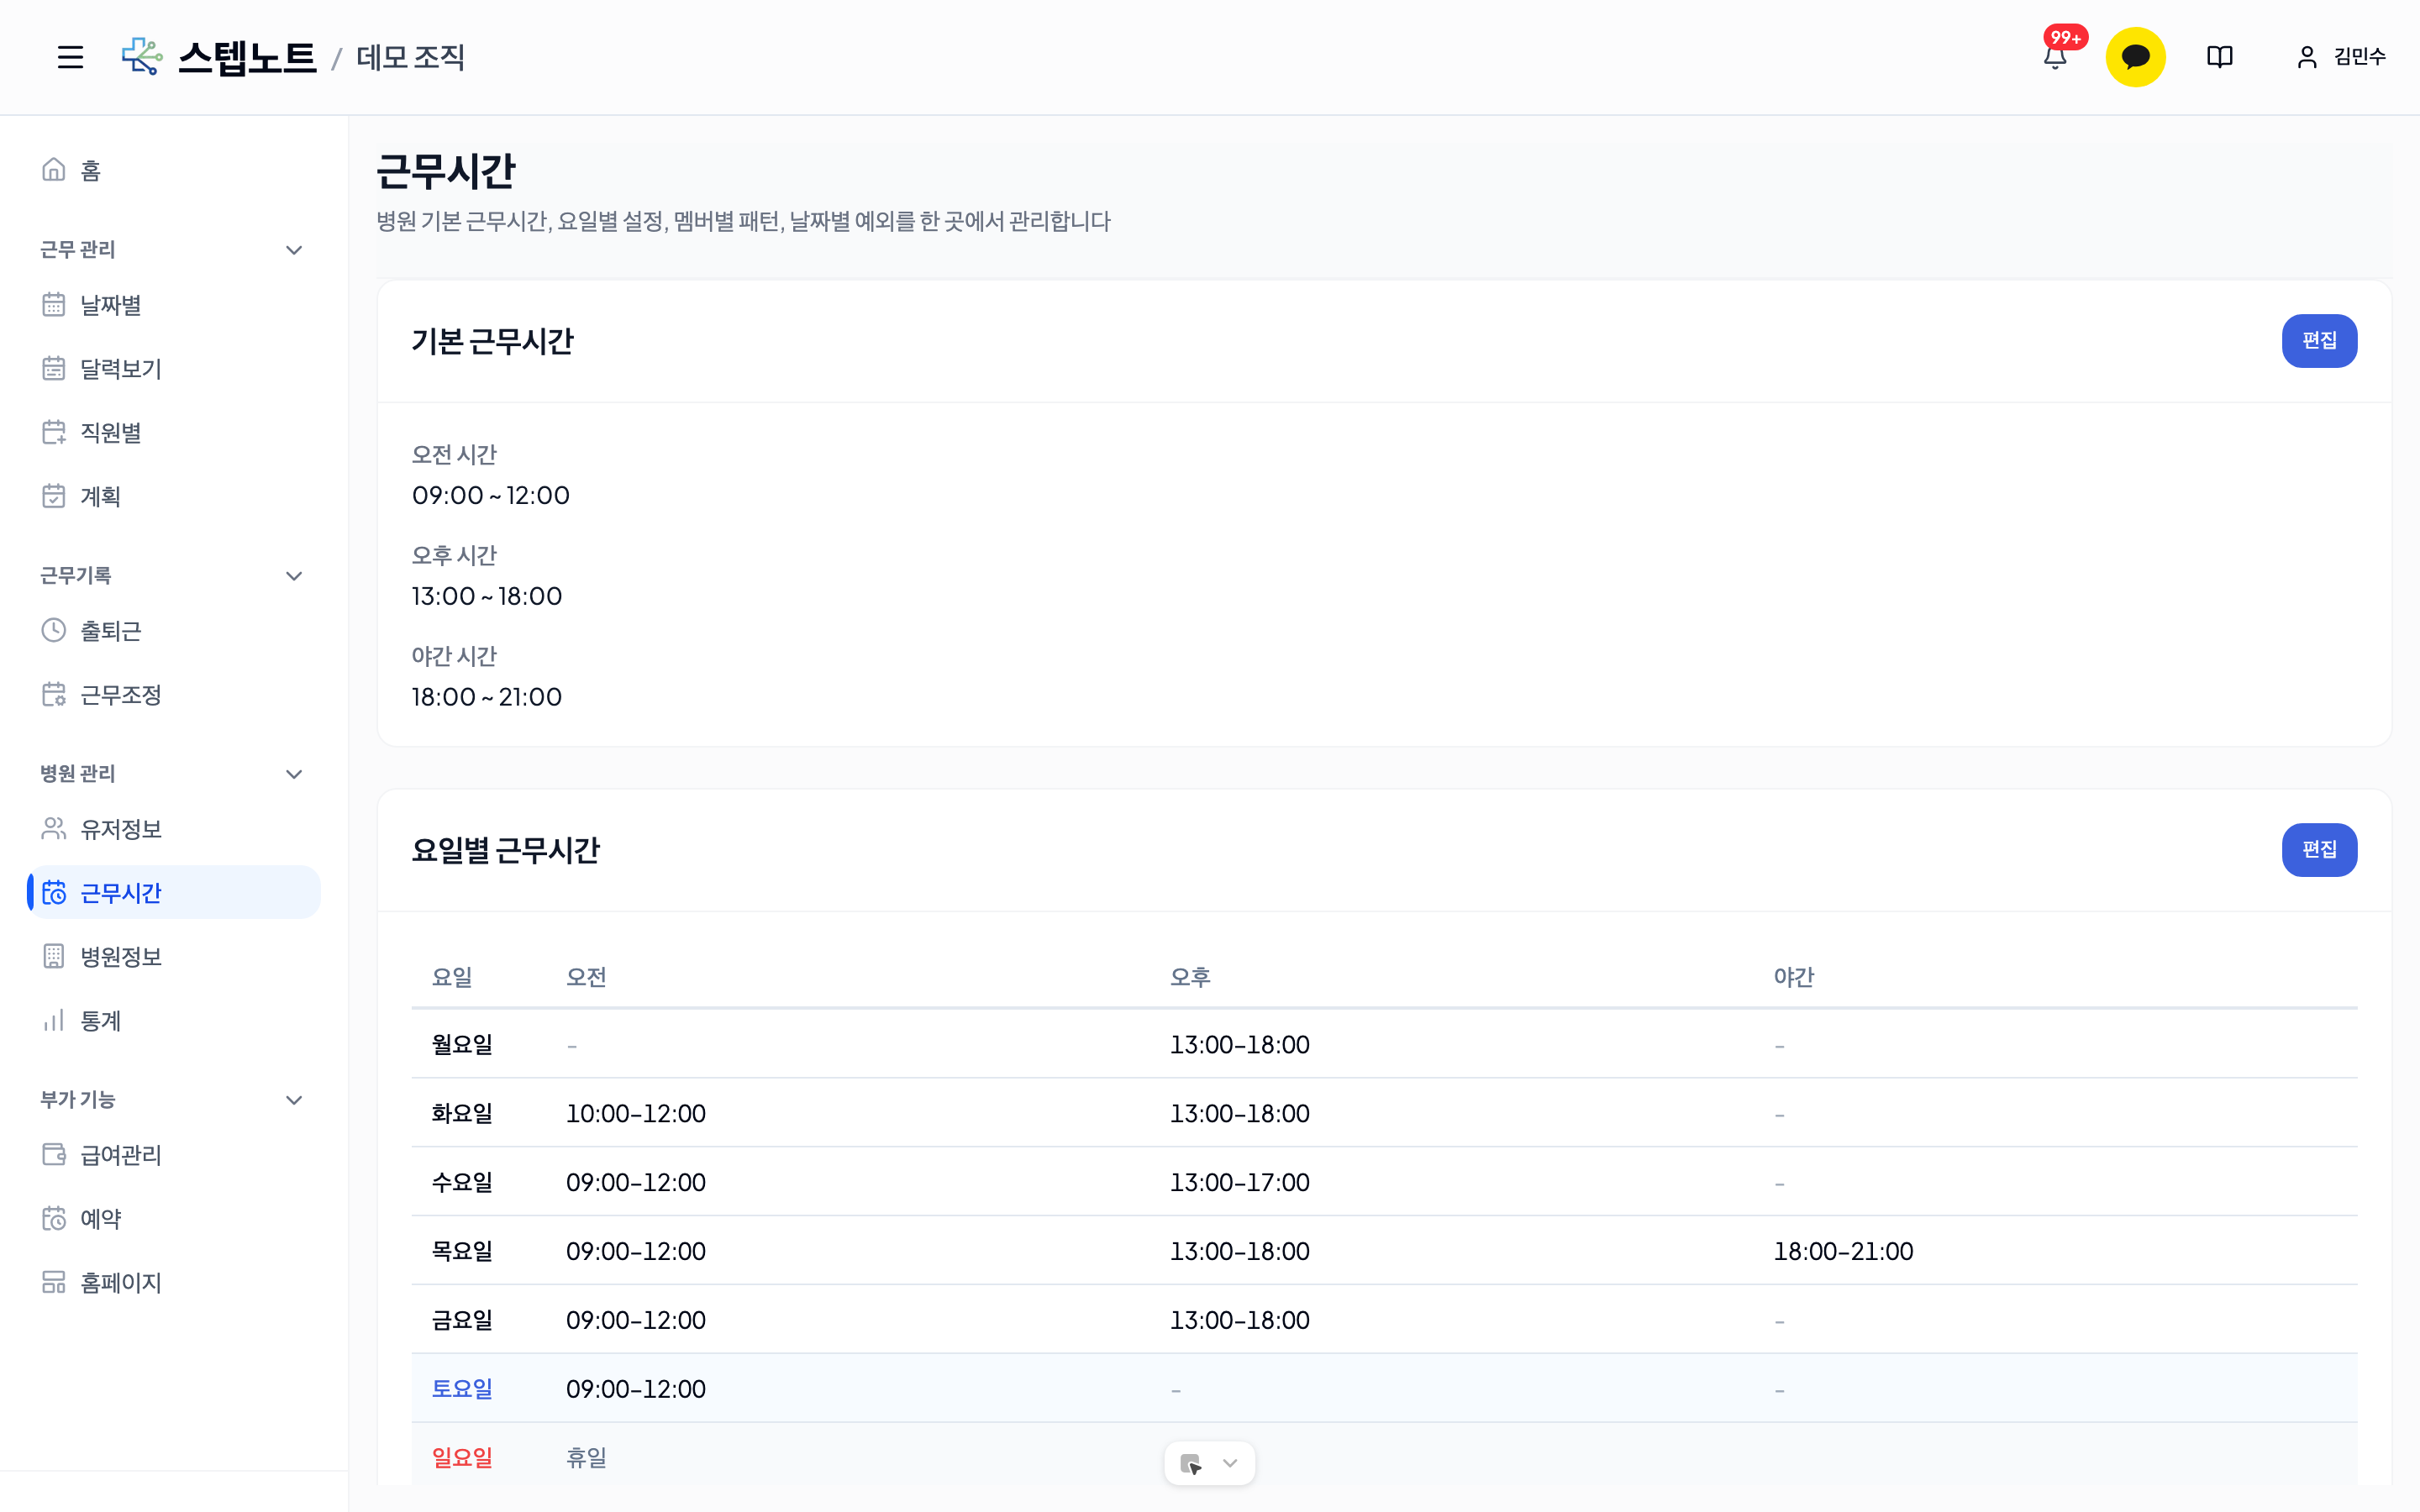
Click the "Work Hours" tab in the sidebar to manage all clinic work-hour settings in one place. The screen is divided into three sub-tabs at the top.
Sub-Tabs
| Sub-tab | Description |
|---|---|
| Clinic Hours | The clinic's practice/working hours per weekday (Mon–Sun) — applied to all members by default |
| Member Hours | Register only members who work different hours from the clinic default (shown in a member × weekday grid) |
| Temporary Closures & Hour Changes | Holidays / clinic-wide / per-member customizations that apply to specific dates only |
Clinic Hours — Editing Weekday Working Hours
The weekday working hours table is the baseline for clinic hours. There is no separate "default working hours" setting; you manage the morning, afternoon, and night hours of each weekday (Mon–Sun) directly in this table.
Click the Edit button to switch to edit mode.
- Use the checkbox in front of each time slot (Morning / Afternoon / Night) to decide whether that slot is used on that weekday. Turning on the checkbox auto-fills the times.
- Checked time slots require both start and end times. If they are left blank, saving is blocked and a message shows which weekday/slot is missing.
- Click the copy button at the end of a weekday row (tooltip: "Copy to all checked weekdays") to copy that weekday's times to every weekday that is not a holiday and has the time slot checked. This is handy for setting one weekday and then spreading it to the rest at once.
- For weekdays that are fully closed, check Holiday.
Managing Temporary Closures & Hour Changes
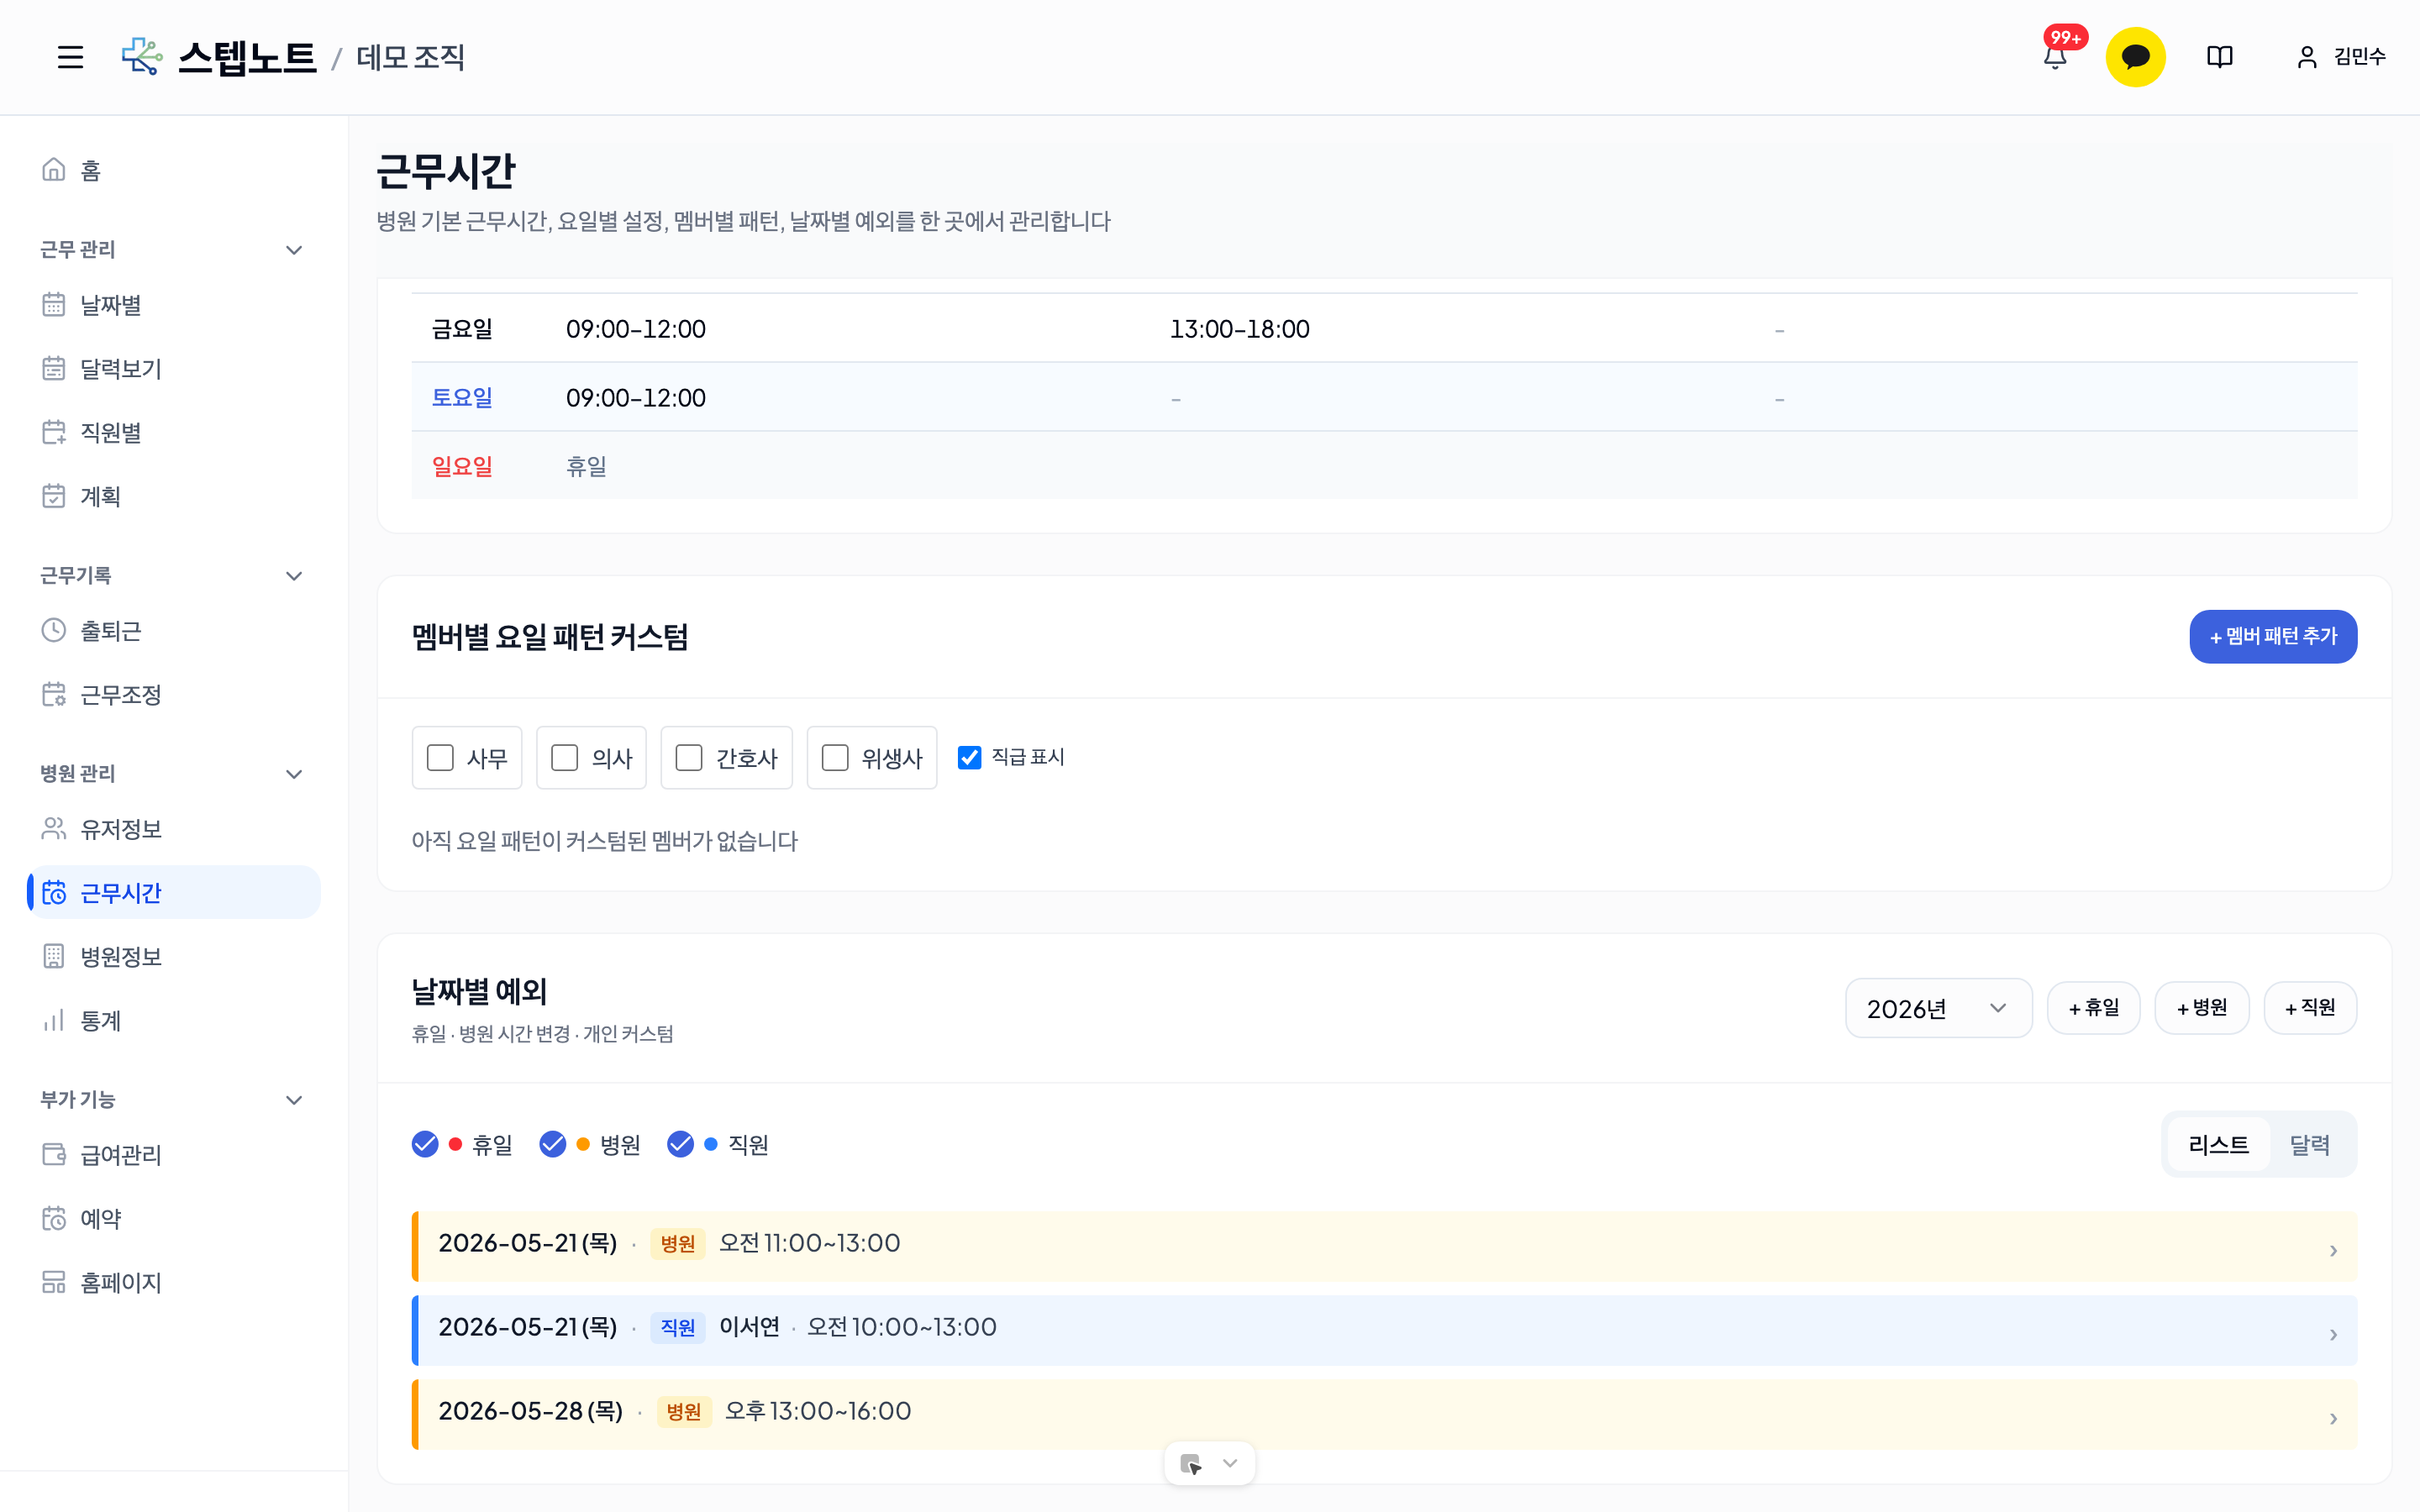
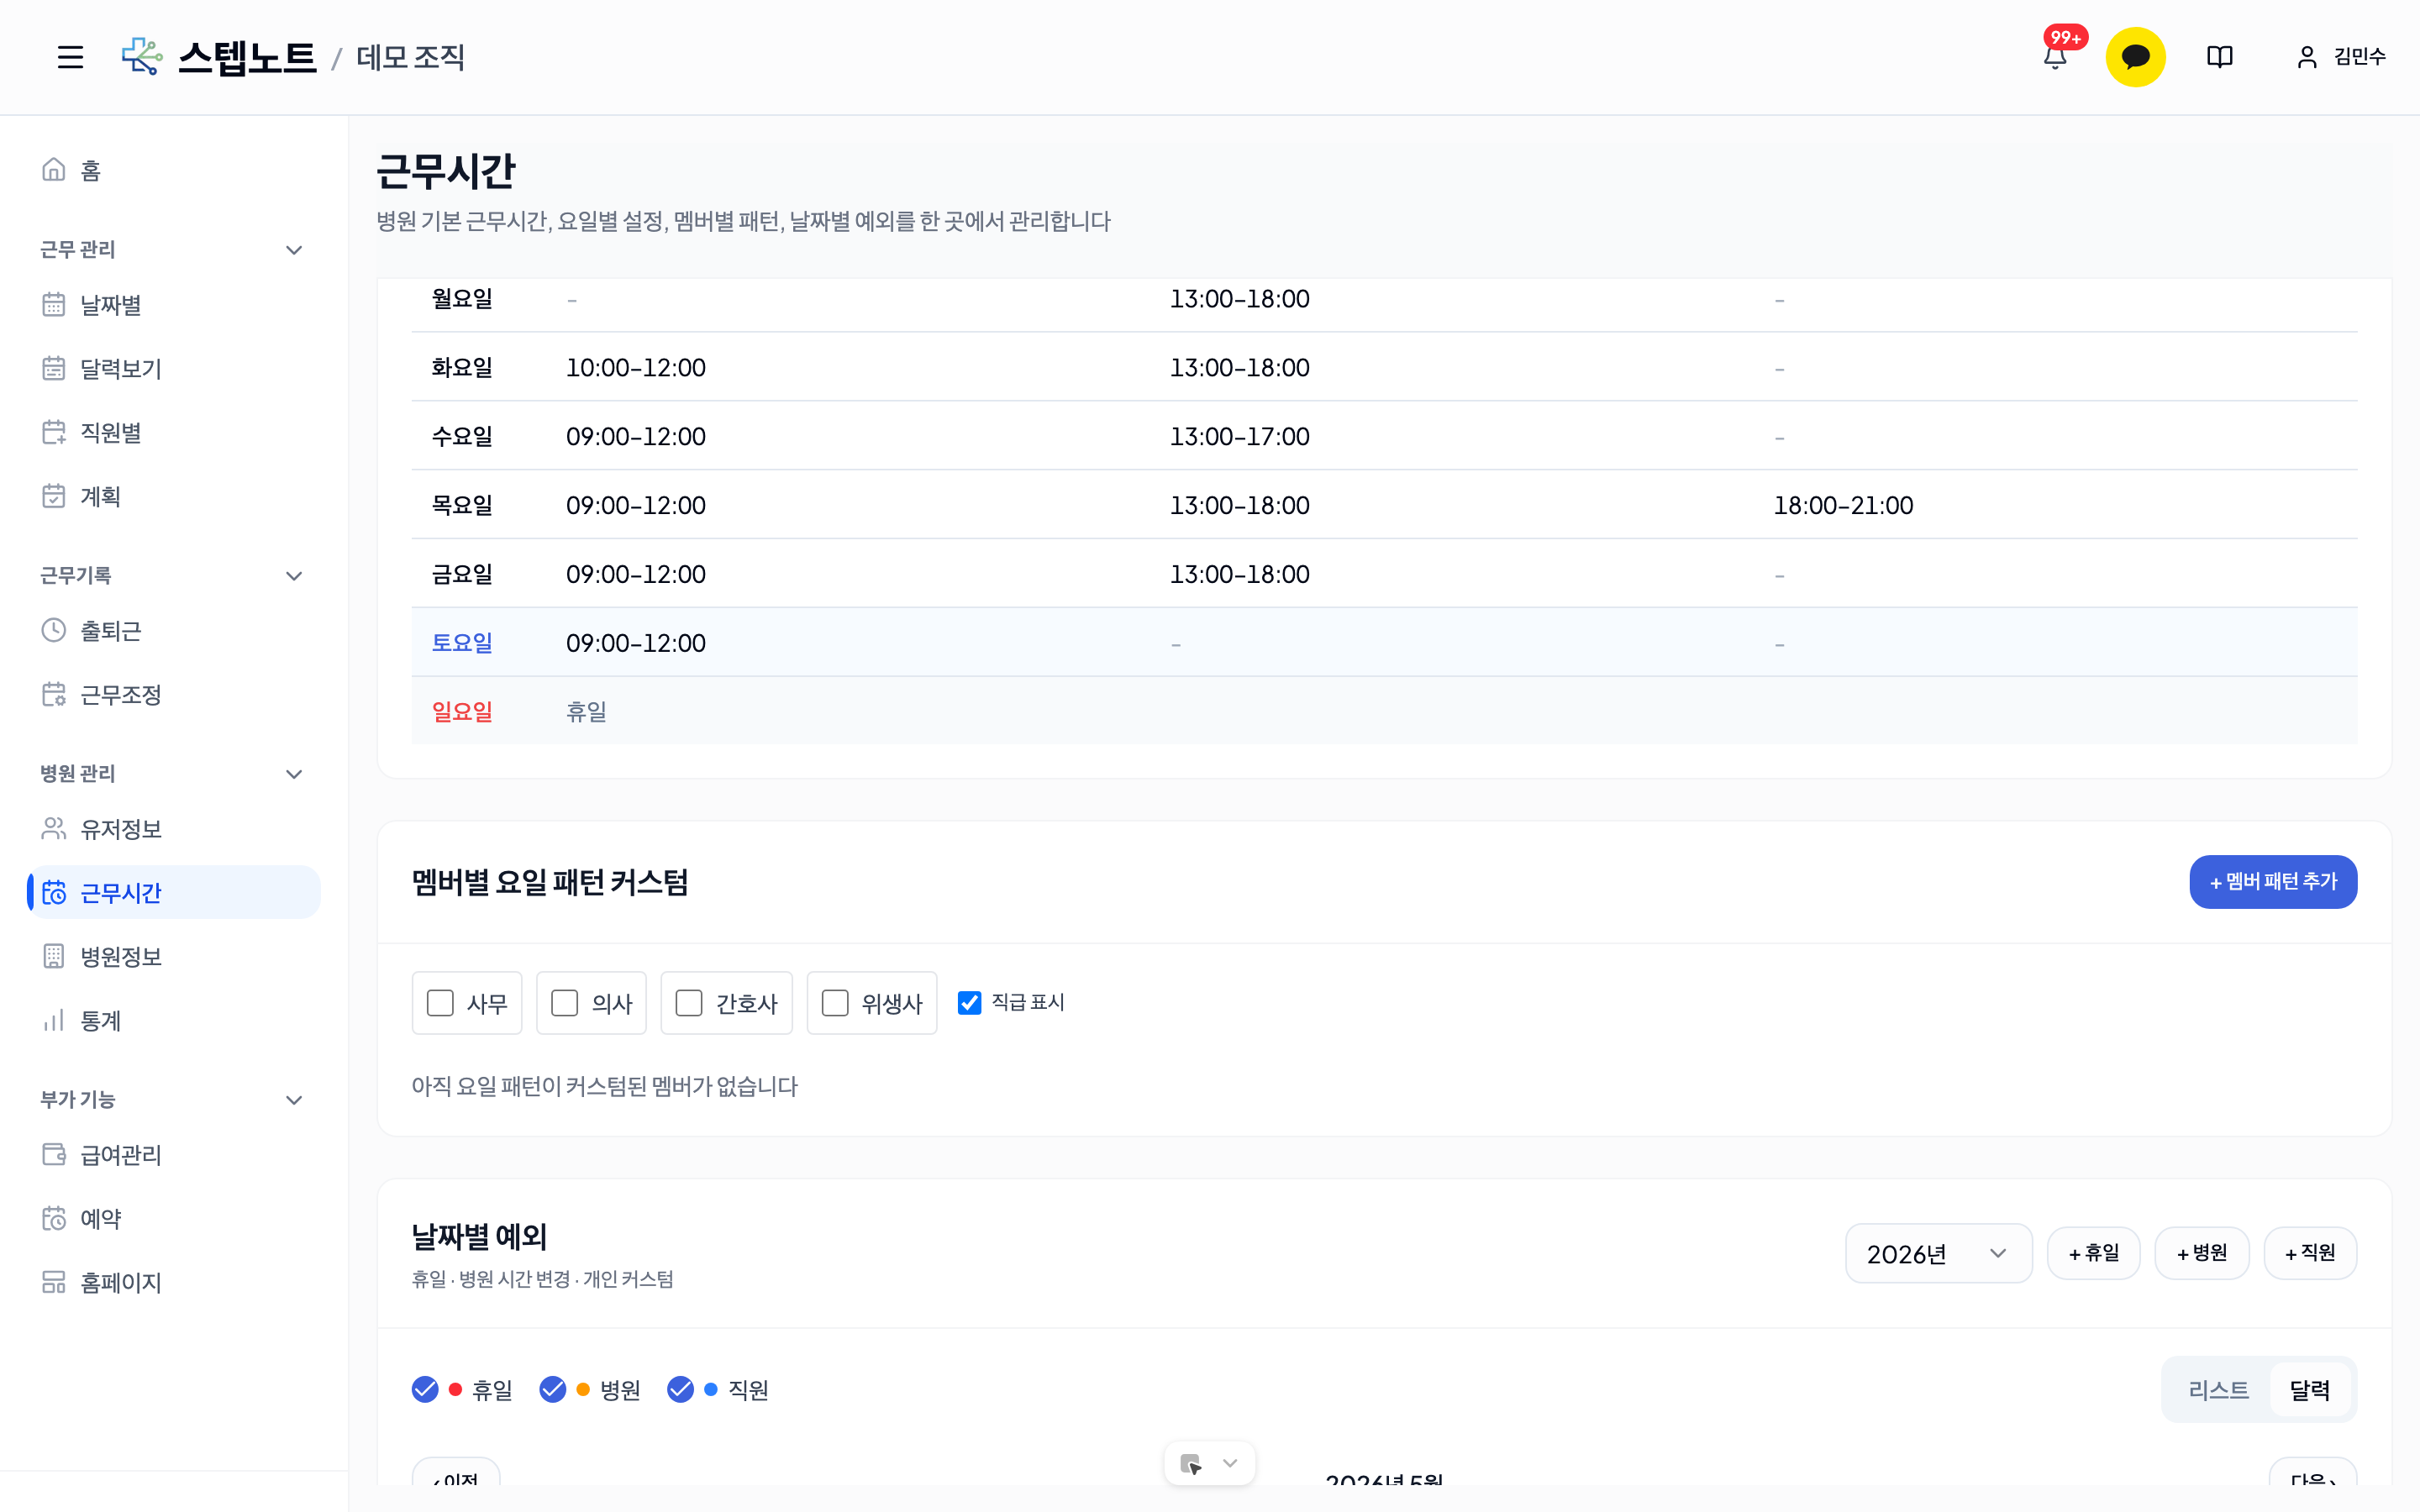
The Temporary Closures & Hour Changes sub-tab manages exceptions that apply to specific dates only, in three types: Holiday · Clinic hour change · Personal customization.
Exception Types
| Type | Badge color | Purpose |
|---|---|---|
| Holiday | Red | Full days off, such as public holidays and clinic closures |
| Clinic | Orange | Clinic-wide working hours applied to a specific date only |
| Member | Blue | A specific member's working hours on a specific date |
Filters and View Switching
- Use the Holiday / Clinic / Member checkboxes at the top to view only the types you want.
- Switch the view mode with the List / Calendar tabs.
- Use the year selector at the top right of the card (e.g., 2026) to change the year being viewed.
- In the calendar, click a badge shown on a date to open the edit dialog for that exception directly.
Adding an Exception
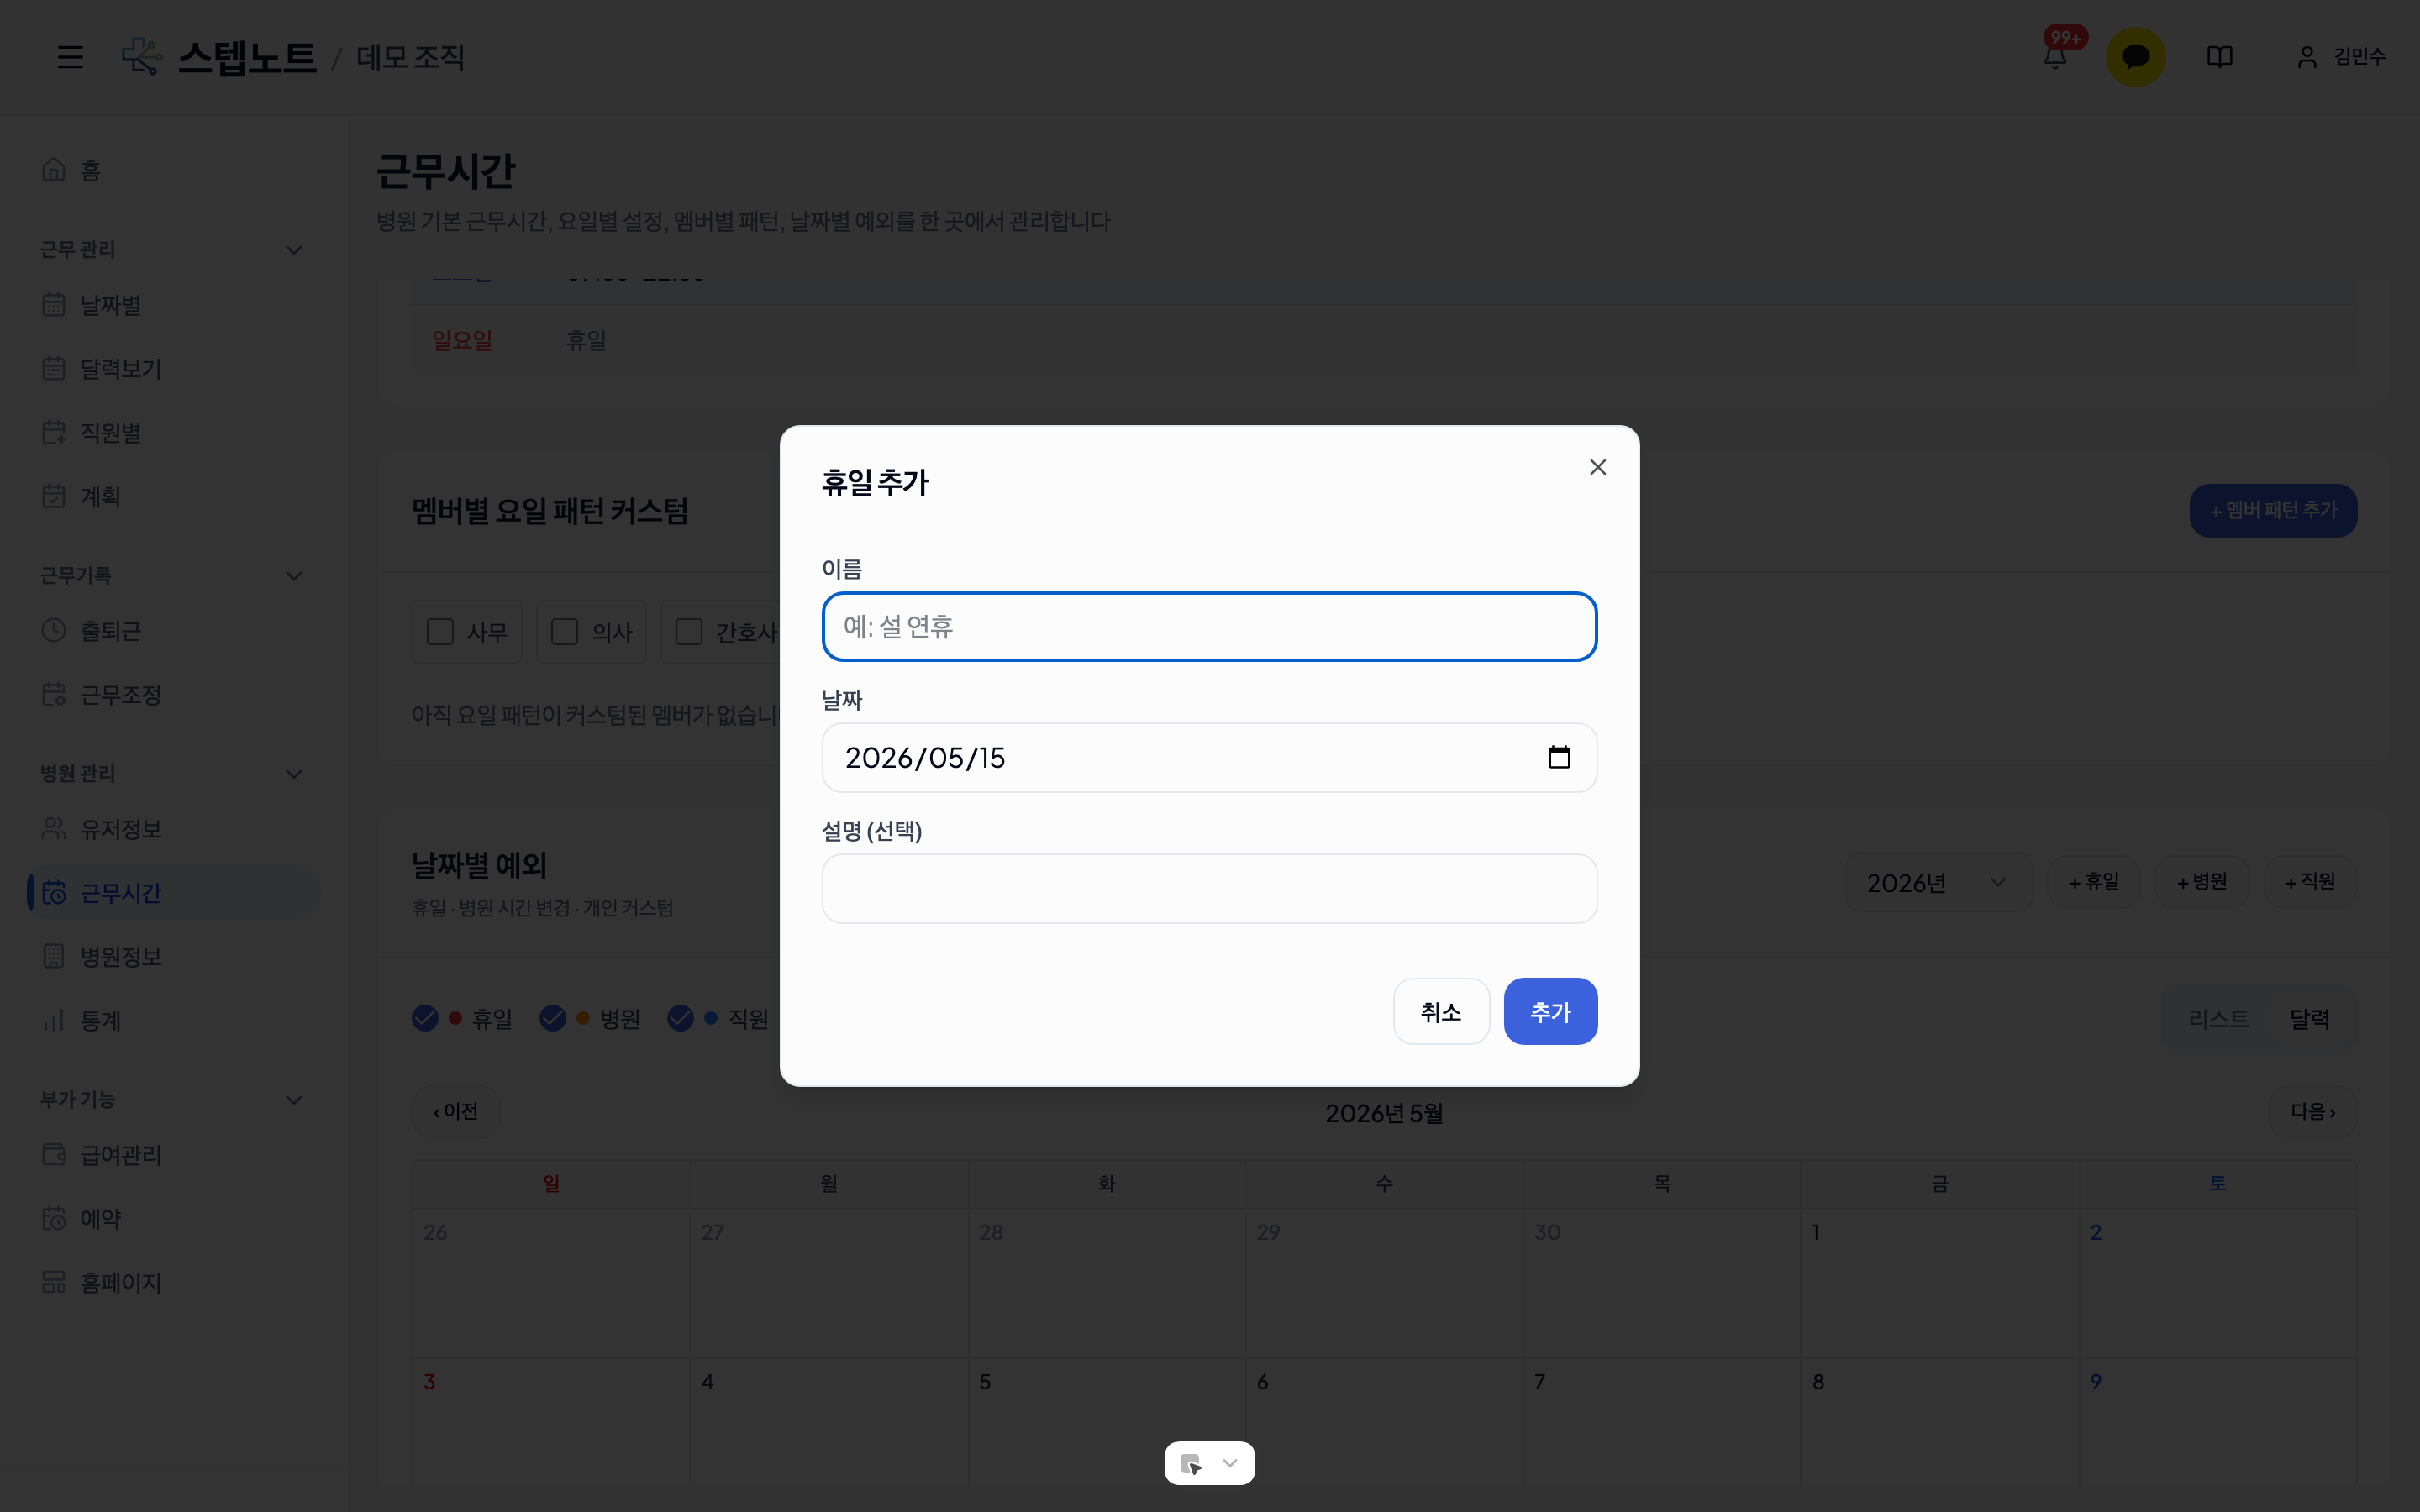
Use the + Holiday, + Clinic Hour Change, and + Personal Customization buttons at the top right of the card to add a new exception of each type.
- + Holiday: enter a name (e.g., "Lunar New Year holidays"), the date, and a description (optional).
- + Clinic Hour Change: specify the working hours (Morning / Afternoon / Night) applied clinic-wide. Each time slot has a No shift checkbox and an optional description field.
- + Personal Customization: select the target member, then specify that member's working hours for that day. A description (optional) can be entered.
Editing / Deleting Exceptions
- Click an item in the list or calendar to open the edit dialog for its type.
- The Holiday, Clinic, and Member edit dialogs each have a Delete button, which removes the exception after a confirmation prompt.
Priority Order
Working hours are applied in the following order (highest first):
- Personal, per-date — a specific member's setting for a specific date (the "Member" type in Temporary Closures & Hour Changes)
- Clinic, per-date — a clinic-wide setting for a specific date (the "Clinic" type in Temporary Closures & Hour Changes)
- Personal, per-weekday — the member's per-weekday hours set in Member Hours
- Clinic, per-weekday — the weekday working hours in the Clinic Hours sub-tab
Note: For a member with a personal weekday pattern, the personal pattern takes precedence over clinic per-date changes. To change that member's hours as well, set a personal per-date entry separately.
Member Hours Grid
The Member Hours sub-tab is displayed as a member × weekday grid, so you can see at a glance who has personal settings. Register only members who work different hours from the clinic default; unregistered members follow the clinic hours.
| Display | Meaning |
|---|---|
Bold time (e.g., 10:00~15:00) | Custom hours are set for that member/weekday |
Red badge Off | That weekday is set as a personal day off |
| Gray time | No customization — the clinic's weekday hours apply |
- Click a row (member) to open the edit dialog (administrators only)
- Use the "+ Add Member" button to add members who have not been registered yet
- Turn on the "Show positions" checkbox at the top right of the section to display positions next to member names, making it easy to distinguish senior/junior members at a glance
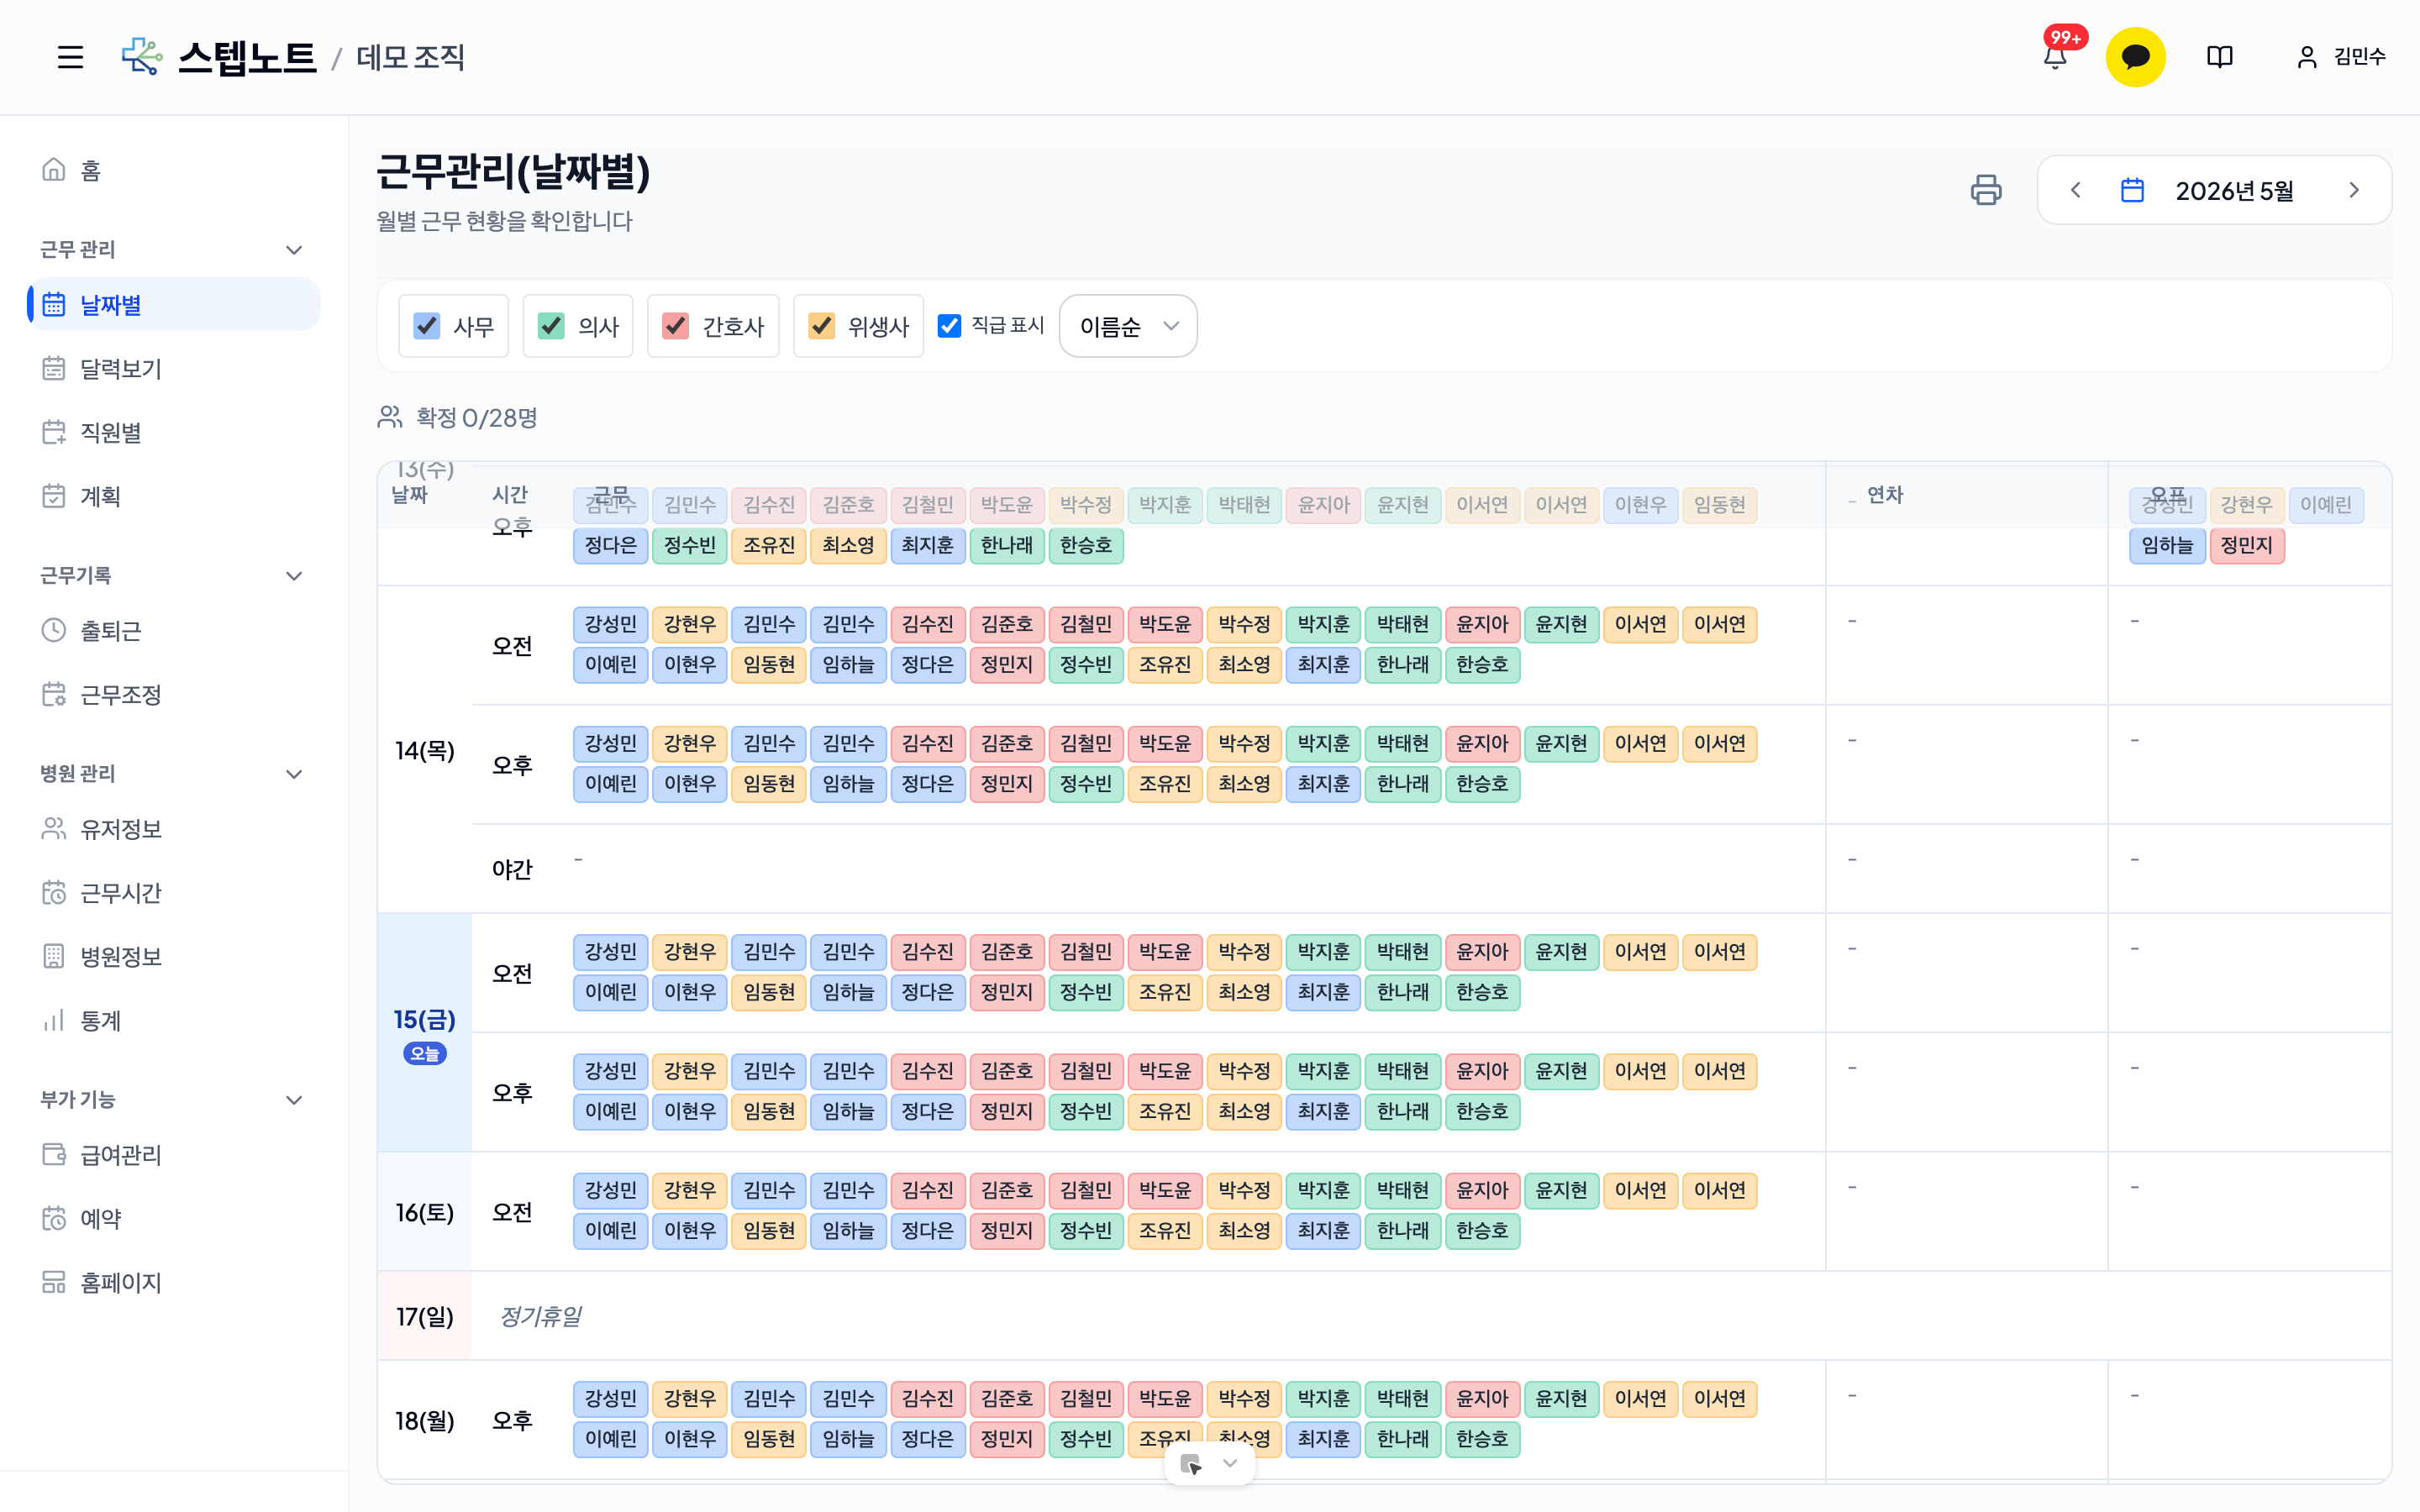
3.9 Monthly Shift Overview (By Date)
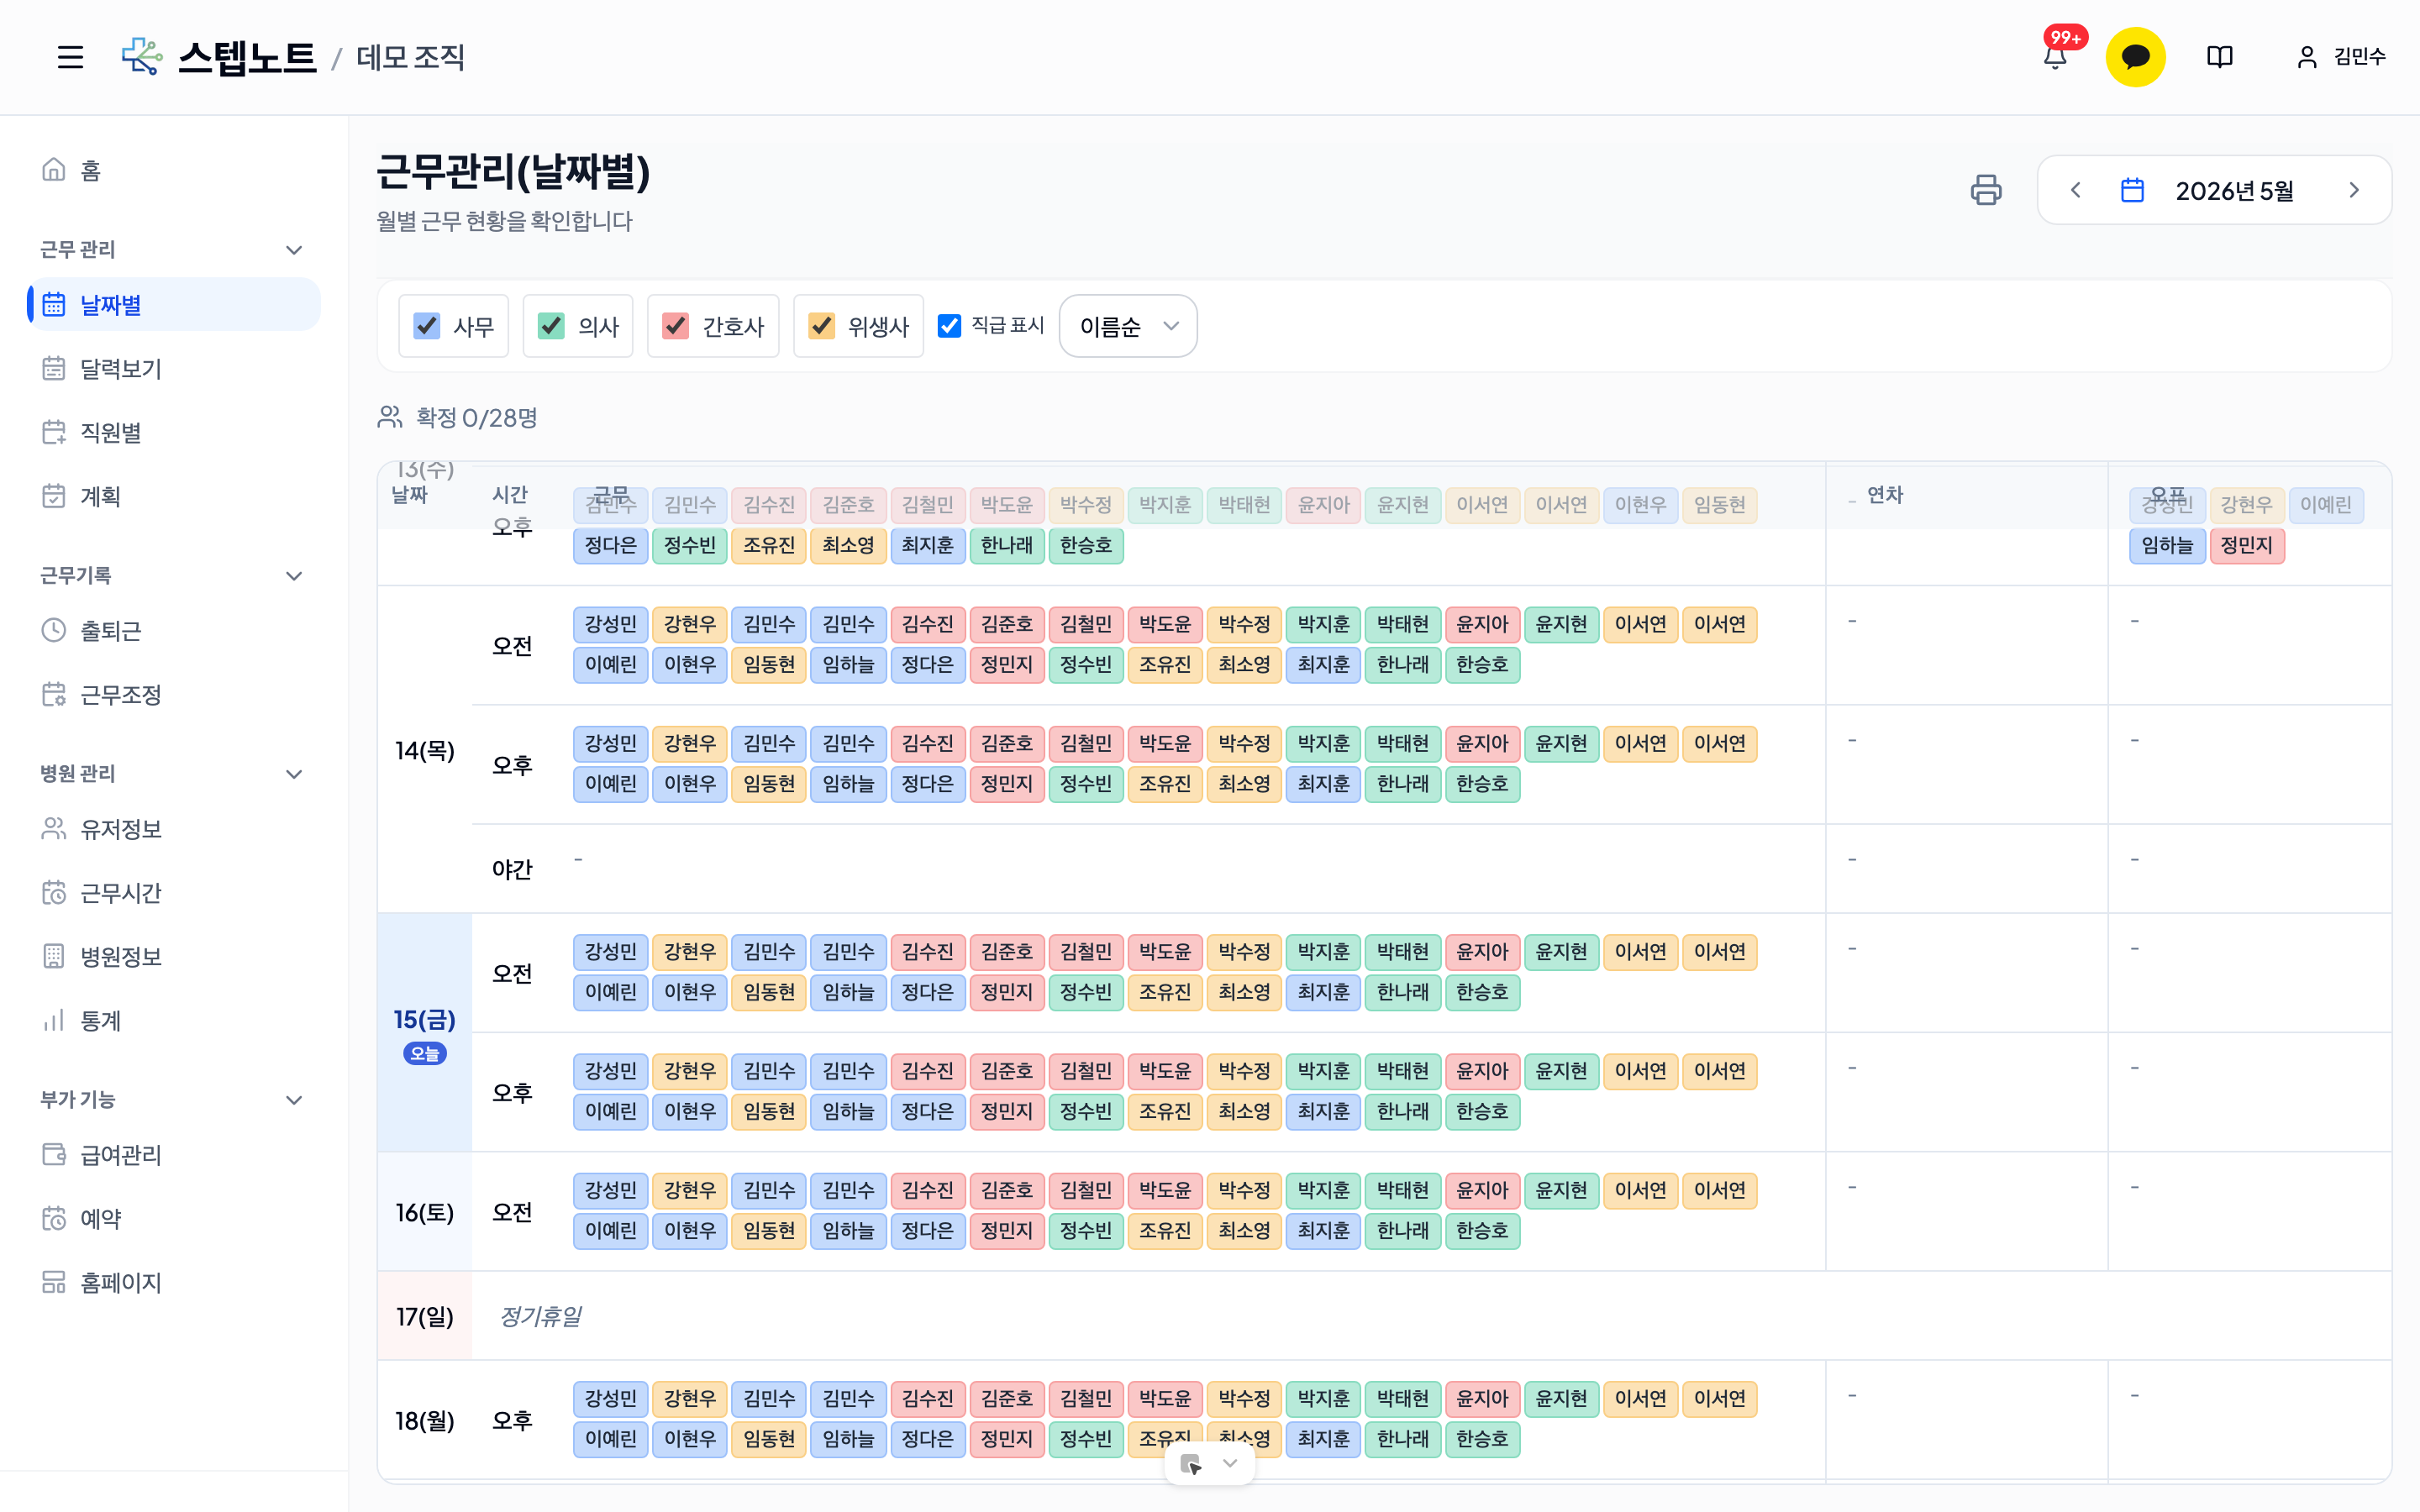
Viewing the Monthly Work Schedule
- Click the "By Date" tab in the sidebar
-
What is shown
- All members' monthly schedules at a glance
- Color-coded by department
- Shift/annual leave/off statistics
-
Filter options
- Filter by department
- View specific members only
- Show positions toggle — when checked, positions appear in small text above names
Printing
Click the Print button on the right side of the header (a printer icon on mobile) to switch to the inline print preview. On your first visit a "Print the schedule" guide card says "Print the confirmed schedule on A4 and pin it at the desk. Pick the period and department in the print preview.", and if nothing has been confirmed yet you'll see "No confirmed schedule yet." with a Go to Make schedule button. The Open print preview button in step 4 of the Get started tab opens this preview directly.
- Paper size: enter width × height in mm directly
- Page mode:
- Shrink to one page: automatically scales everything to fit on a single page (default)
- Print across multiple pages: automatically splits onto additional pages when there are many members
- After checking the preview, click the "Print" button
- To close the preview, click the "Close" button
3.10 Calendar View Tab
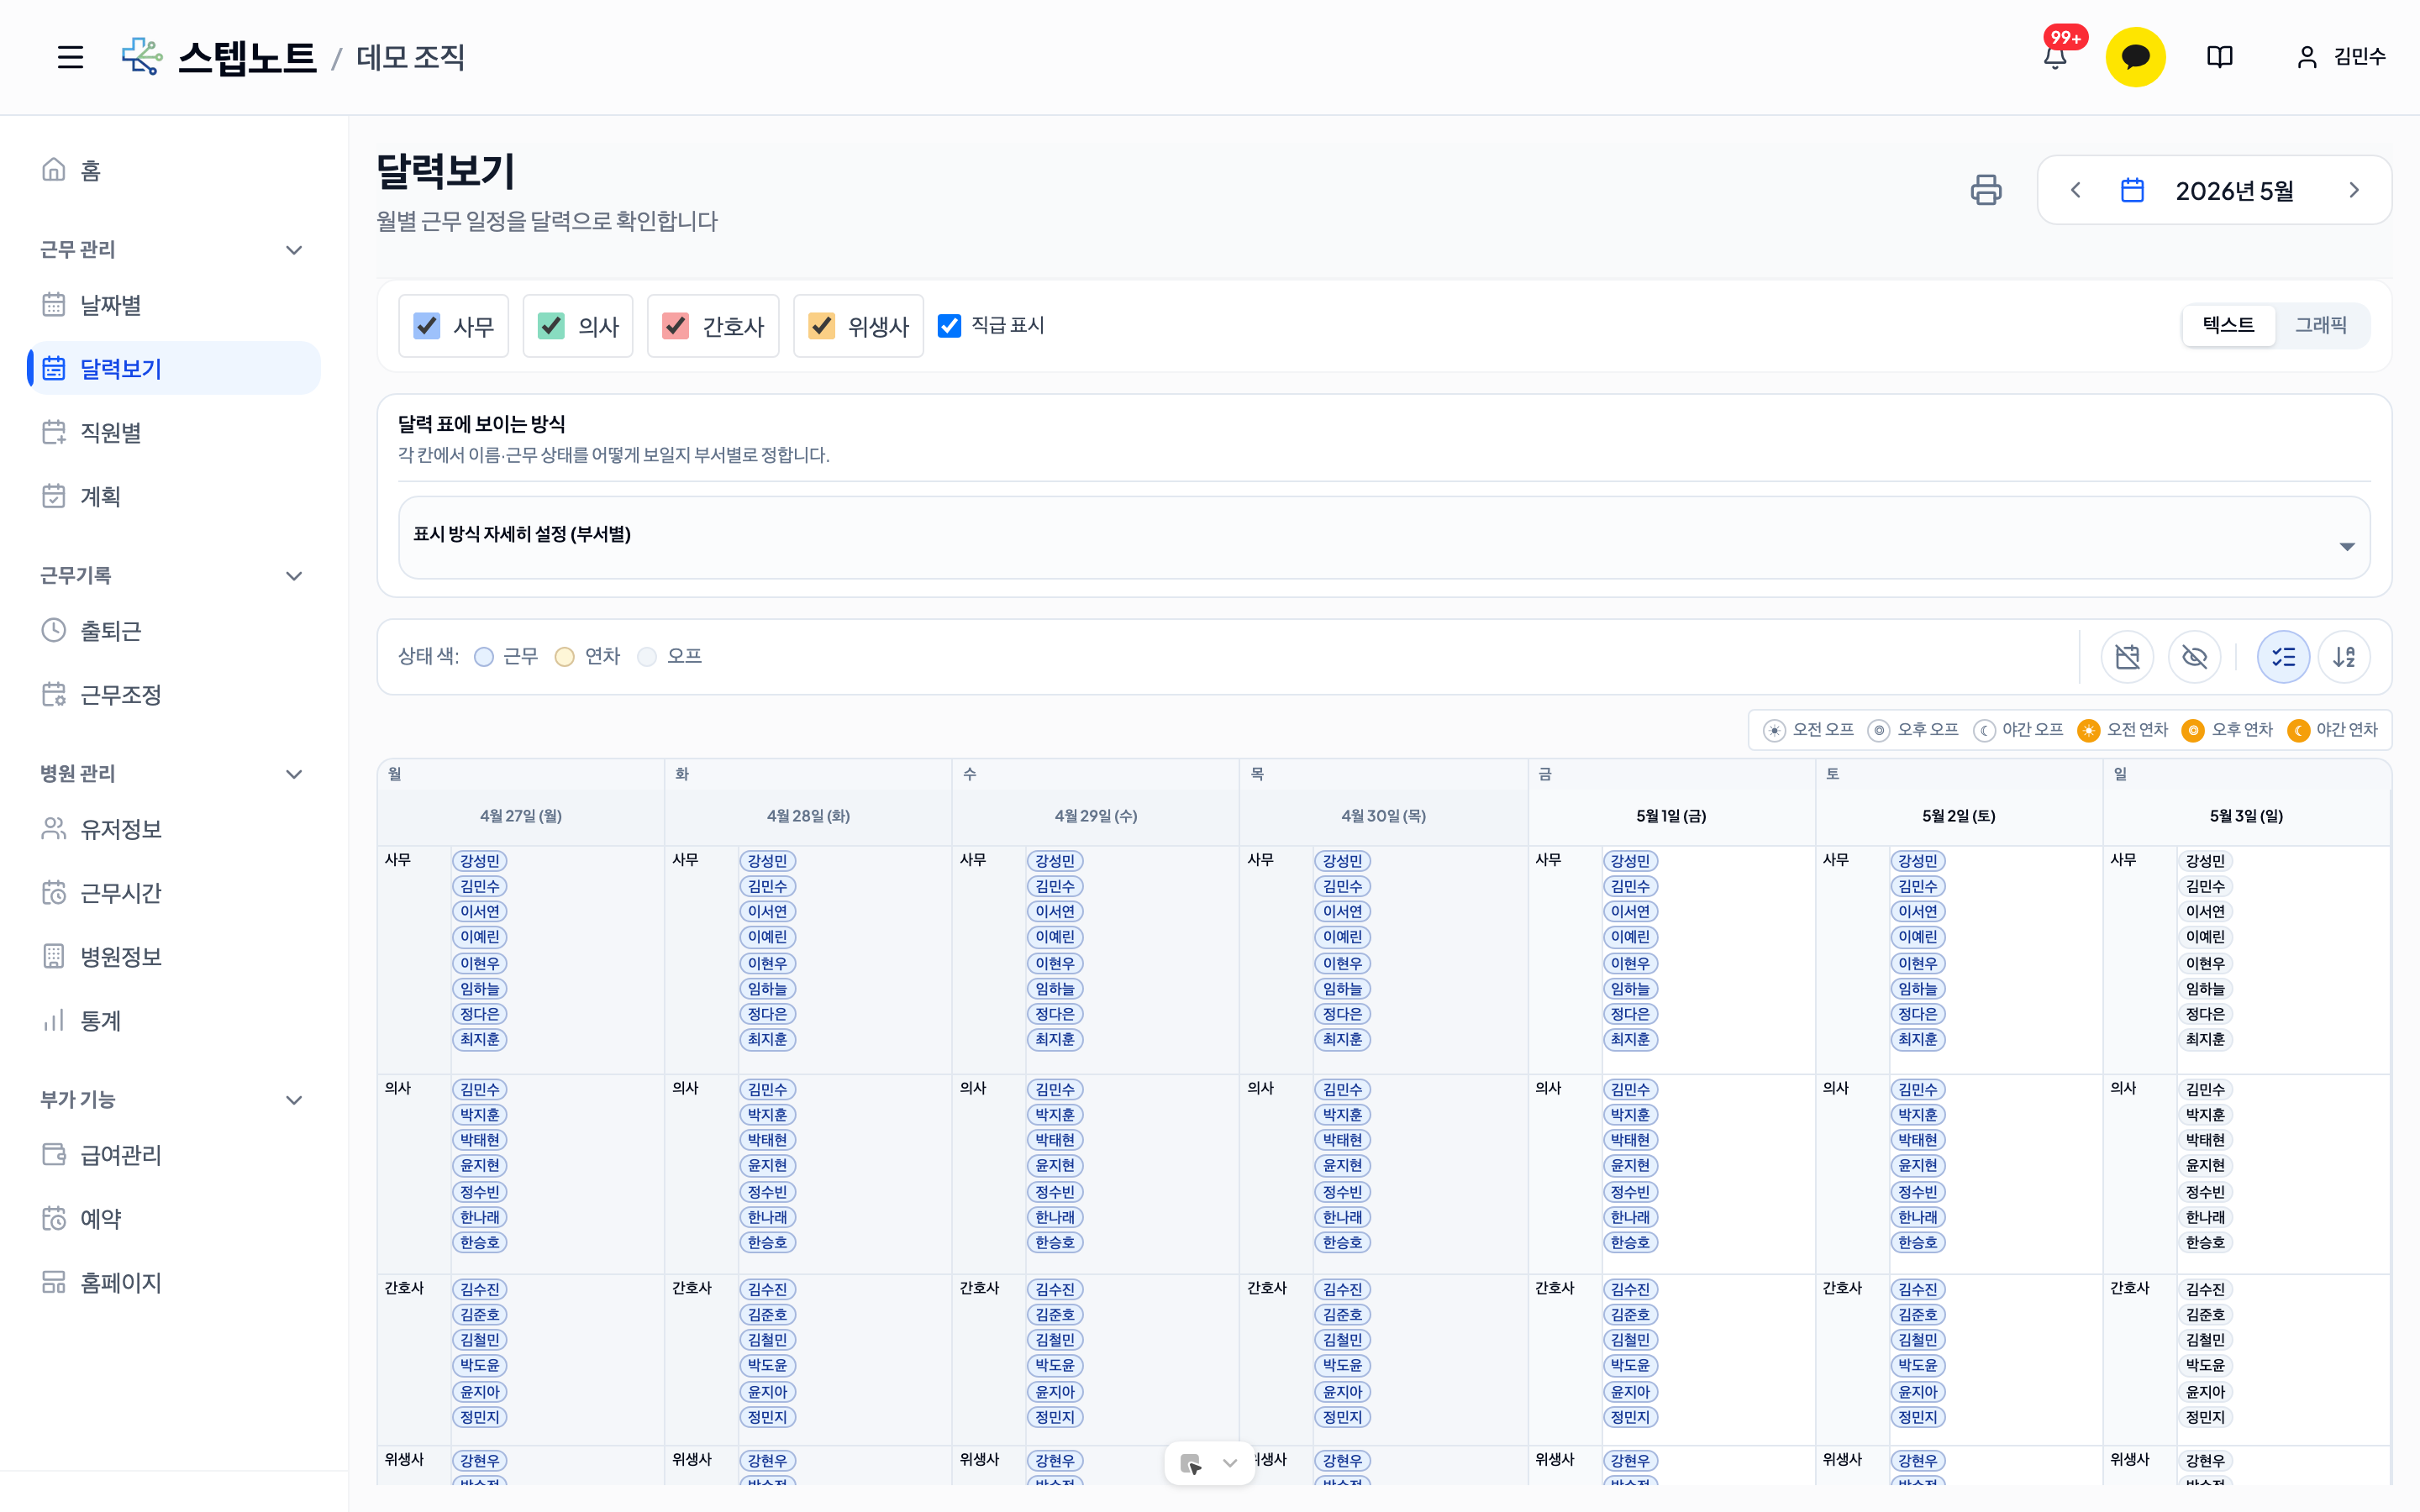
Click the "Calendar View" tab in the sidebar to see shift status in a monthly calendar format.
Sub-Tabs: Overview / Detailed
The Calendar View tab has two sub-tabs.
| Sub-tab | Description |
|---|---|
| Overview | Shows shift status visually in a calendar format (formerly "Graphic") |
| Detailed | Shows the list of morning/afternoon/night workers per date as text (formerly "Text") |
Detailed tab highlights:
- See the list of workers per time slot (morning/afternoon/night) for each date at a glance
- Partial off/annual leave statuses are also clearly labeled
The selected sub-tab is remembered automatically. The last sub-tab you viewed opens again on your next visit.
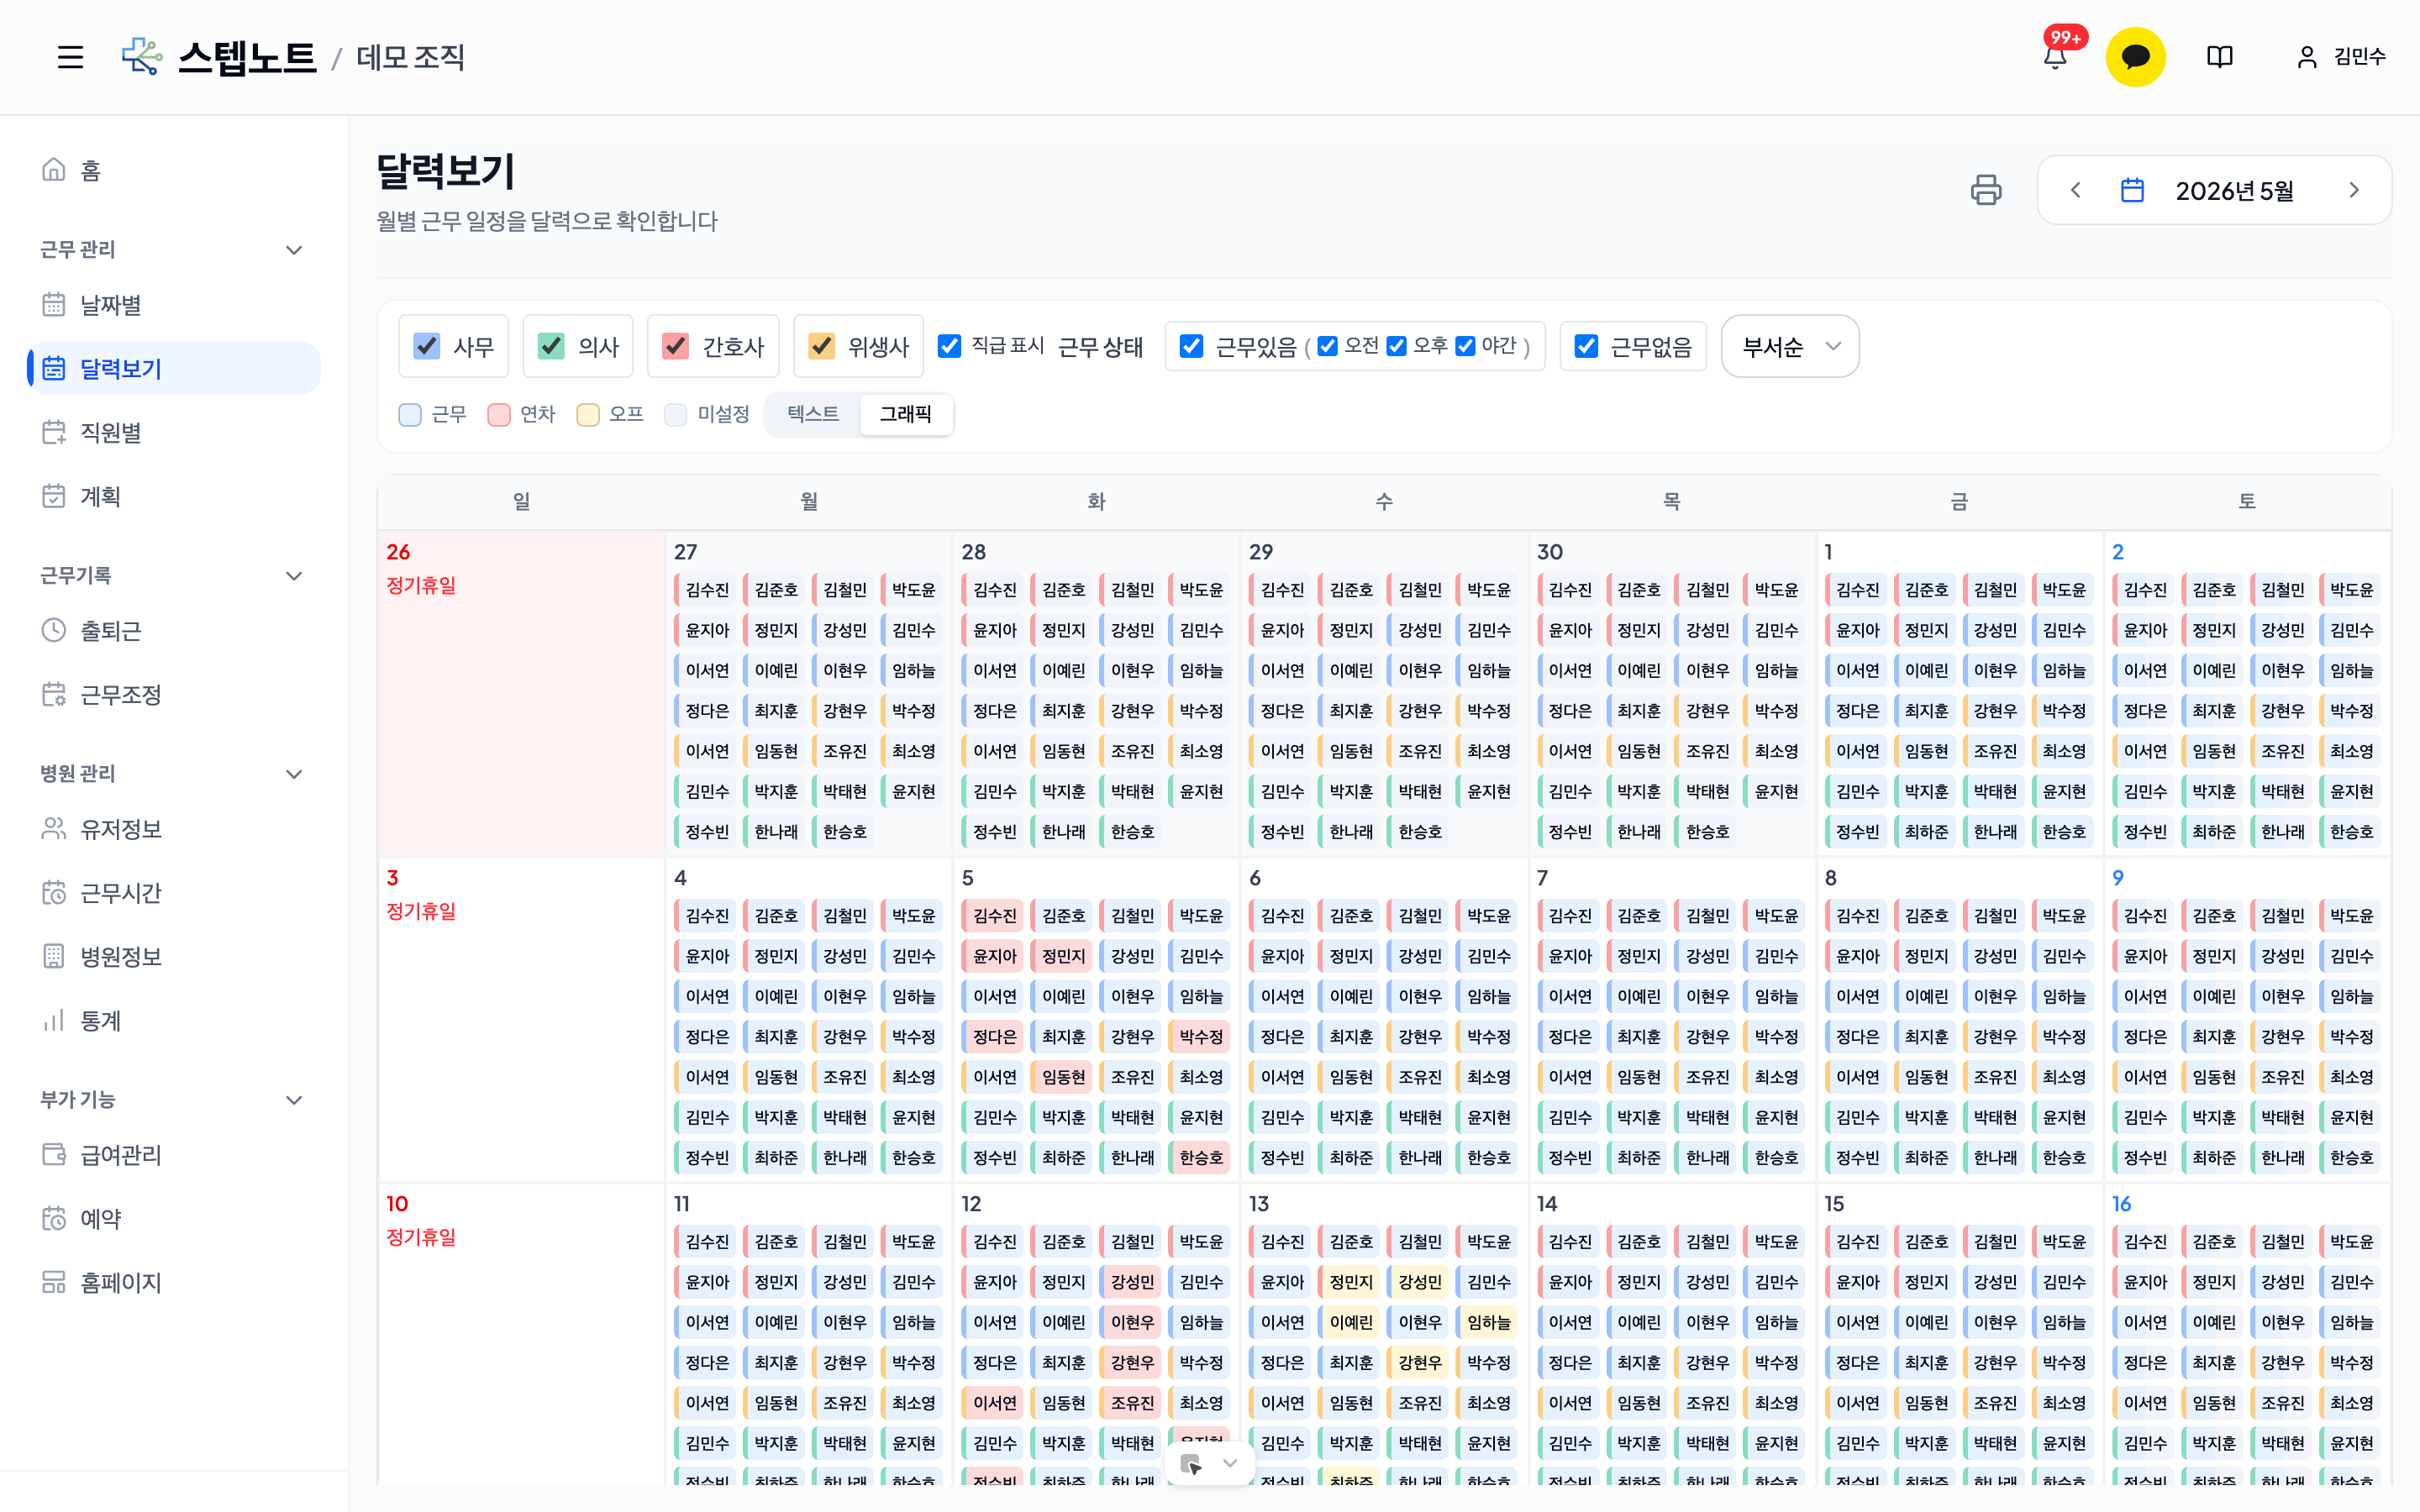
Screen Layout (Overview Tab)
- Built-in month navigation: move between months with the ← → buttons
- Department filter sync: the department filter is automatically synced with the By Date tab
- Show positions toggle: located next to the department filter — applies to both Overview and Detailed
- Legend: Shift (blue) · Annual leave (green) · Off (orange) · Not set (gray) · (Night) night-shift weekdays — shown as a collapsible legend on mobile, and printed identically in the print preview
Night Labels in Weekday Headers
Weekdays with night shifts configured automatically show (Night) in the calendar's weekday header.
Example: Tue (Night) — when Tuesday is a night-shift weekday
Night-shift weekdays are configured in Work Hours tab → weekday working hours.
Shift Filters
You can filter which members appear on the calendar by time slot.
| Filter | Description |
|---|---|
| Has shift (all) | Members with a shift in any time slot |
| Morning | Show morning workers only |
| Afternoon | Show afternoon workers only |
| Night | Show night workers only |
| No shift | Show members with no shift on that date |
- Clicking the
Has shiftcheckbox turns the Morning/Afternoon/Night sub-items on and off together - If only some sub-items are selected, the parent checkbox shows a partially selected (indeterminate) state
Printing the Calendar
-
Click the print icon button at the top right
-
The screen switches to an inline preview
Overview tab print options:
- Adjust the paper size (width × height in mm)
- Choose Shrink to one page / Print across multiple pages
Detailed tab print options:
- Choose whether to show the memo area in each date cell
- Font size adjustment — use the stepper buttons to increase or decrease the printout's font size step by step
- Week-based page breaks — pages break on calendar week (Mon–Sat) rows rather than in the middle of date cells, so a week is never split across pages
- The preview width matches A4, so it corresponds to the actual number of printed pages
- Dates with night shifts show (Night shift) alongside the date/weekday label
-
Click the "Print" button
3.11 Cautions and Tips
Cautions
-
Check remaining annual leave
- Always check the remaining balance before entering annual leave
- If it is insufficient, grant annual leave in Member Management first
-
Be careful with Edit Mode
- Edits to confirmed schedules are always recorded with a reason
- Turn Edit Mode off when you are done to prevent mistakes
- Edit history cannot be deleted, so make changes carefully
-
Plan submission deadline
- Please submit next month's plan by the end of the month whenever possible
- Plans appear in the By Member tab only after the administrator confirms them
Tips for Efficient Use
-
Use auto-fill
- Setting up weekly patterns in advance lets you enter plans quickly with auto-fill
- Pattern setup: Member Management → select a member → Weekly Pattern
-
Administrator bulk confirmation
- Once every member has submitted, process everything at once with the "Confirm All" button
-
Manage by department
- Use the department filter to review and manage schedules per department
- You can grasp each department's shift status at a glance
-
Use the edit history
- Manage changes transparently through the edit history
- In case of a dispute, the edit history serves as supporting evidence
3.12 Attendance & Calendar UX Improvements (Updated 2026-05)
All shift-related screens (Plan, By Member, By Date, Calendar View, and the Work Hours tab) have been aligned to the organization design system (semantic tokens).
- Consistent status colors: The standard shift = blue / off = orange / annual leave = green / not set = gray is applied identically across all screens, including Plan, By Member, By Date, Calendar View, and My Schedule. (Updated 2026-06 — the annual leave color, previously different per screen, has been unified to green)
- Dark mode support: When switching between light/dark themes, all badges, cells, legends, and toggle buttons keep the same meaning and display with appropriate brightness.
- Unified focus/hover states: Focus rings on input fields, checkboxes, radio buttons, and toggle buttons match the organization's primary color, improving keyboard accessibility.
- Print output: Legends, cards, and badges in the graphic/text print previews use the same semantic colors, providing a consistent look even when saved as PDF.
Clock In/Out Records Tab — Status Visual Language (Updated 2026-05-29)
Status indicators on the clock in/out records screen have been improved to combine color + icon + text.
| Status | How it is shown |
|---|---|
| On time | Calm default text (following the principle of highlighting exceptions only) |
| Late | ↑ arrow icon + yellow text + "Late N min" accessibility label |
| Left early | ↓ arrow icon + yellow text |
| Not recorded | Italic type + scheduled time shown as (09:00) — clearly distinguishing absence (not recorded) from days off |
| Off / Annual leave | Gray — no shift on that date |
Added features:
- Today strip: The number of members clocked in / not clocked in / late today is shown at the top of the administrator screen.
- Legend on mobile: The legends for clock in/out records and Calendar View are now shown on mobile too (previously desktop-only).
- Night labels on the calendar: Night-shift weekdays are shown as
(Night)in the weekday header at the top of the Calendar View tab.
Late arrivals and early departures are distinguished by icons as well as color, so they remain identifiable in color-blind and black-and-white environments.
3.13 Mobile Readability Improvements (Updated 2026-06)
In response to feedback that work schedules were hard to read on mobile, the mobile layouts of key screens have been improved.
My Schedule Calendar (Member Mode)
- Icon-only cells: Instead of truncated text in narrow mobile cells, only the time-slot icons (☀️ morning / 🌅 afternoon / 🌙 night) are shown. Long-press a cell, or view on desktop, to see the text labels as well.
- Collapsible legend at the top: A legend has been added above the calendar so you can immediately check the meaning of colors (shift / off / annual leave) and time-slot icons. Tap to collapse and expand.
Administrator Calendar and Other Screens
- The administrator Calendar View → Overview calendar also shows a collapsible legend on mobile.
- The mobile layouts (font sizes, spacing, horizontal table scrolling) of the clock in/out records, schedule, statistics, business analytics entry, work board, messenger, reservations, and settings screens have been tidied up across the board.
- The By Member tab switches from the grid to a dedicated editing screen on mobile — see 3.4 "Editing on Mobile".
Unified Annual Leave Color
Annual leave used to be shown in a different color on each screen (personal calendar = green, administrator Overview calendar = red, By Date = orange), but it is now unified to green on all screens. Orange always means off, and blue always means shift.
3.14 Statistics Tab — Analyzing Attendance
Audience: Clinic directors, clinic administrators
Click the "Statistics" tab in the sidebar to analyze your organization's attendance data from multiple angles.
Shared Period Filter Bar
A period filter bar appears at the top of every statistics sub-tab.
| Control | Description |
|---|---|
| This month | Automatically sets the 1st through the last day of this month |
| Last month | Automatically sets the full period of last month |
| This year | Automatically sets January 1 through December 31 |
| Start date / End date | Enter the dates you want directly |
| Apply button | Applies the manually entered dates |
- Pressing a preset button (This month/Last month/This year) also syncs the date input fields.
- The preset button matching the currently applied period is highlighted in a darker color.
- When entering dates manually, enter both the start and end dates, then press the "Apply" button.
Changing the period automatically reloads that tab's data.
3.14.1 Dashboard Tab
Check your organization's key attendance metrics at a glance.
KPI Cards
| Card | Description |
|---|---|
| Late days | Total number of late days across all members in the selected period |
| Late minutes | Total late time (minutes) across all members |
| Extended shifts | Total extended-shift time across all members |
| Members to watch | Number of members with frequent lateness or early departures |
Lateness Trend Chart
Shows the lateness rate over the last 6 months as a line chart. You can see whether lateness spiked in a particular month or is improving.
Members-to-Watch Table
Lists members with frequent lateness. Click a member's name to jump straight to the Individual Attendance Analysis tab.
Overtime Analysis (New)
Below the KPI cards and the members-to-watch table, a "⏱ Overtime Analysis" section follows. It lets you break the "Extended shifts" number from the KPI cards above down further by weekday, date, and member.
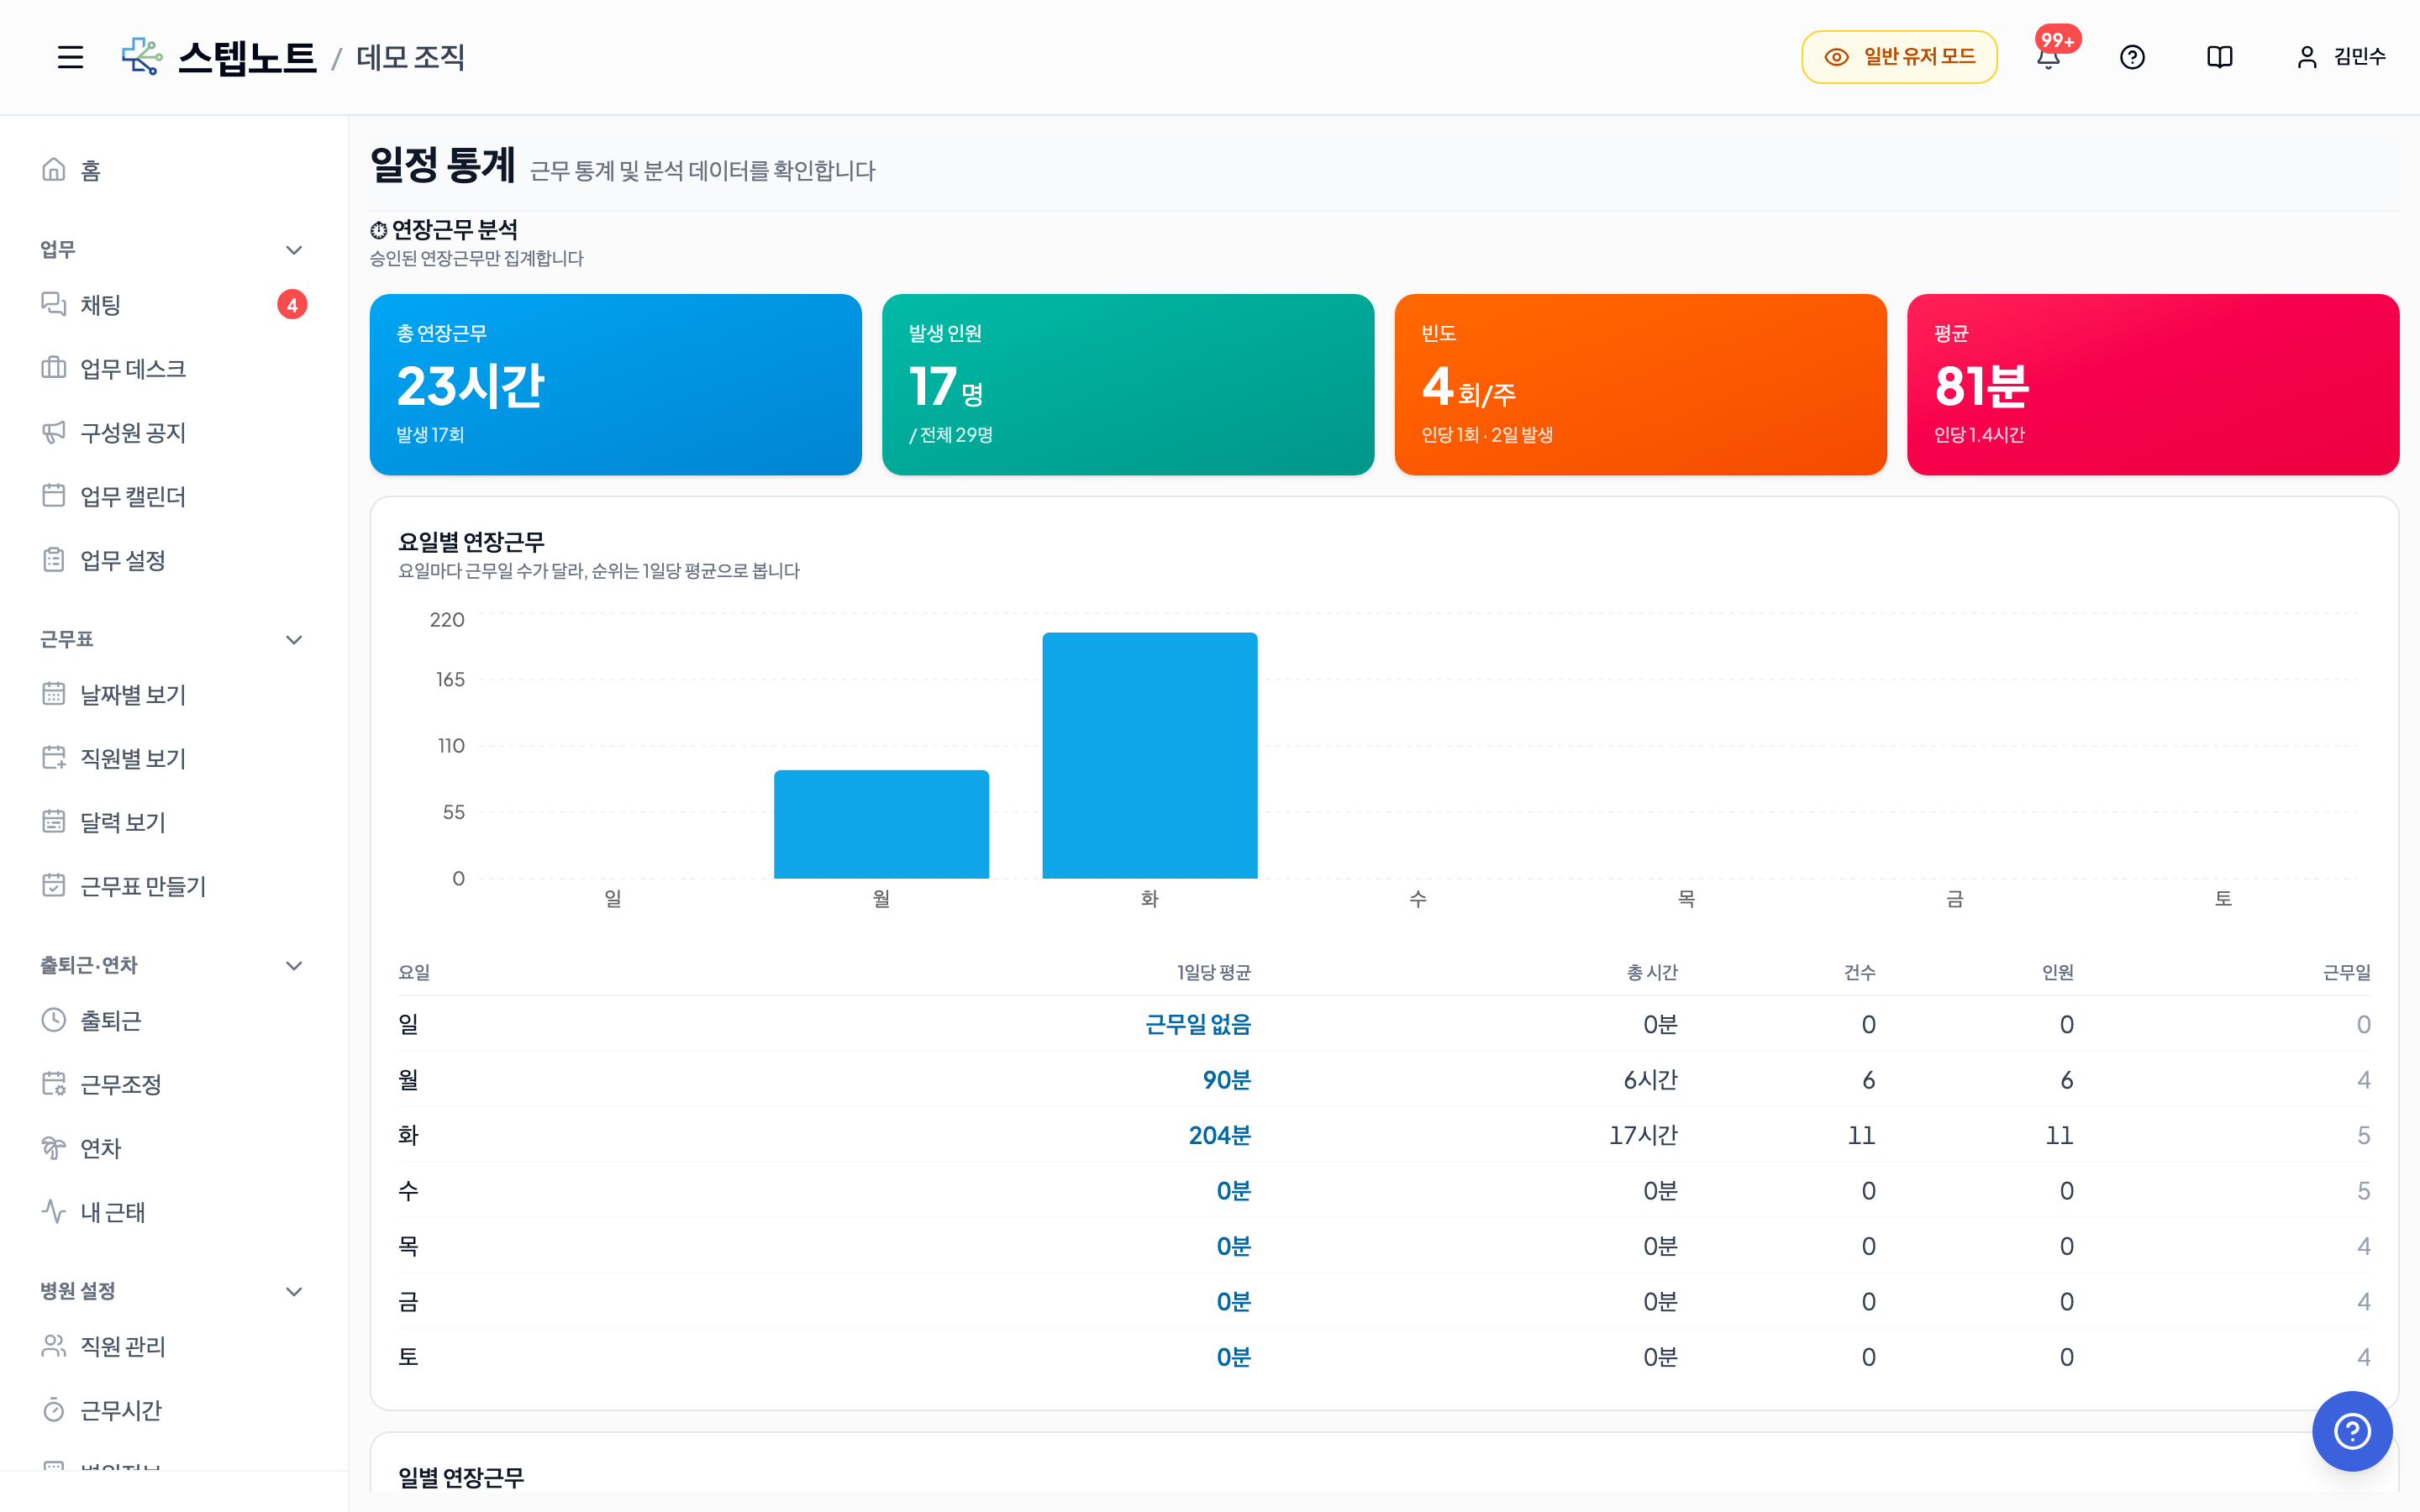
| Component | Details |
|---|---|
| 4 KPI cards | Total overtime (occurrence count) · members with overtime (/total members) · frequency (occurrences per member per week) · average (per case, per member) |
| Overtime-by-weekday chart | The bars show the average per weekday occurrence — this compares weekdays fairly, since a Monday that occurred 5 times in the period shouldn't outweigh a Wednesday that only occurred twice by using totals. The table below also shows the total, count, member count, and number of working days per weekday |
| Overtime-by-date chart | Days with no occurrences are filled in as 0, so you can see at a glance whether overtime clustered on specific dates |
| Top overtime members table | Ranks members by occurrence count, total time, and average time. Click a row to jump to that member's Individual Attendance Analysis tab |
💡 This section only counts approved overtime (from approved work adjustments). Pending or rejected overtime requests are not included.
💡 The "Members to Watch" table is based on lateness, so members with heavy overtime don't show up there — lateness is something to fix, while overtime is a workload-distribution issue, which is why they're tracked in separate tables.
3.14.2 Attendance Summary Tab
Summarizes attendance for the selected period by person or by date.
Shared Filters
| Control | Description |
|---|---|
| By person / By date tabs | Switch the view mode |
| Exclude former/inactive checkbox | When checked, former members and inactive members are excluded from the totals (default: excluded) |
| Department filter | View specific departments only |
By-Person View
Each member is shown as a row.
| Column | Description |
|---|---|
| Name | Member name |
| Late days | Number of late days in the period |
| Late minutes | Total late time in the period (minutes) |
| Extended time | Total extended-shift time |
| Reduced time | Total early-departure/reduced-shift time |
| Leave granted | Annual leave days granted in the period |
| Leave used | Annual leave days used in the period |
| Leave remaining | Current remaining annual leave |
| Unpaid leave | Unpaid leave days in the period (not deducted from annual leave, see 3.6) |
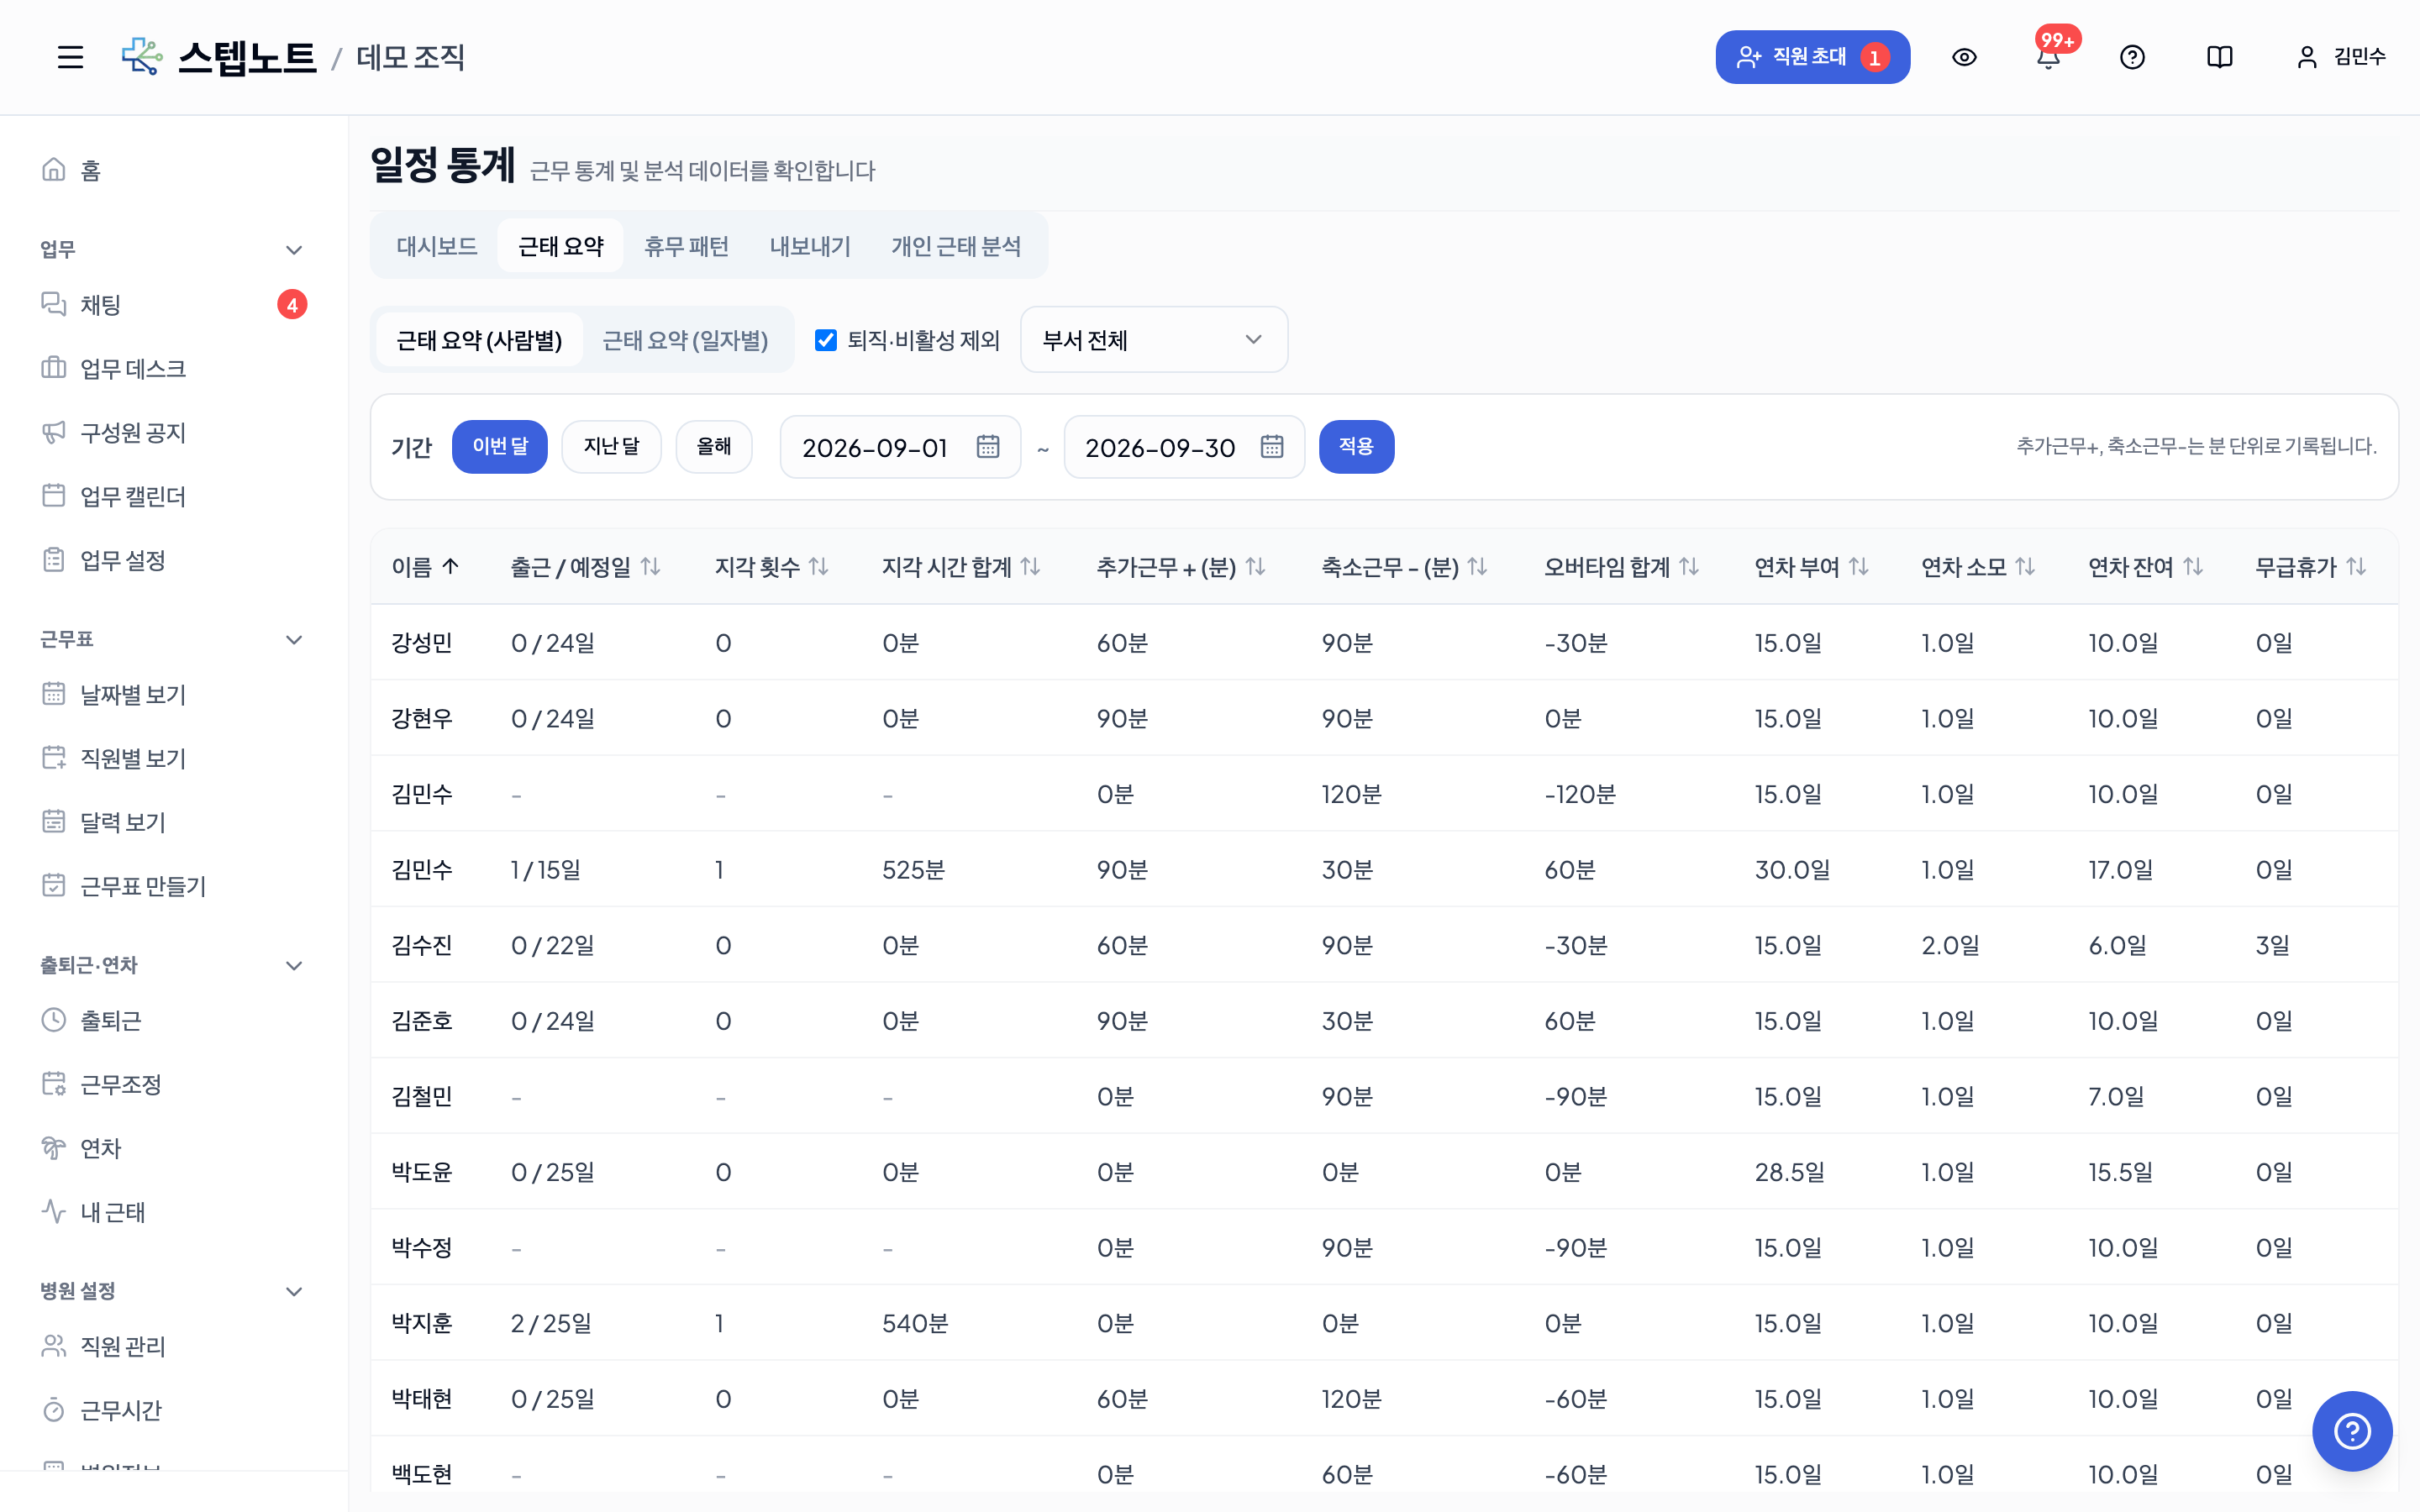
- Click a column header to sort by that column in ascending/descending order.
- The file from the Export tab also includes an "Unpaid leave (days)" column.
By-Date View
Shows dates as rows and each member's attendance status (late, extended, off, annual leave) as columns. Useful for spotting whether issues cluster on particular dates.
3.14.3 Time-Off Patterns Tab
Analyzes members' off and annual leave usage patterns.
View Modes
| Tab | Description |
|---|---|
| Compare members | Compare each member's off/annual leave days side by side |
| By weekday | Shows how offs/annual leave are distributed across weekdays |
- The default period is set to the entire current year.
- You can freely change the period with the period filter bar.
- Unpaid leave is not included in the off/annual-leave patterns — check unpaid-leave days in the Attendance Summary tab instead.
3.14.4 Individual Attendance Analysis Tab
Select members one at a time to analyze detailed monthly and yearly attendance patterns.
- Clicking a member to watch in the Dashboard tab navigates here with that member preselected.
- You can review monthly lateness, working-hour patterns, and annual leave usage trends per member.
3.15 Chart Program Paste Memo (Not in the Sidebar)
This feature is for clinics that manually copy the day's workers and members on leave into their own chart program (EMR) every day. It does not appear in the sidebar menu; you must enter the URL directly in the address bar: your-stepnote-url/organization/{organizationId}/chart-memo
- Choose the month and the departments and their order (drag to rearrange), and cards are generated per date with a line of that day's workers (separated by
/in department order) and a line of members off for the full day - Use the copy button next to each line to copy that line only — because line breaks get lost when pasting into chart programs, copying is deliberately done line by line
- The department selection and order are saved on this device only (not on the server)
- Only organization members can access it, so knowing the URL does not expose another organization's data