2. Managing members
2. Managing Members
Audience: Directors, clinic admins
Purpose
Manage the details of staff added to your organization, set up departments, and register or convert staff without an account. Granting annual leave and checking balances is done in the Attendance & leave → Annual leave tab (see 2.3).
2.1 Viewing the Member List
- Open the member list
- Click Clinic Settings → Staff Management in the left menu
- Everyone in your organization — active members, external collaborators, and so on — is shown in tables grouped by type
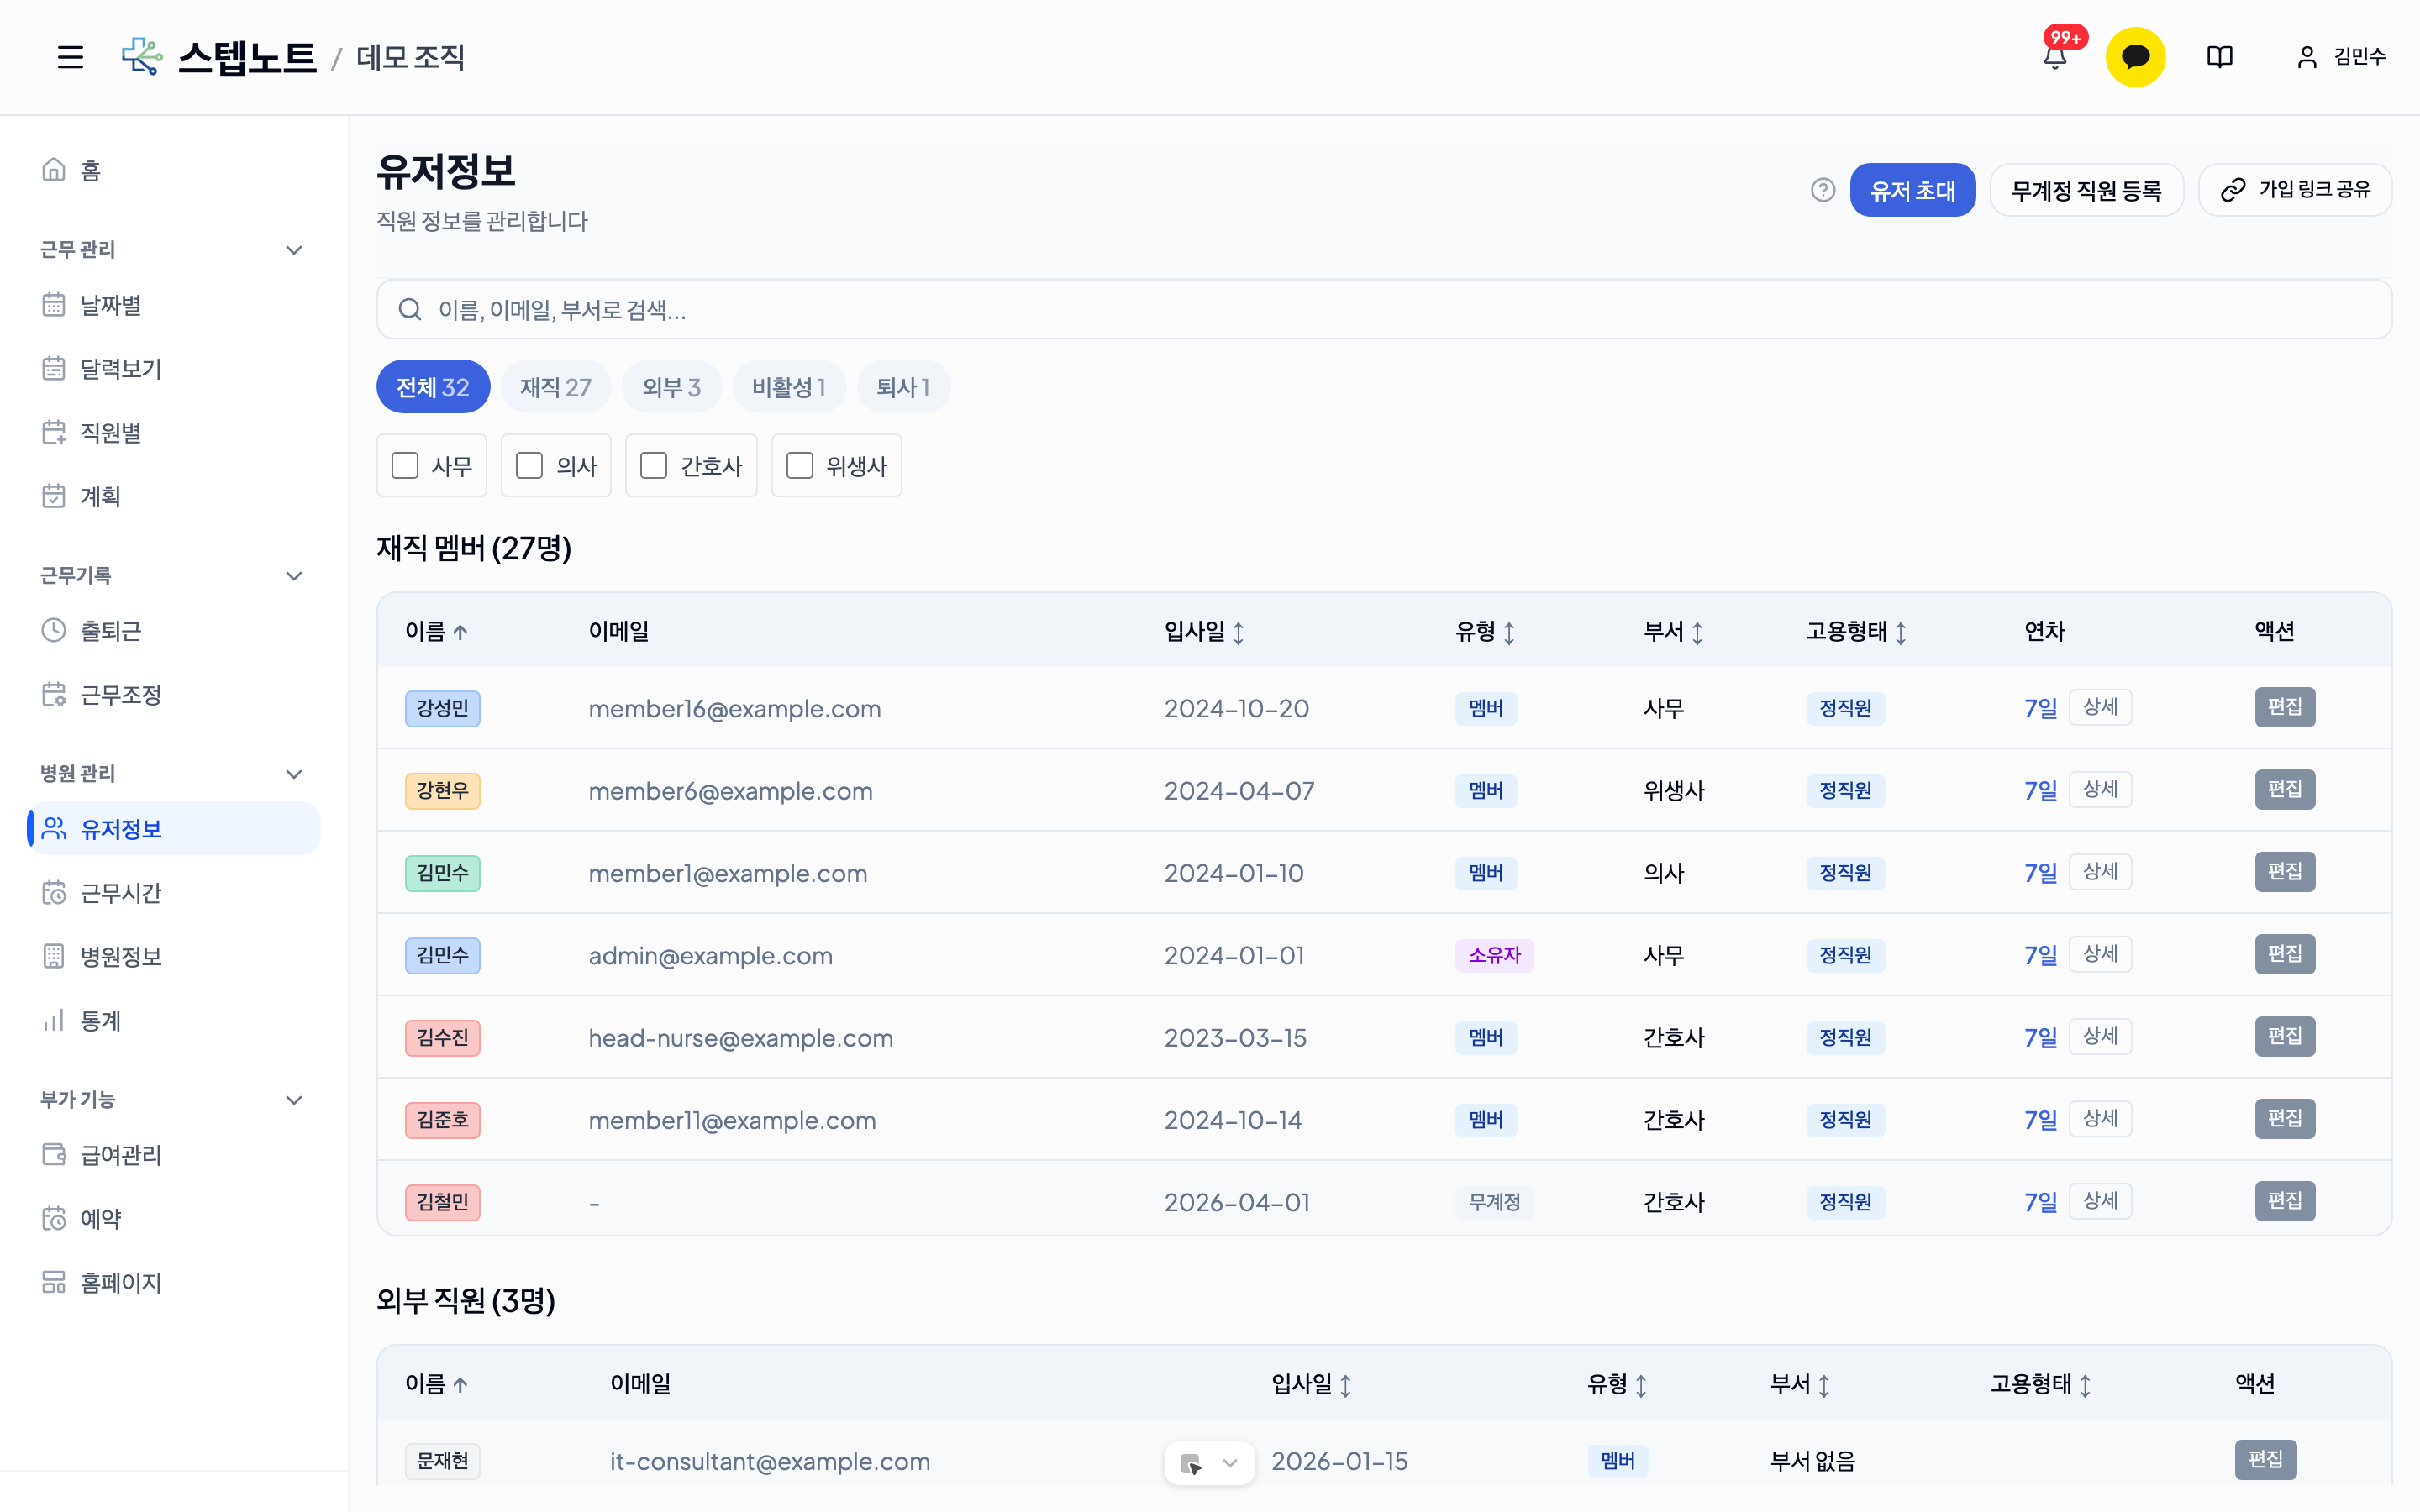
- Displayed information
- Name: the staff member's full name — shown in their assigned department's color
- Email: a reachable email address (
-for staff without an account) - Hire date: the date they started work
- Tenure: years of service calculated automatically from the hire date (e.g., 3rd year)
- Type: the staff category — color-coded backgrounds make it easy to tell apart
- Owner (purple): the organization owner
- Admin (green): a regular admin
- Member (blue): a regular staff member
- No account (gray): a staff member without an account who doesn't use the app — registered and managed directly by an admin
- Department: the assigned department name
- Employment type: Full-time / Part-time — affects how work hours are calculated and shown in statistics
- Actions: the Edit button
An
*after a name marks a member who is exempt from clock in/out records. See the question mark (?) in the legend at the top right of the table for an explanation.
Annual leave balances are checked in the Attendance & leave → Annual leave → Leave Overview tab, not in the member list (see 2.3).
💡 What is staff without an account? Part-time or contract staff who don't use the app, registered directly by an admin. The default is explicit-entry mode (only items the admin enters appear on the schedule); you can switch to auto-fill mode in the modal if needed. See 2.6 and 2.7 for details.
- Search, filter, and sort
- Use the search box at the top to find someone by name / email / department
- Below it, use the All · Active · External · Inactive · Resigned chips to view only the group you want. The number on each chip is that group's headcount
- Check department chips as well to layer department filters on top
- Click the ↑↓ icons in the table header to sort by name, hire date, tenure, type, department, or employment type
2.2 Editing Member Information
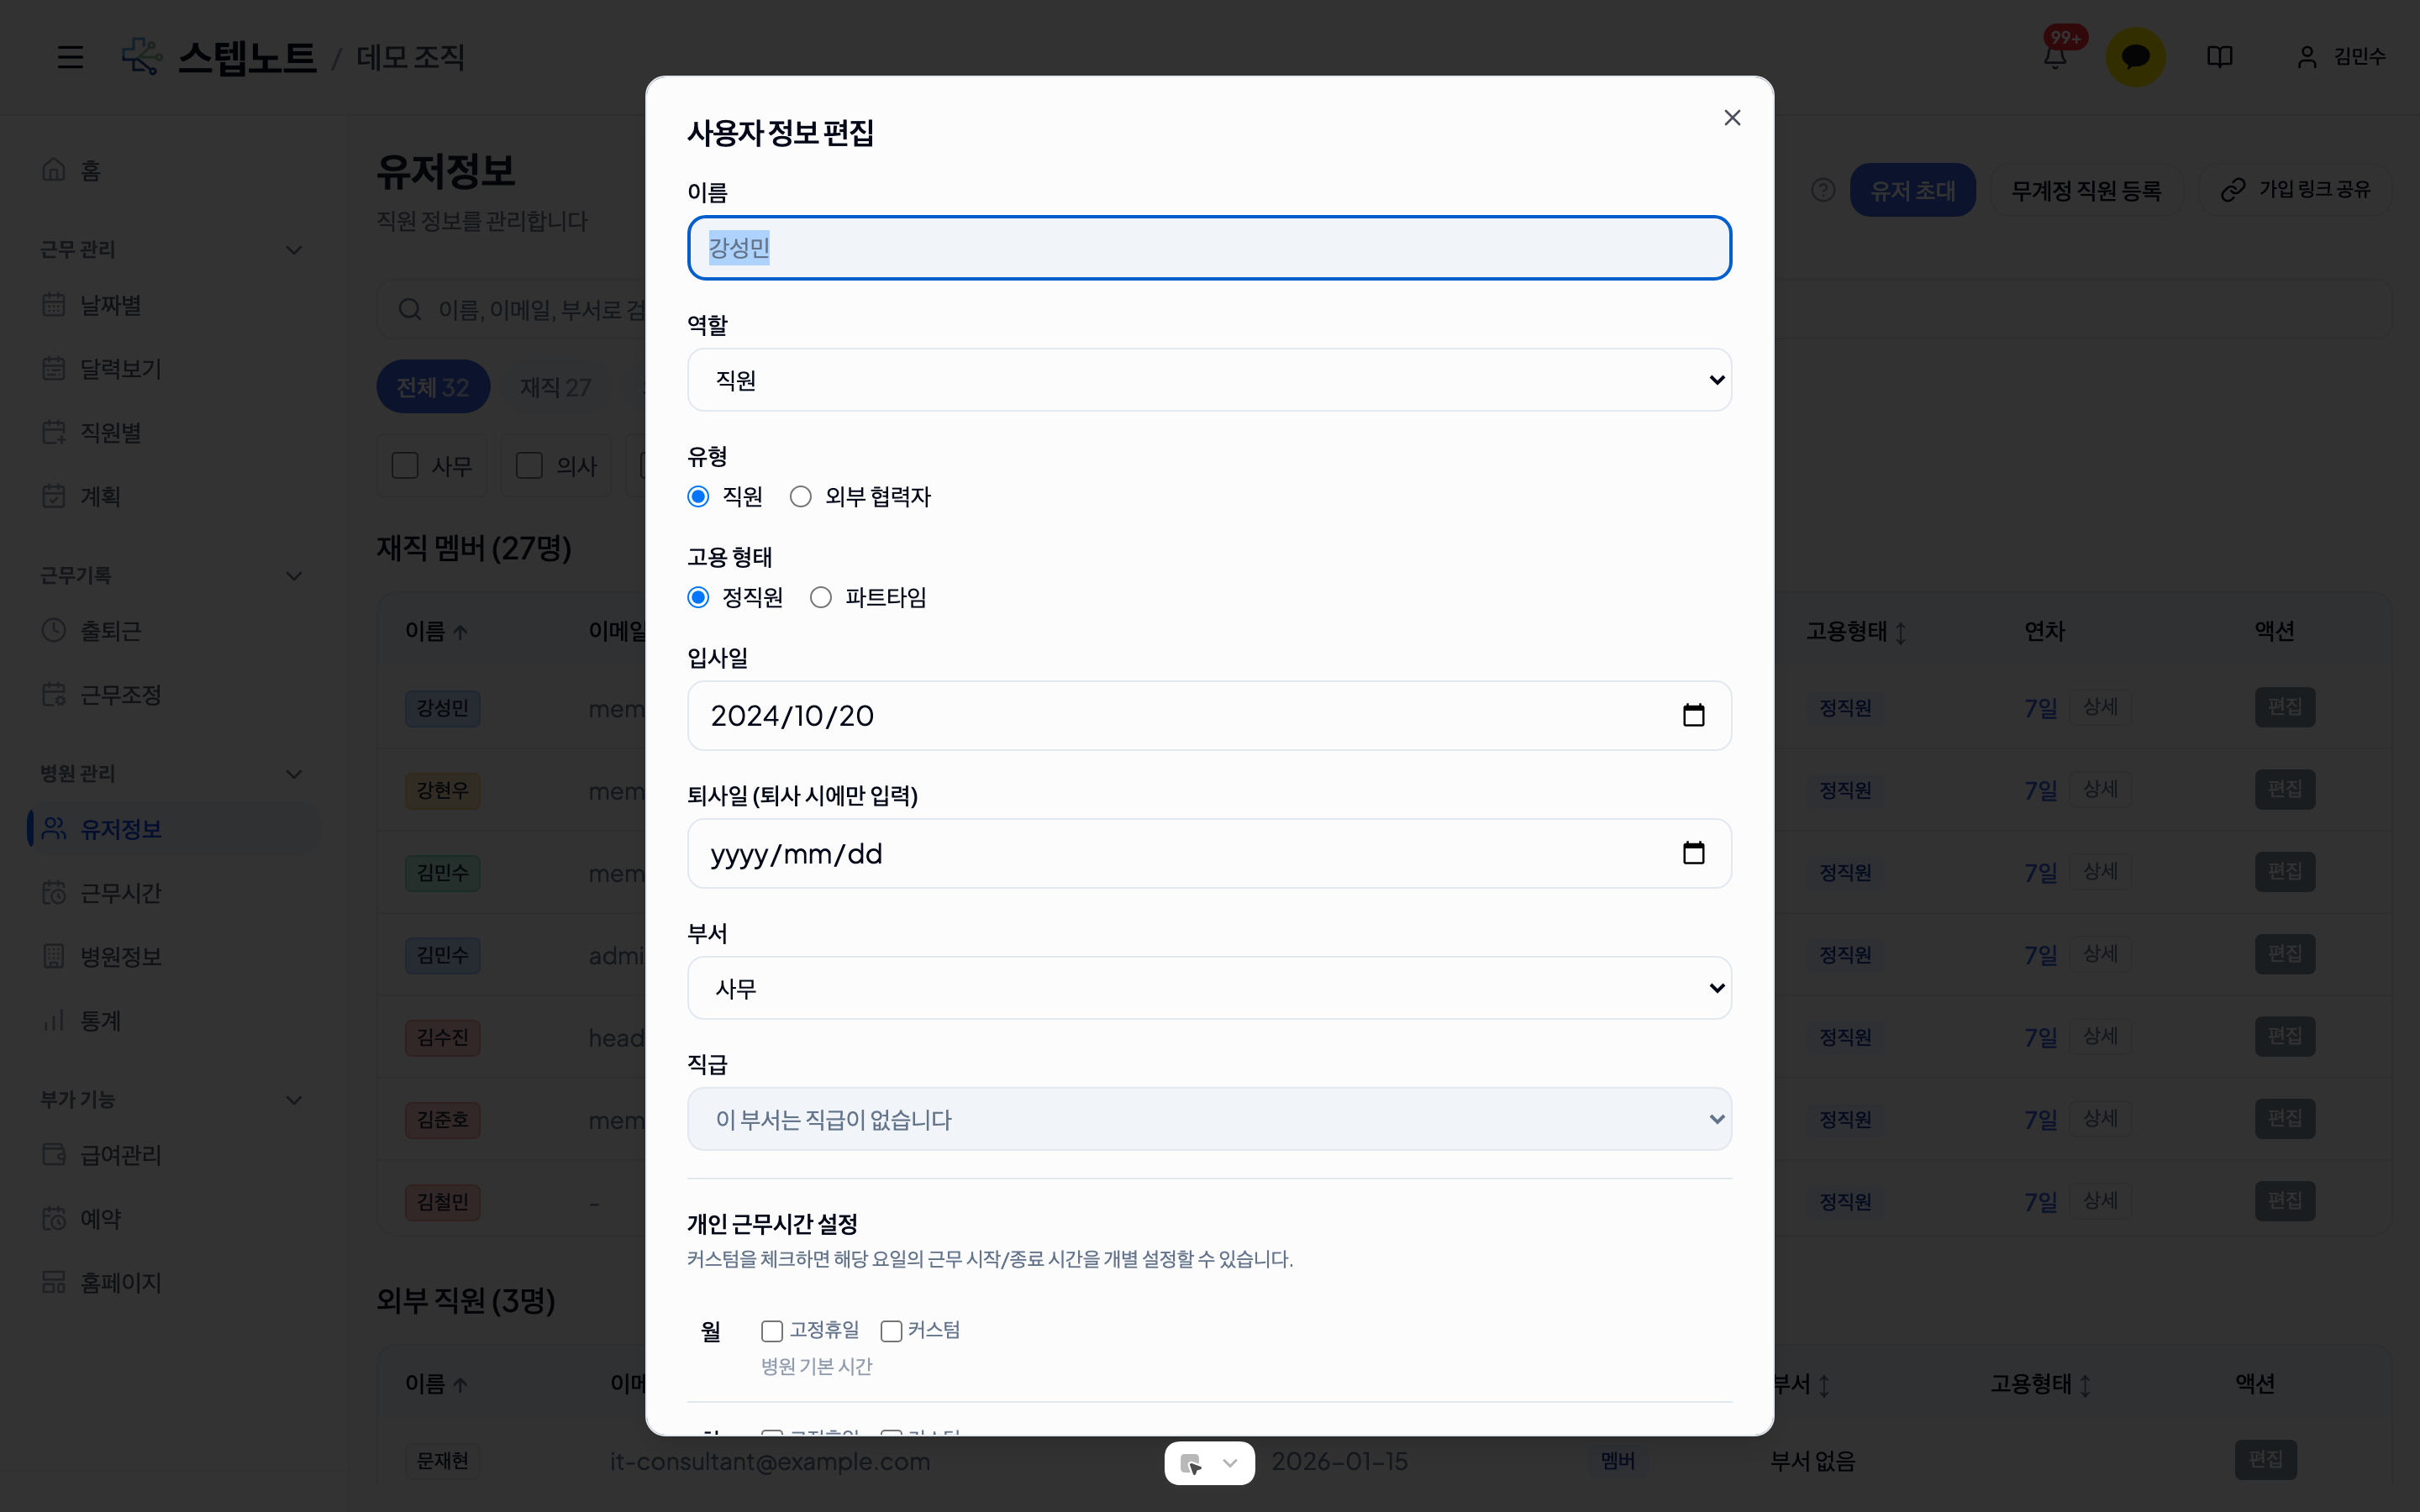
- Open the edit modal
- In the member list, click the "Edit" button for the staff member you want to update
-
Editable information
-
Hire date (work start date)
- Set the hire date with the date picker
- This becomes the reference date for annual leave calculations
-
Resignation date (work end date)
- Enter the date when someone resigns
- Leave it blank to keep them shown as currently employed
-
Role change
- Staff (Member): regular permissions
- Admin: management permissions
- Owner cannot be set from this dropdown. Each clinic always has exactly one Owner, and ownership can only be transferred with the "Transfer ownership" button in another member's edit modal (a confirmation step is required). In the Owner's own edit modal, the role is shown fixed as "Owner".
-
Payroll permission (New)
- The "Grant payroll admin permission" checkbox lets you grant or revoke payroll access (org-wide payroll settings and issuing statements) for this member individually, regardless of their role
- Example: even a Member can be given payroll access alone, without making them an Admin, if they handle payroll for the clinic
- When explicitly granted, an "Added" badge appears next to the checkbox
- The Owner always has every permission regardless of this setting
-
Department assignment
- Choose a department from the dropdown
- New departments must be created in organization settings first
-
No clock in/out records
- Unchecked (default): clock in/out records, lateness and absence detection, and attendance-related notifications work as usual
- Checked: no clock in/out records are created, and clock-in/out reminders and other attendance notifications are not sent. Work scheduling (Shift Planner, shift adjustments) and annual leave still work normally, and they appear on the work schedule as usual. On the statistics and attendance status screens, the member still appears in the list, but items that aren't tracked — like clock-ins — show as "N/A" instead of 0
- Example use: a director or doctor who doesn't clock in/out — a member who uses schedules and annual leave but doesn't record attendance
- Only admins (Owner/Admin) can change this, and it takes effect immediately. If you check it and later uncheck it, past records and statistics from the recording period are preserved
-
Schedule auto-fill (shown for staff without an account only)
- Explicit entry only (default): only shifts, offs, and annual leave entered by the admin appear on the schedule. No auto-fill
- Auto-fill by pattern: weekday shifts are filled in automatically based on the clinic and personal patterns. Use for staff without an account who work a regular schedule
- The radio selection is saved immediately
- Regular staff (app users) are always locked to auto-fill, so this toggle is not shown for them
-
Account conversion (shown for staff without an account only)
- Use the "Convert to account staff" button at the bottom of the modal to issue a login account to staff without an account, converting them to a regular staff member
- See 2.7 for details
-
-
Save
- Click the "Save" button to apply your changes
2.3 Managing Annual Leave
📌 This screen has moved. The annual leave column and "Details" button that used to be in the member list are now consolidated in the sidebar's "Attendance & leave → Annual leave" tab. Granting/deducting annual leave, viewing grant/usage/reservation/expiry history, and the all-staff overview are all managed in this one tab.
- Click Attendance & leave → Annual leave in the sidebar. With leave view permission (leave:read), you'll see 4 subtabs — My Leave / Leave Overview / Monthly Overview / Usage History — and admins land on the Leave Overview subtab by default. Annual leave is tallied by each staff member's 1-year contract period based on their hire date, so staff with no hire date show "Hire date required" in the table — you can fill it in right there with the Enter hire date button, while editing an already-entered hire date is done in the member edit modal on the Members tab (2.2), not on this screen.
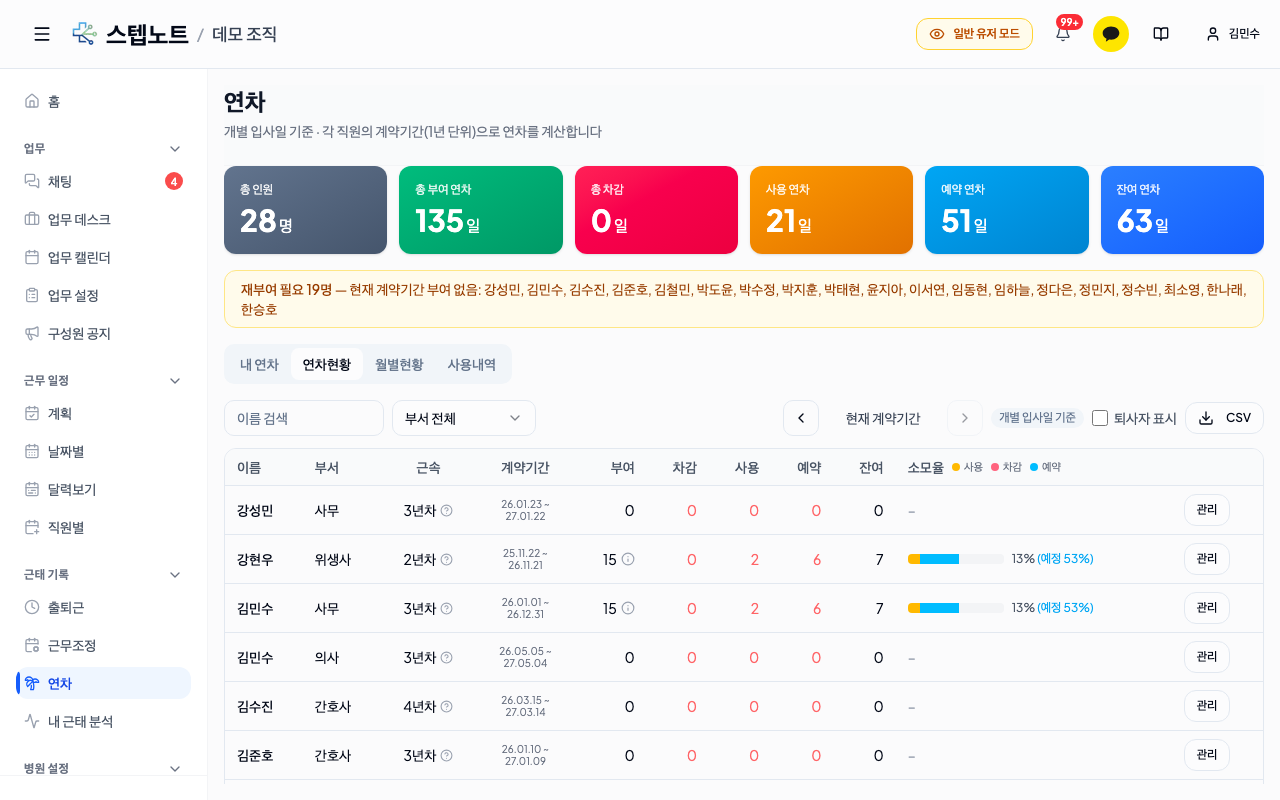
- In the Leave Overview table, with leave management permission (leave:manage), use the Manage button at the end of a row (or click the row) to open the leave history modal, then use the Grant/Deduct leave button inside it to open the grant/deduct modal.
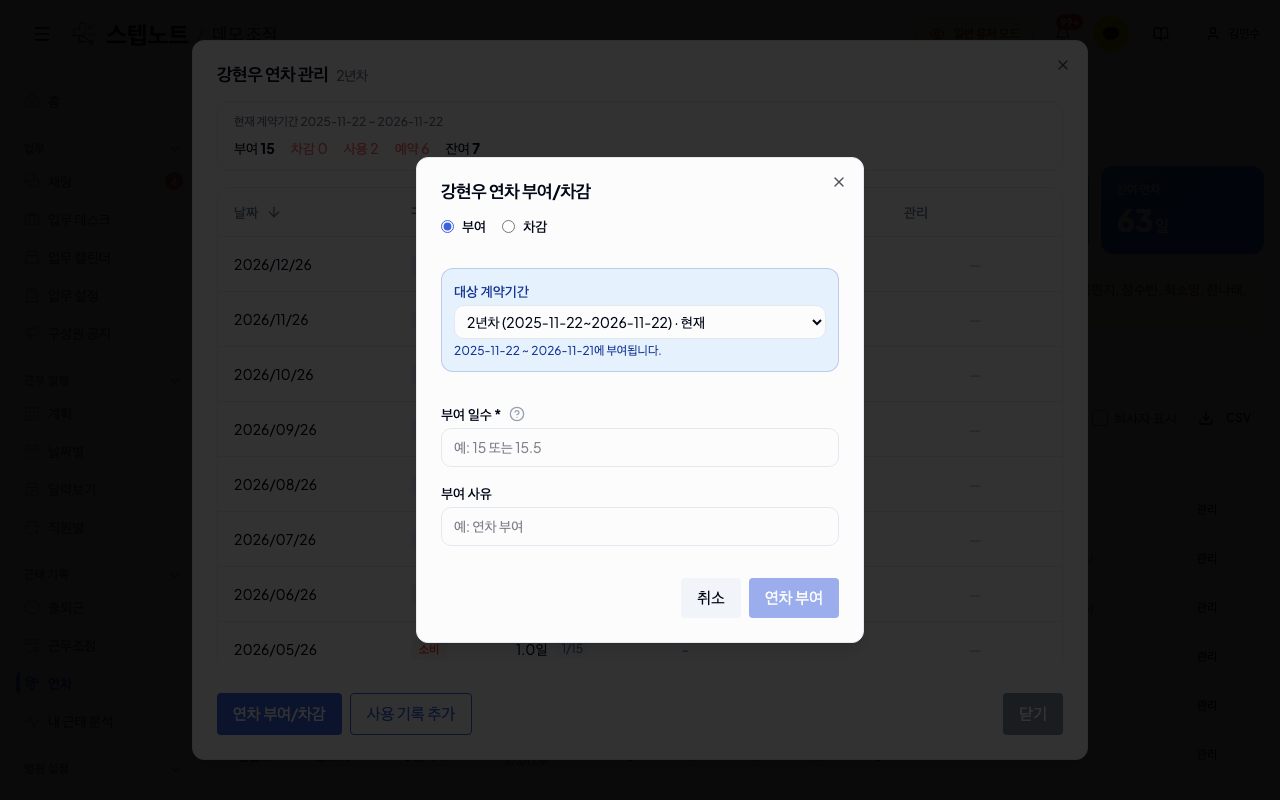
- Target contract period: choose a period from the list calculated from the hire date, and the effective and expiry dates are set automatically. You can also pick a past period for retroactive grants or settlement deductions.
- Days granted: enter in 0.5-day increments (e.g., 2.5 days)
- Switch to the "Deduct" radio at the top to reduce leave with negative days on the same screen (a reason is required).
- Only for staff without a hire date do you enter the effective and expiry dates manually. Unused days past their expiry date are automatically excluded from the balance.
- Fix mistaken grants/deductions with Edit or Delete on that row in the leave history modal, and record past leave usage missing from the work schedule with the Add usage record button.
For detailed grant/deduct steps, the grant detail popover, balance-rate display, per-subtab permissions, CSV download, and more, see Managing your staff's annual leave.
2.5 Managing Departments and Positions
Open Clinic Settings → Clinic Info and you'll find 3 subtabs at the top: Clinic Info / Department Management / Attendance settings. Departments and positions are managed together on the Department Management subtab. Each department appears as one row, in the order color dot · department name · position summary · action icons.
Creating a Department
- Create a new department with the "+ Add department" button
- Set the department name and its signature color
- If you don't have any departments yet, a hint is shown: "e.g., Treatment Room · Hygienist · Administration"
Reordering Departments
- Drag the ⠿ handle on the left of a row to change the order
- The new order is saved and reflected everywhere — the sidebar filter bar, member dropdowns, and more
Editing a Department's Name and Color
- Click the pencil icon on the right of a row to open the edit modal
- You can change the name and color together in one modal
- Saving is blocked if a department with the same name already exists
- Deleting is done with the trash icon next to it
Managing Positions
- Press the arrow on a department row to expand or collapse its position list. Departments that have positions are expanded by default
- On a collapsed row, positions are summarized as chips (up to 3 plus a count of the rest); departments with no positions show "Department without positions"
- After expanding, type a name into the single-line input and press "Add position" to register it immediately
- Position rows can also be reordered by dragging the handle, and edited or deleted with the pencil and trash icons
- Deleting a position clears that position from any members who held it (the members themselves are kept)
Assigning Departments
- Choose a department when editing member information. You can also add a department on the spot with "+ Create new department" inside the dropdown (a color is assigned automatically; change it later in Department Management)
- A position can be selected only after choosing a department first
- In schedule management, members are color-coded by department
2.6 Registering Staff Without an Account Directly
Admins can directly register staff who don't use the app — contract doctors, part-time clinical staff, and so on — and manage their attendance.
How to Register
- Go to Clinic Settings → Staff Management → click the "Register staff without an account" button at the top right (admins only)
-
Enter registration details
- Name (required): enter the staff member's full name
- Expand "Additional info" at the bottom for optional fields:
- Department
- Employment start / end date
-
Click the "Register" button
After Registering
- In the member list, the Type column shows a gray "No account" label
- The email field shows
-, and the person cannot sign in to the app - The admin enters and manages this staff member's clock in/out, schedule, and annual leave directly
How Schedules Work for Staff Without an Account
Staff without an account are in explicit-entry mode by default. You can switch modes with the "Schedule auto-fill" toggle in the member edit modal.
| Mode | Weekday shift auto-fill | Days with no entry | Example use |
|---|---|---|---|
| Explicit entry only (default) | None | Left blank | Irregular part-timers, on-call doctors, etc. |
| Auto-fill by pattern | Yes (clinic and personal patterns applied) | Filled with pattern-based shifts | Part-timers who work the same weekdays every week |
💡 Which mode when? If someone without an account works irregular days, use explicit entry only — enter each workday manually as a "one-day shift". If they come in on the same weekdays regularly, switch to auto-fill to cut down on data entry.
💡 When is this useful? If you bring non-regular staff you've been tracking in a spreadsheet into StepNote, you can handle everything — statistics through payroll calculation — in one place.
2.7 Converting Staff Without an Account to App Users
When a directly registered staff member later wants to use the app themselves, you can convert their account while keeping their existing attendance and annual leave data.
How to Convert
- On the Staff Management screen, click the "Edit" button on the row of the staff member without an account to open the member edit modal
- In the "Account conversion" area at the bottom of the modal, click the "Convert to account staff" button
- This button appears only for staff without an account
- In the contact entry modal, choose an invite method:
- Phone number: sends the invite link via KakaoTalk notification message/SMS
- Email: sends the invite link by email
- Click "Send invite" → the invite appears as pending in the invite status list
- The staff member accepts the invite link → signs up with their preferred login method (Kakao, email, etc.)
After Conversion
- The Type column changes from gray "No account" to blue "Member"
- Previously recorded clock in/out, schedule, and annual leave data carries over as-is
- Once confirmed, weekday shifts switch to the auto-fill mode
2.8 Managing Inactive Members
View resigned or deactivated staff separately using the "Inactive" and "Resigned" filter chips above the list.
- Pressing a chip shows only that group (active members and invite status are hidden)
- Both admins (Admin) and owners (Owner) can restore someone with the "Reactivate" button
- Resignation is processed with the "Resign" button in the Danger area at the very bottom of the member edit modal. A member is treated as employed through the resignation date itself
Things to Keep in Mind
- Once granted, annual leave cannot be deleted (usage history is preserved)
- If you granted leave by mistake: switch to the "Deduct" radio at the top of the grant modal in the Annual Leave tab and enter negative days to adjust
- Enter the resignation date accurately so the person is excluded from schedule planning
- Directly registered staff without an account cannot access the app, so admins must enter their clock in/out records themselves