Settle payroll based on attendance records
When you want to manage staff payroll
Set each staff member's salary (annual/monthly) and fixed allowances, and issue and edit pay statements every month in the order confirm → issue.
✅ Before you start
- Are clock-in and clock-out records accumulating? If not → When you want to record and check staff attendance
1. Open the Payroll tab
Go to Add-ons → Payroll in the left menu.
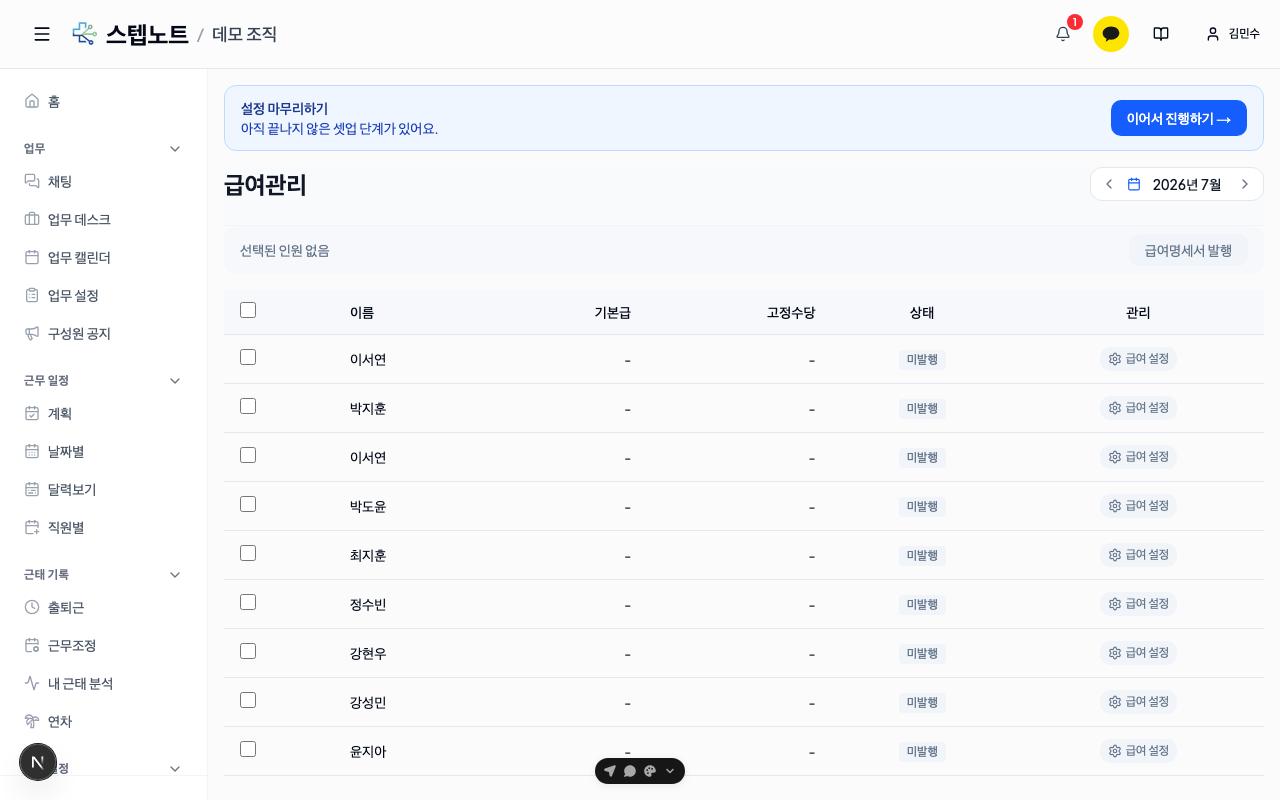
💡 The payroll screen looks different depending on your role The "Payroll" tab itself is visible to all users as long as the payroll feature is on for the organization (on by default), but what's inside the tab depends on permissions. Only the owner (clinic director) and staff who have been granted payroll admin permission can set all staff salaries and issue statements as in the screen shown here; everyone else gets a screen showing only their own salary information and statements (see step 6). To give a payroll staffer this permission, turn on the "Grant payroll admin permission" checkbox in Staff management → that member's edit modal — payroll permission can be granted and revoked individually, regardless of role (member/admin). If the tab itself isn't visible, the payroll feature is off for your organization — contact StepNote.
💡 Payroll-managed vs. non-managed members: Staff with registered salary settings (payroll-managed members) appear at the top of the table, while staff without salary settings are shown grayed out below a "Not managed for payroll · no salary settings" divider. Non-managed staff cannot be selected, confirmed, or issued statements — register their salary settings and they move up into the managed section.
2. Set each staff member's salary
Click a staff member's name or the Payroll settings button in the table to open the settings modal.
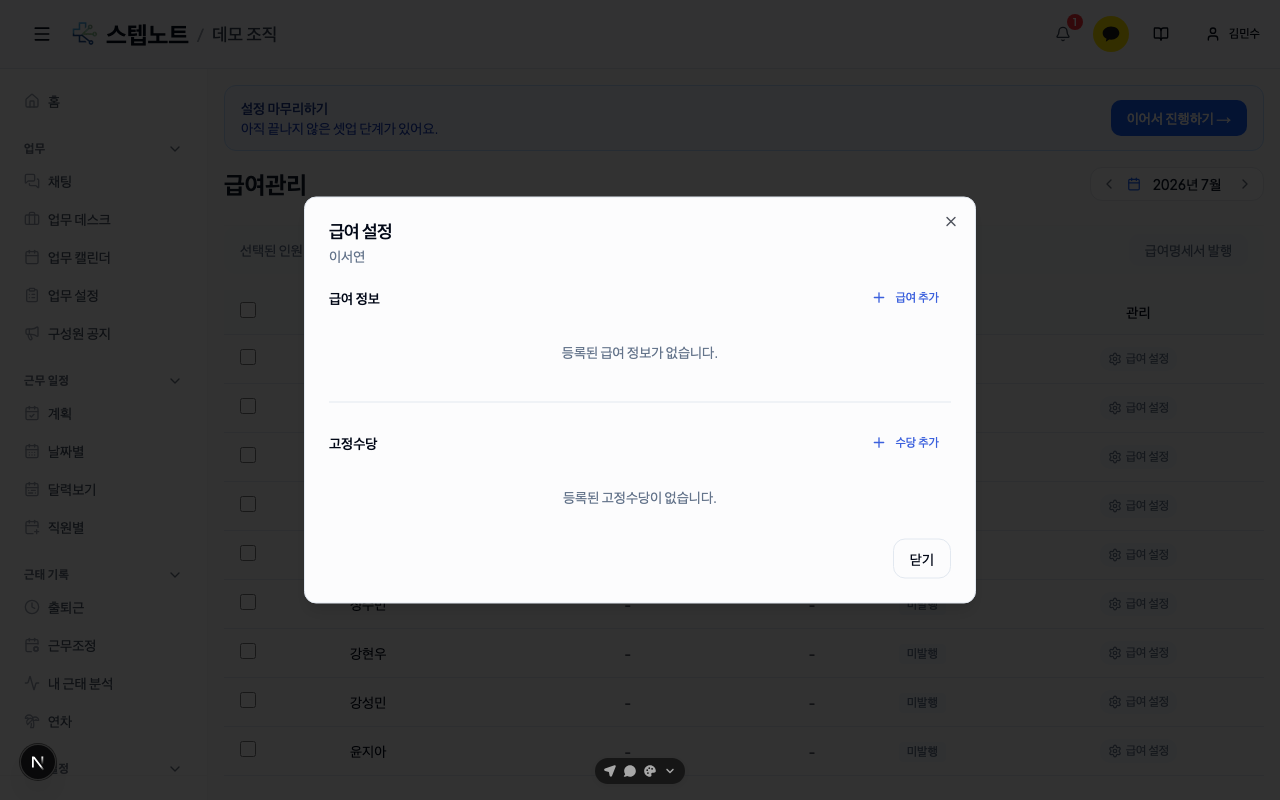
- Add salary — choose either annual salary (when entered, it's automatically converted to a monthly amount ÷12 and shown in the table) or monthly salary, choose the contract basis (gross or net take-home pay), and enter the start date it applies from. When the salary changes, add a new one — but fill in the end date of the existing salary first.
- Add allowance — choose transportation, housing, or other allowance (for "other," enter the name yourself), then enter the amount and effective period.
💡 Overlapping salary periods are rejected. When changing a salary, fill in the end date of the existing salary first, then add the new one. Past salary history is kept automatically and staff can check it themselves.
2-1. (New) Tax information, social insurance, and monthly allowances
For Korean organizations, fill in the Tax information area of the same modal — tax status (regular employee/daily worker/business income), regular hourly rate, date of birth, dependents, and the social insurance assessment basis — and National Pension, health insurance, long-term care, employment insurance, income tax, and local income tax are calculated automatically at issue time.
Payments that only occur in a given month — fixed overtime, holiday work, bonuses, etc. — can be pre-entered in the table's "Monthly allowances" cell, and they are automatically filled into the next step, the Confirm payroll screen.
3. Confirm payroll (review before issuing)
To issue statements, each staff member must first be confirmed. This step handles sign-off by a reviewer such as a labor consultant inside the system, and only confirmed staff can be issued statements.
- Select the target month with < July 2026 > at the top, and select staff with the checkboxes.
- Click the Confirm payroll button.
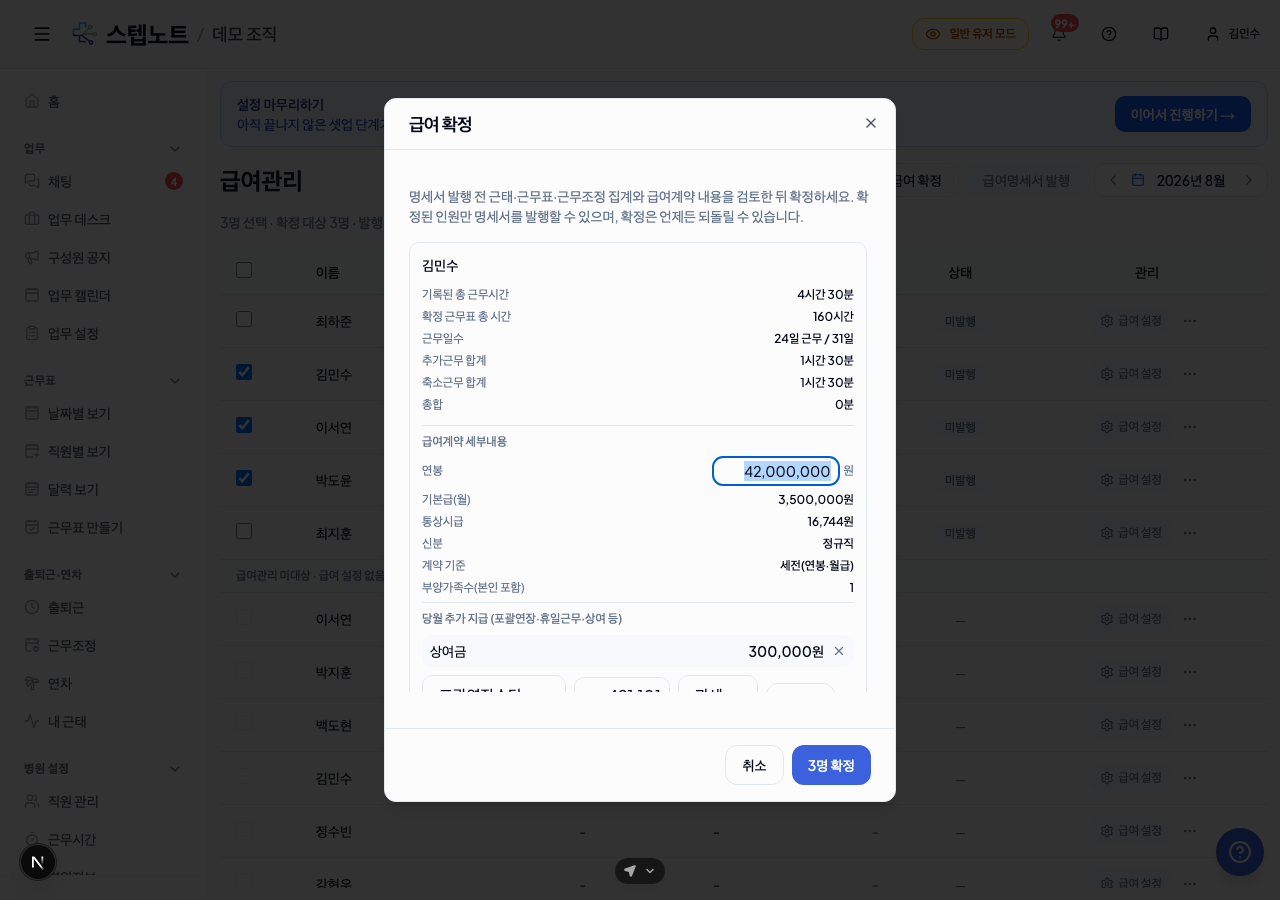
The confirmation modal shows a card per staff member with their attendance aggregates (total recorded work hours, total confirmed schedule hours, work days, extra/reduced work totals) and salary contract details. Right here you can edit that month's salary amount (the original salary settings are unchanged) or enter and edit additional pay this month such as bonuses and incentives, and immediately see the resulting recalculated monthly pay. Click the Confirm N members button and the status changes to Confirmed (blue), with a Preview button appearing in the row.
💡 Use Preview to check the calculation before issuing (nothing is saved), and if you confirmed by mistake, cancel it with the row's ⋯ menu → Revert confirmation. A salary amount edited at confirmation is shown in parentheses in the table's Base salary (adjusted) column.
4. Issue pay statements
- Select confirmed staff with the checkboxes (use the header checkbox to select everyone — unconfirmed staff are excluded from issuing).
- Click the Issue pay statements button.
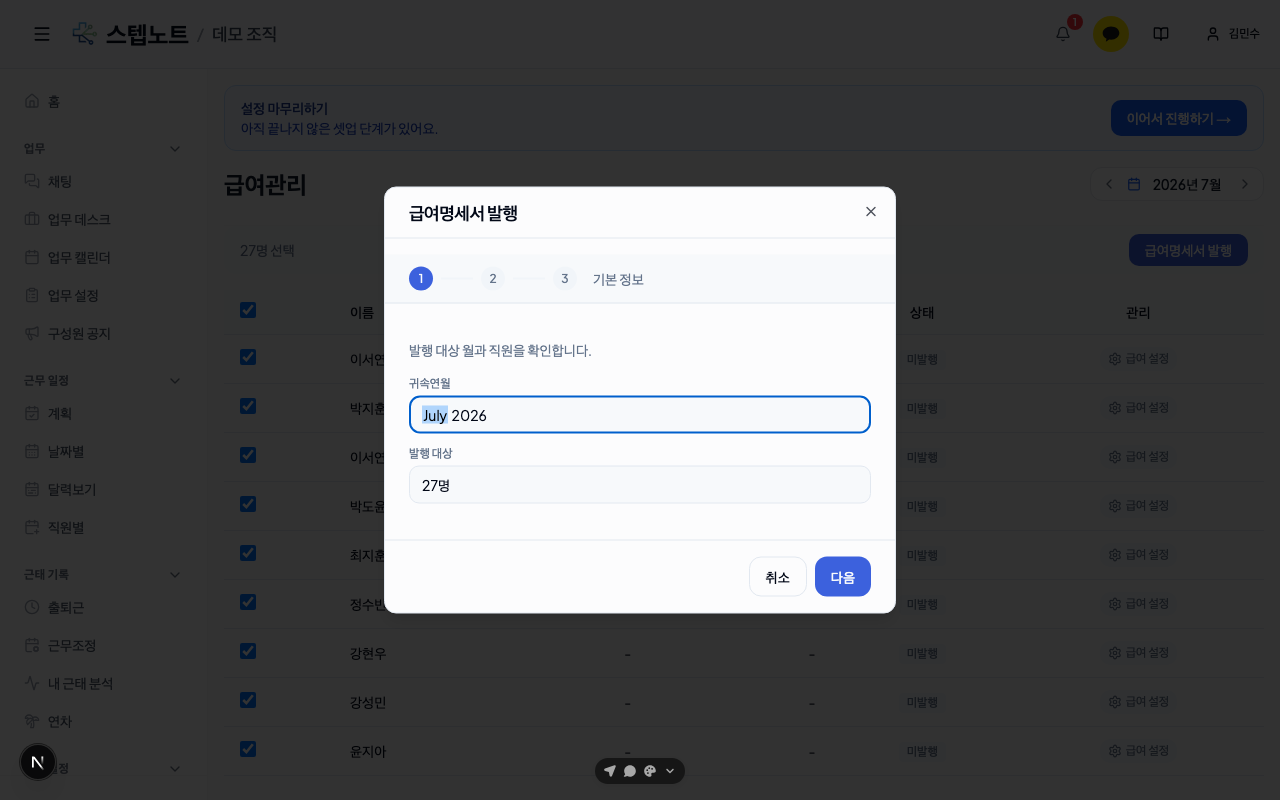
Issuing proceeds in 3 steps: Basic info → Salary details → Review & issue. The base salary and fixed allowances are filled in automatically from the salary settings, but if the salary amount or additional pay this month was edited at the confirmation step, those values are used in the calculation (you don't edit in the issue modal — edits are made at the confirmation step). For Korean organizations, social insurance and income tax are calculated automatically, with the deduction total and net pay shown as well. Issue at the last step and the statement is saved in Issued status.
💡 Issuing again for the same staff member in an already-issued month overwrites the existing statement with the latest calculated values (reissue).
5. Check and edit issued statements
Staff with a statement in the table show additional Statement / Edit buttons next to the status badge.
- Statement — opens a detail modal showing the name, pay month, base salary, fixed allowances (per item), additional pay this month, deductions (Korean organizations only), and net pay. With the Print button at the top of the modal, open a print view in a new window to print it or save it as a PDF.
- Edit — lets you change the base salary, fixed allowance, and additional pay amounts, and the status (Draft ↔ Issued). Editing a statement for a month earlier than the current one requires entering an edit reason, and the edit history is recorded automatically and can be reviewed again inside the modal.
| Status | Meaning |
|---|---|
| Not issued | No confirmation or issuance has happened for that month |
| Confirmed | The pre-issue review (payroll confirmation) is complete and the statement can be issued |
| Issued | The statement has been issued |
| Draft | A statement has been written but not yet finalized |
| Reissue needed | Salary settings changed after issuing, so the statement differs from the latest values |
6. Members check only their own pay
When a user who doesn't see the management screen described in step 1 (admins and members other than the owner and payroll-permission holders) opens the Payroll tab, they see the My pay statements screen instead. At the top, the currently applied salary type and amount (for annual salaries, the monthly-converted amount too), effective period, and fixed allowances are displayed as a card, with past salary history below. Further down, flip through years (< >) to view the statements issued that year as cards; clicking a card expands the per-item details, and the View statement button opens a printable detail modal. If there are no salary settings or issuance history yet, each area shows only a "No salary information registered." / "No pay statements issued." notice.
👥 Tell your staff "Open the Payroll tab and you can only see your own current salary and past statements. Other staff members' pay information isn't visible."
When you're done
- View as statistics: When you want to check your clinic's statistics