6. Payroll management
6. Payroll Management
Audience: Clinic directors, clinic admins, staff (members)
Purpose
Set up payroll information for members of your organization, issue and manage pay statements, and let staff view their own payroll information and statements.
6.1 Opening the Payroll Tab
- Open the tab
- Click the "Payroll" tab in the left sidebar of the organization dashboard
- Admins/directors: Can manage payroll information and pay statements for all staff
- Regular members: Can only view their own payroll information and issued statements
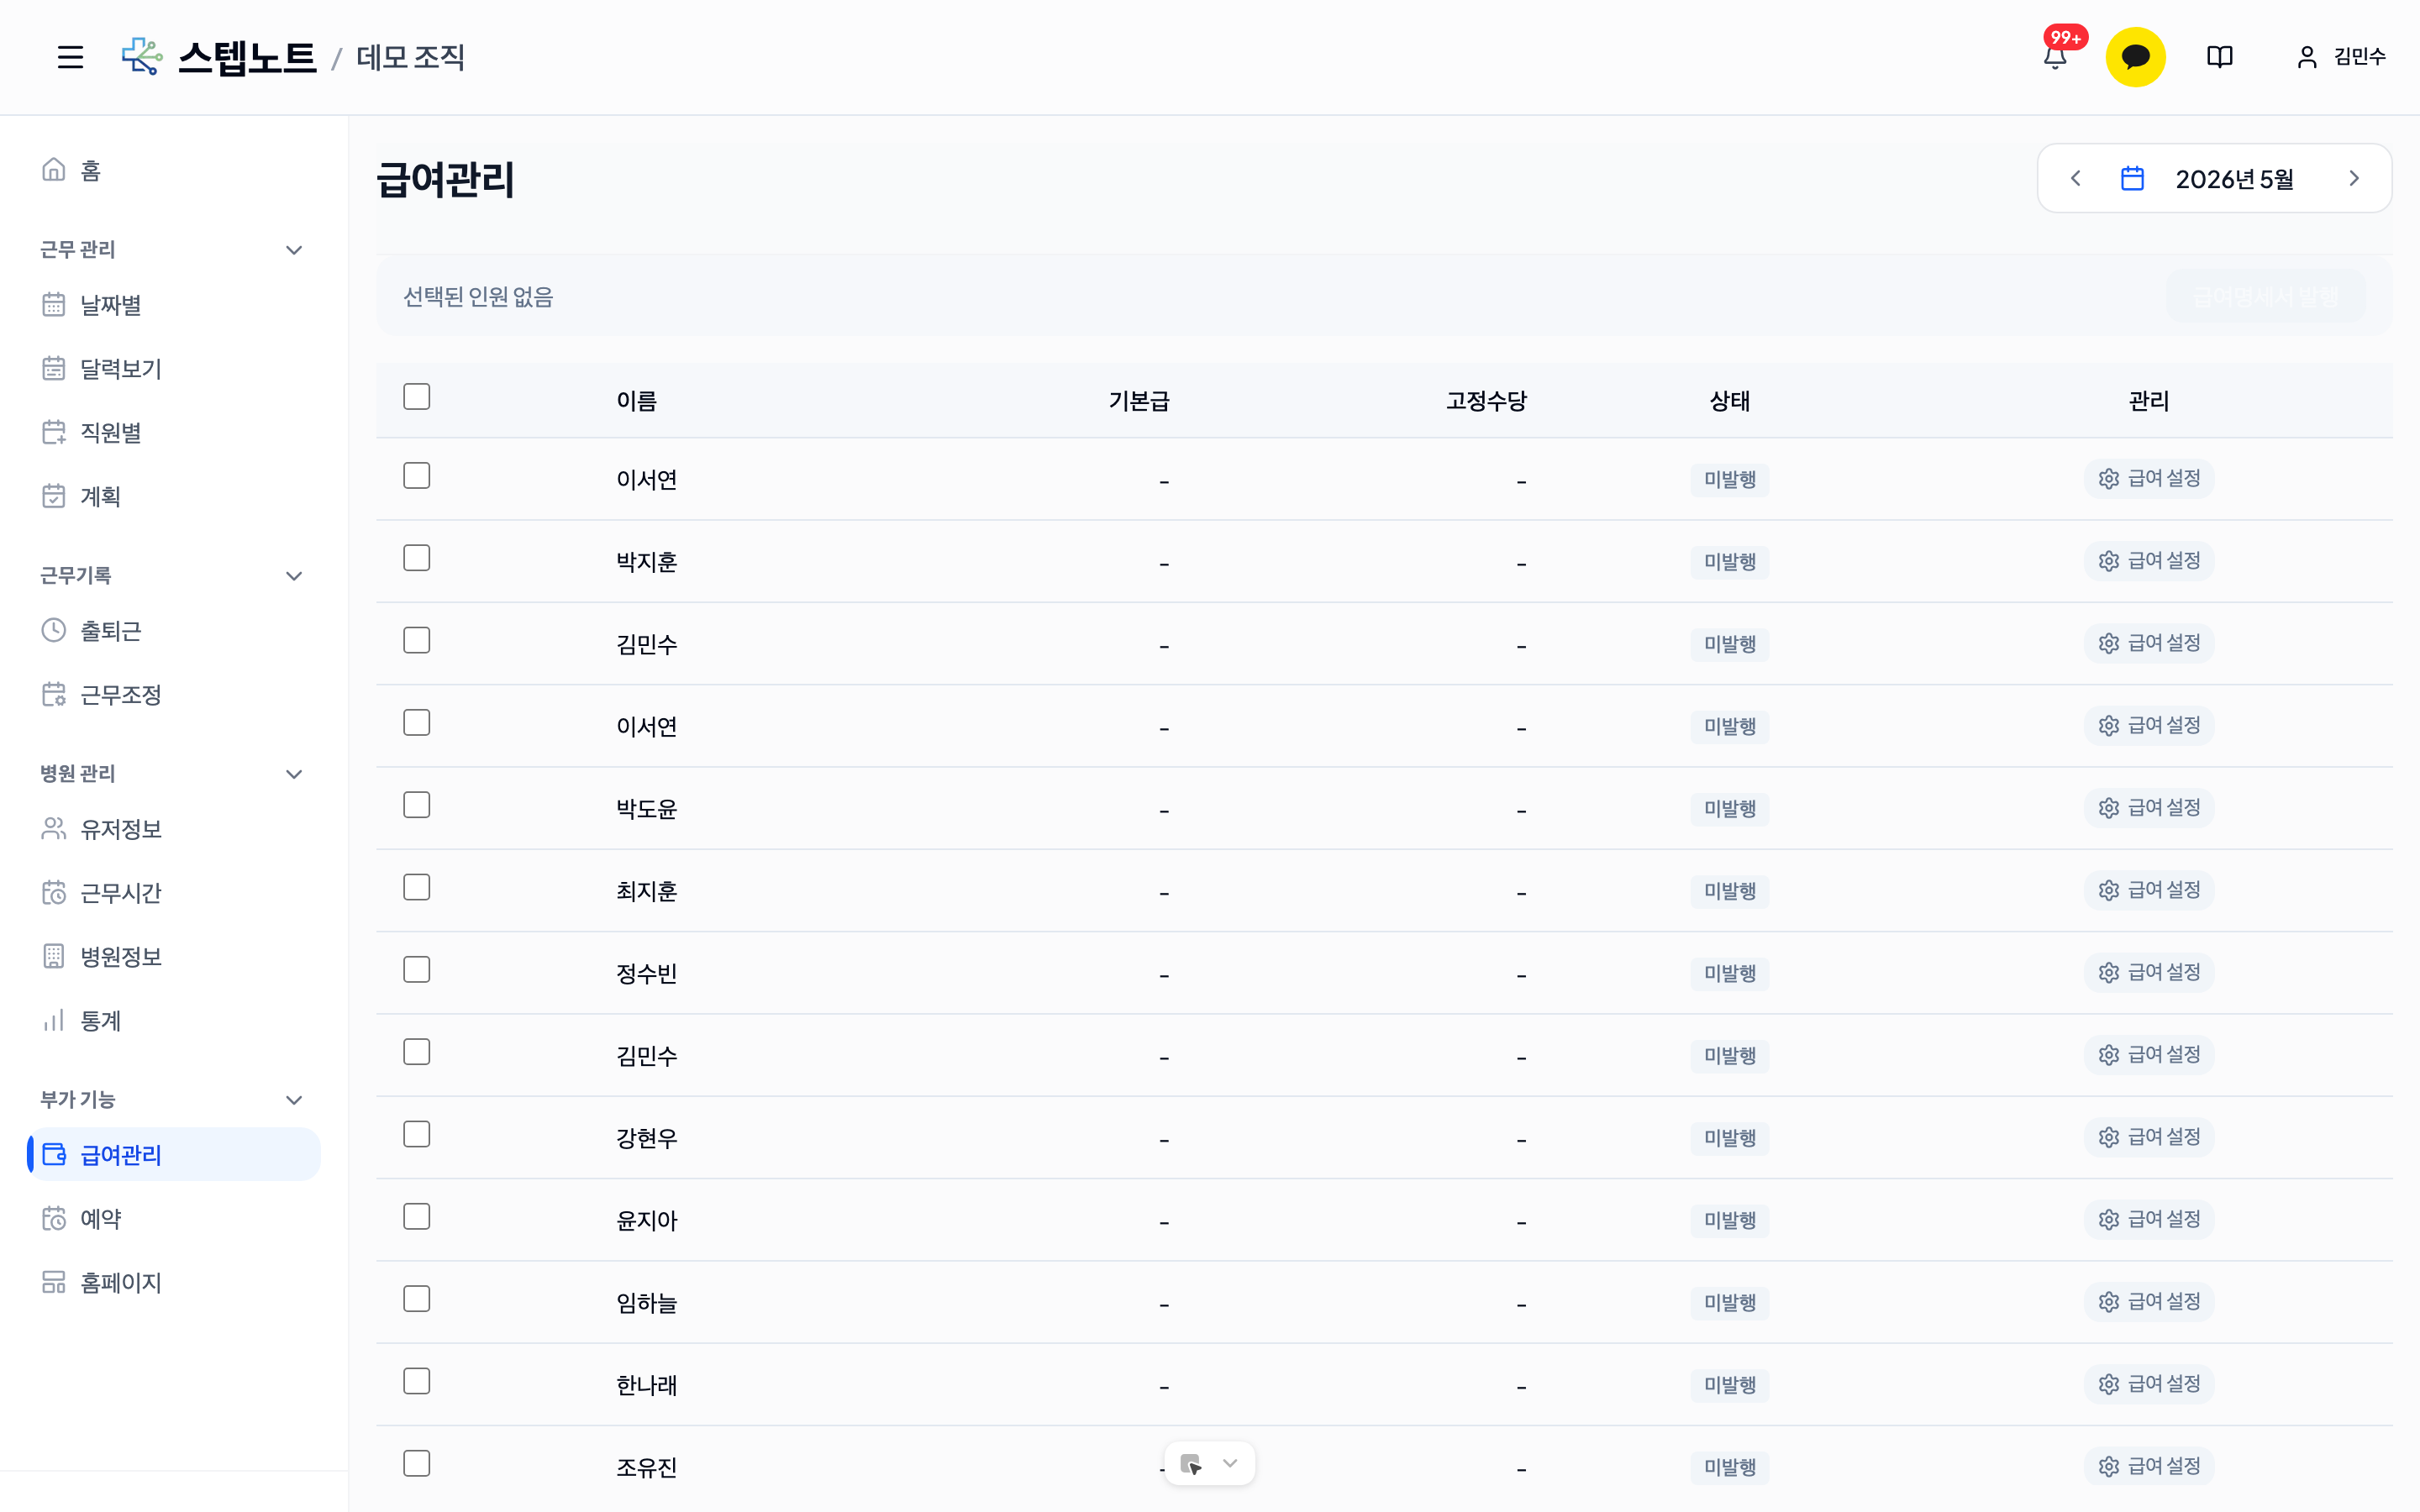
💡 Payroll-managed vs. non-managed members (new): Staff with registered salary settings (payroll-managed members) appear at the top of the table, while staff without salary settings are shown grayed out below a "Not managed for payroll · no salary settings" divider. Non-managed staff cannot be selected, confirmed, or issued statements — click their name to register salary settings and they move up into the managed section.
6.2 Setting Up Staff Payroll (Admin)
Registering Payroll Information
- Open the payroll settings modal
- Click the "Payroll settings" button in the row of the relevant staff member in the payroll table
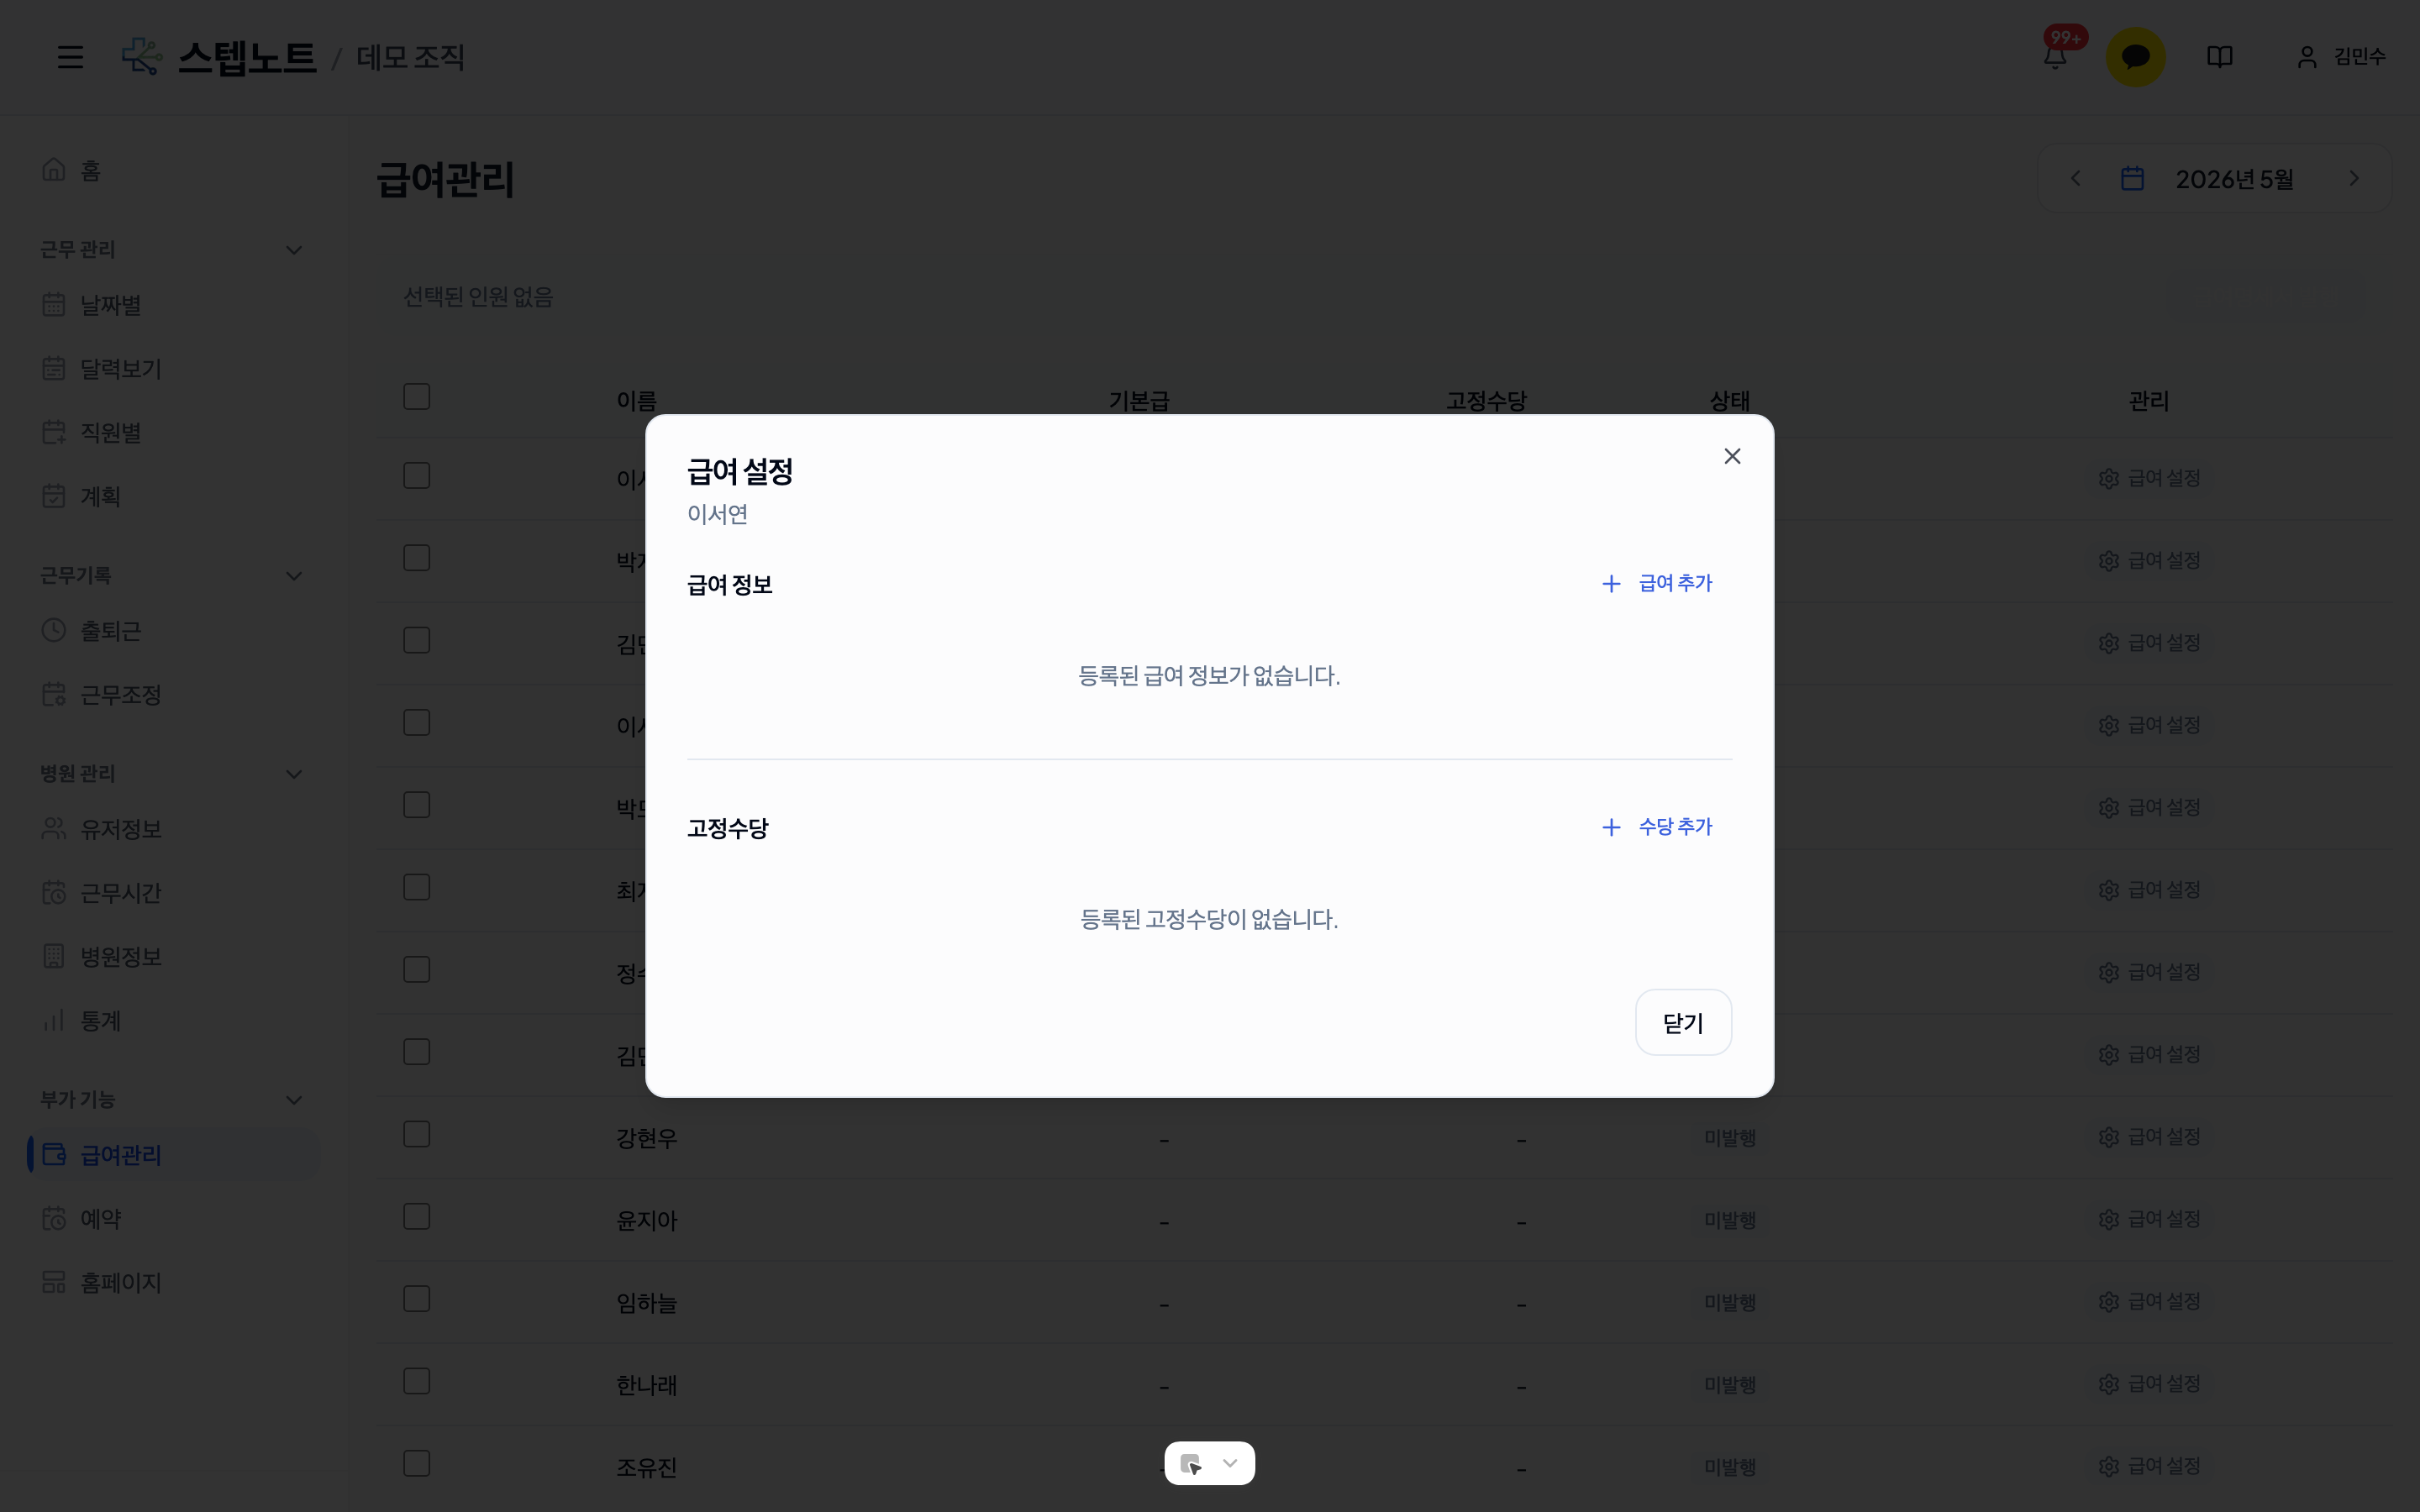
-
Add payroll information
- Click the "+ Add salary" button in the Salary area of the modal
- Select the salary type:
- Annual salary: Enter the total annual amount and it is automatically converted to a monthly amount (÷ 12)
- Fixed monthly pay: Enter the monthly amount directly
- Contract basis: Choose Gross (annual/monthly salary) or Net pay (take-home). If you choose net pay, the base salary is automatically back-calculated so that the entered amount is what the staff member actually takes home (statements and printouts show a "Back-calculated from net pay of ○○" note)
- Applicable period: Set the start month – end month in monthly units. If you leave the end month empty, it is shown as "Ongoing" and continues to apply
- Registered salaries appear as cards, and the currently applied salary carries an "Active" badge. Use the pencil/trash icons on the right of the card to edit or delete
-
Add fixed allowances
- Click the "+ Add allowance" button in the Fixed allowances area of the modal to register fixed allowances
- Allowance types: transportation, housing, other (for "other", enter the name yourself)
- Each allowance can also have its own applicable period (start month – end month) and is managed as a card, just like salaries
💡 Note: Registration is rejected if salary periods overlap. When changing a salary, set the end date of the existing salary first, then register the new one.
Tax Information & Social Insurance Settings (New)
To have social insurance and income tax calculated automatically when issuing statements, fill in the following items in the Tax information area of the payroll settings modal. (This area is not shown for overseas organizations.)
| Item | Description |
|---|---|
| Tax status | Regular employee (social insurance + income tax) · Daily worker (employment insurance only + daily-worker income tax) · Business income (3.3% withholding) — the deduction calculation depends on the status |
| Regular hourly rate | The base amount for automatic overtime/holiday/night allowance calculations |
| Date of birth (6 digits) | Used for income tax calculation |
| Dependents (including self) / Children aged 8–20 | Used to calculate income tax deductions |
For the social insurance assessment basis, choose one of two methods:
- Based on current month's income (default): Premiums are calculated from the amount actually paid that month
- Fixed at reported amount: Fixed at the amount reported to the insurance authorities. You can then choose from 3 input methods — Enter as declared annual salary (enter the annual salary to see a preview of the monthly base and estimated premiums), Enter as premiums (back-calculates the base from the premium amounts on your bills), Enter as base amount (enter the standard monthly income directly)
💡 Each insurance renews at a different time, so the declared-annual-salary preview may differ from the actual billed amounts. To match exactly, enter the billed amounts as-is under "Enter as premiums".
Entering Monthly Allowances (New)
Fixed allowances repeat every month, but variable payments that only occur in a given month — such as fixed overtime, holiday work, or bonuses — can be pre-entered before issuing from the "Monthly allowances" cell in the payroll table (click the total or "+").
- Preset items: Fixed overtime allowance · Overtime allowance · Holiday work allowance · Night work allowance · Bonus · Incentive · Custom
- Choosing Fixed overtime allowance auto-suggests an amount of regular hourly rate × 19.5533 hours × 1.5 (you can edit it)
- Mark each item as Taxable / Non-taxable
- Amounts entered here are automatically filled into the payroll confirmation step and carried through to the confirmation, preview, and issue calculations (they cannot be edited in the issue modal — edits are made at the confirmation step)
Managing Salary History
- Add a new record each time the salary changes
- Past salary history is preserved automatically
- Staff can also view their own past salary history
6.3 Confirming Payroll — Review Before Issuing (New)
A new step has been added: before issuing statements, you review the attendance aggregates and salary contract and confirm them. It is designed to handle sign-off by a reviewer such as a labor consultant inside the system, and only confirmed staff can have statements issued.
- Select who to confirm
- Use the month navigation buttons (< >) at the top to select the target month, and select staff with the checkboxes
- Click the "Confirm payroll" button at the top
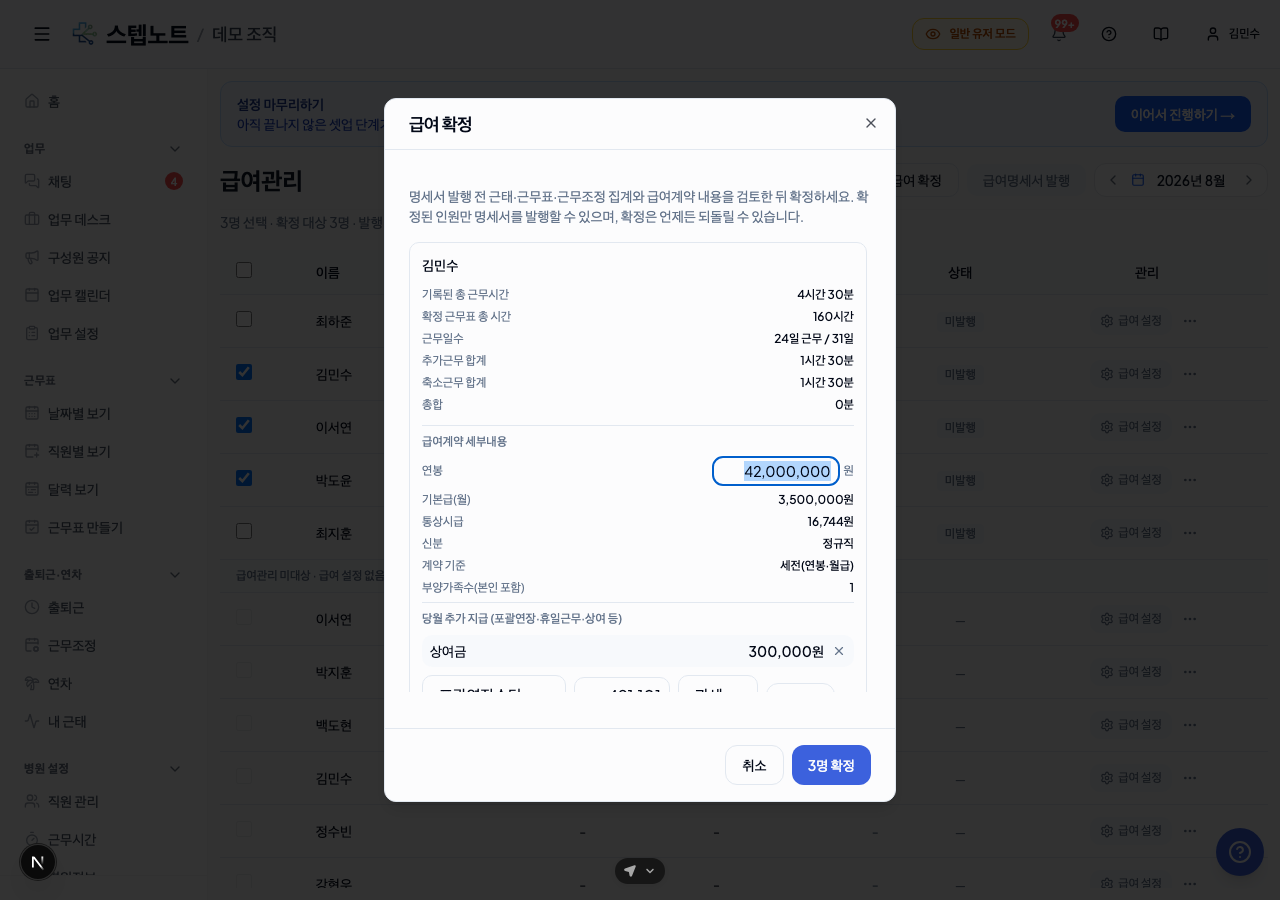
-
Review each staff member — the confirmation modal shows a card per staff member
- Attendance aggregates: Total recorded work hours · total confirmed schedule hours · work days · extra/reduced work totals and their sum
- Salary contract details: Annual/monthly salary amount · regular hourly rate · tax status · contract basis · dependents — the salary amount can be edited right here, for that month only (editing it does not change the original salary settings)
- Additional pay this month: Enter or edit that month's variable payments such as bonuses and incentives here (values pre-entered under "Monthly allowances" are filled in)
- Recalculated monthly pay: The expected payment reflecting the edited salary amount and additional pay
-
Click the "Confirm N members" button to finish
- The status changes to "Confirmed" (blue), and a "Preview" button appears in that staff member's row
What You Can Do After Confirming
- Preview: Check the statement calculation results before issuing (nothing is saved; shown only for confirmed staff)
- Revert confirmation: Use the ⋯ menu → "Revert confirmation" on the right of the staff member's row. Reverting makes the member non-issuable again, and any additional pay this month edited during confirmation is restored to its pre-confirmation values
- A salary amount edited at confirmation is shown in parentheses in the table's Base salary (adjusted) column and is used as-is in subsequent preview and issue calculations
6.4 Issuing Pay Statements (Admin)
Selecting Who to Issue For
-
Select the month
- Use the month navigation buttons (< >) at the top to select the month to issue for
- The table automatically shows the base salary valid for that month
-
Select staff
- Use the checkboxes to select the staff to issue statements for
- Use the select-all checkbox to select all payroll-managed staff at once
- Only staff whose confirmation (6.3) is complete can be issued statements — unconfirmed staff are excluded from issuing
-
Start issuing
- Click the "Issue pay statements" button
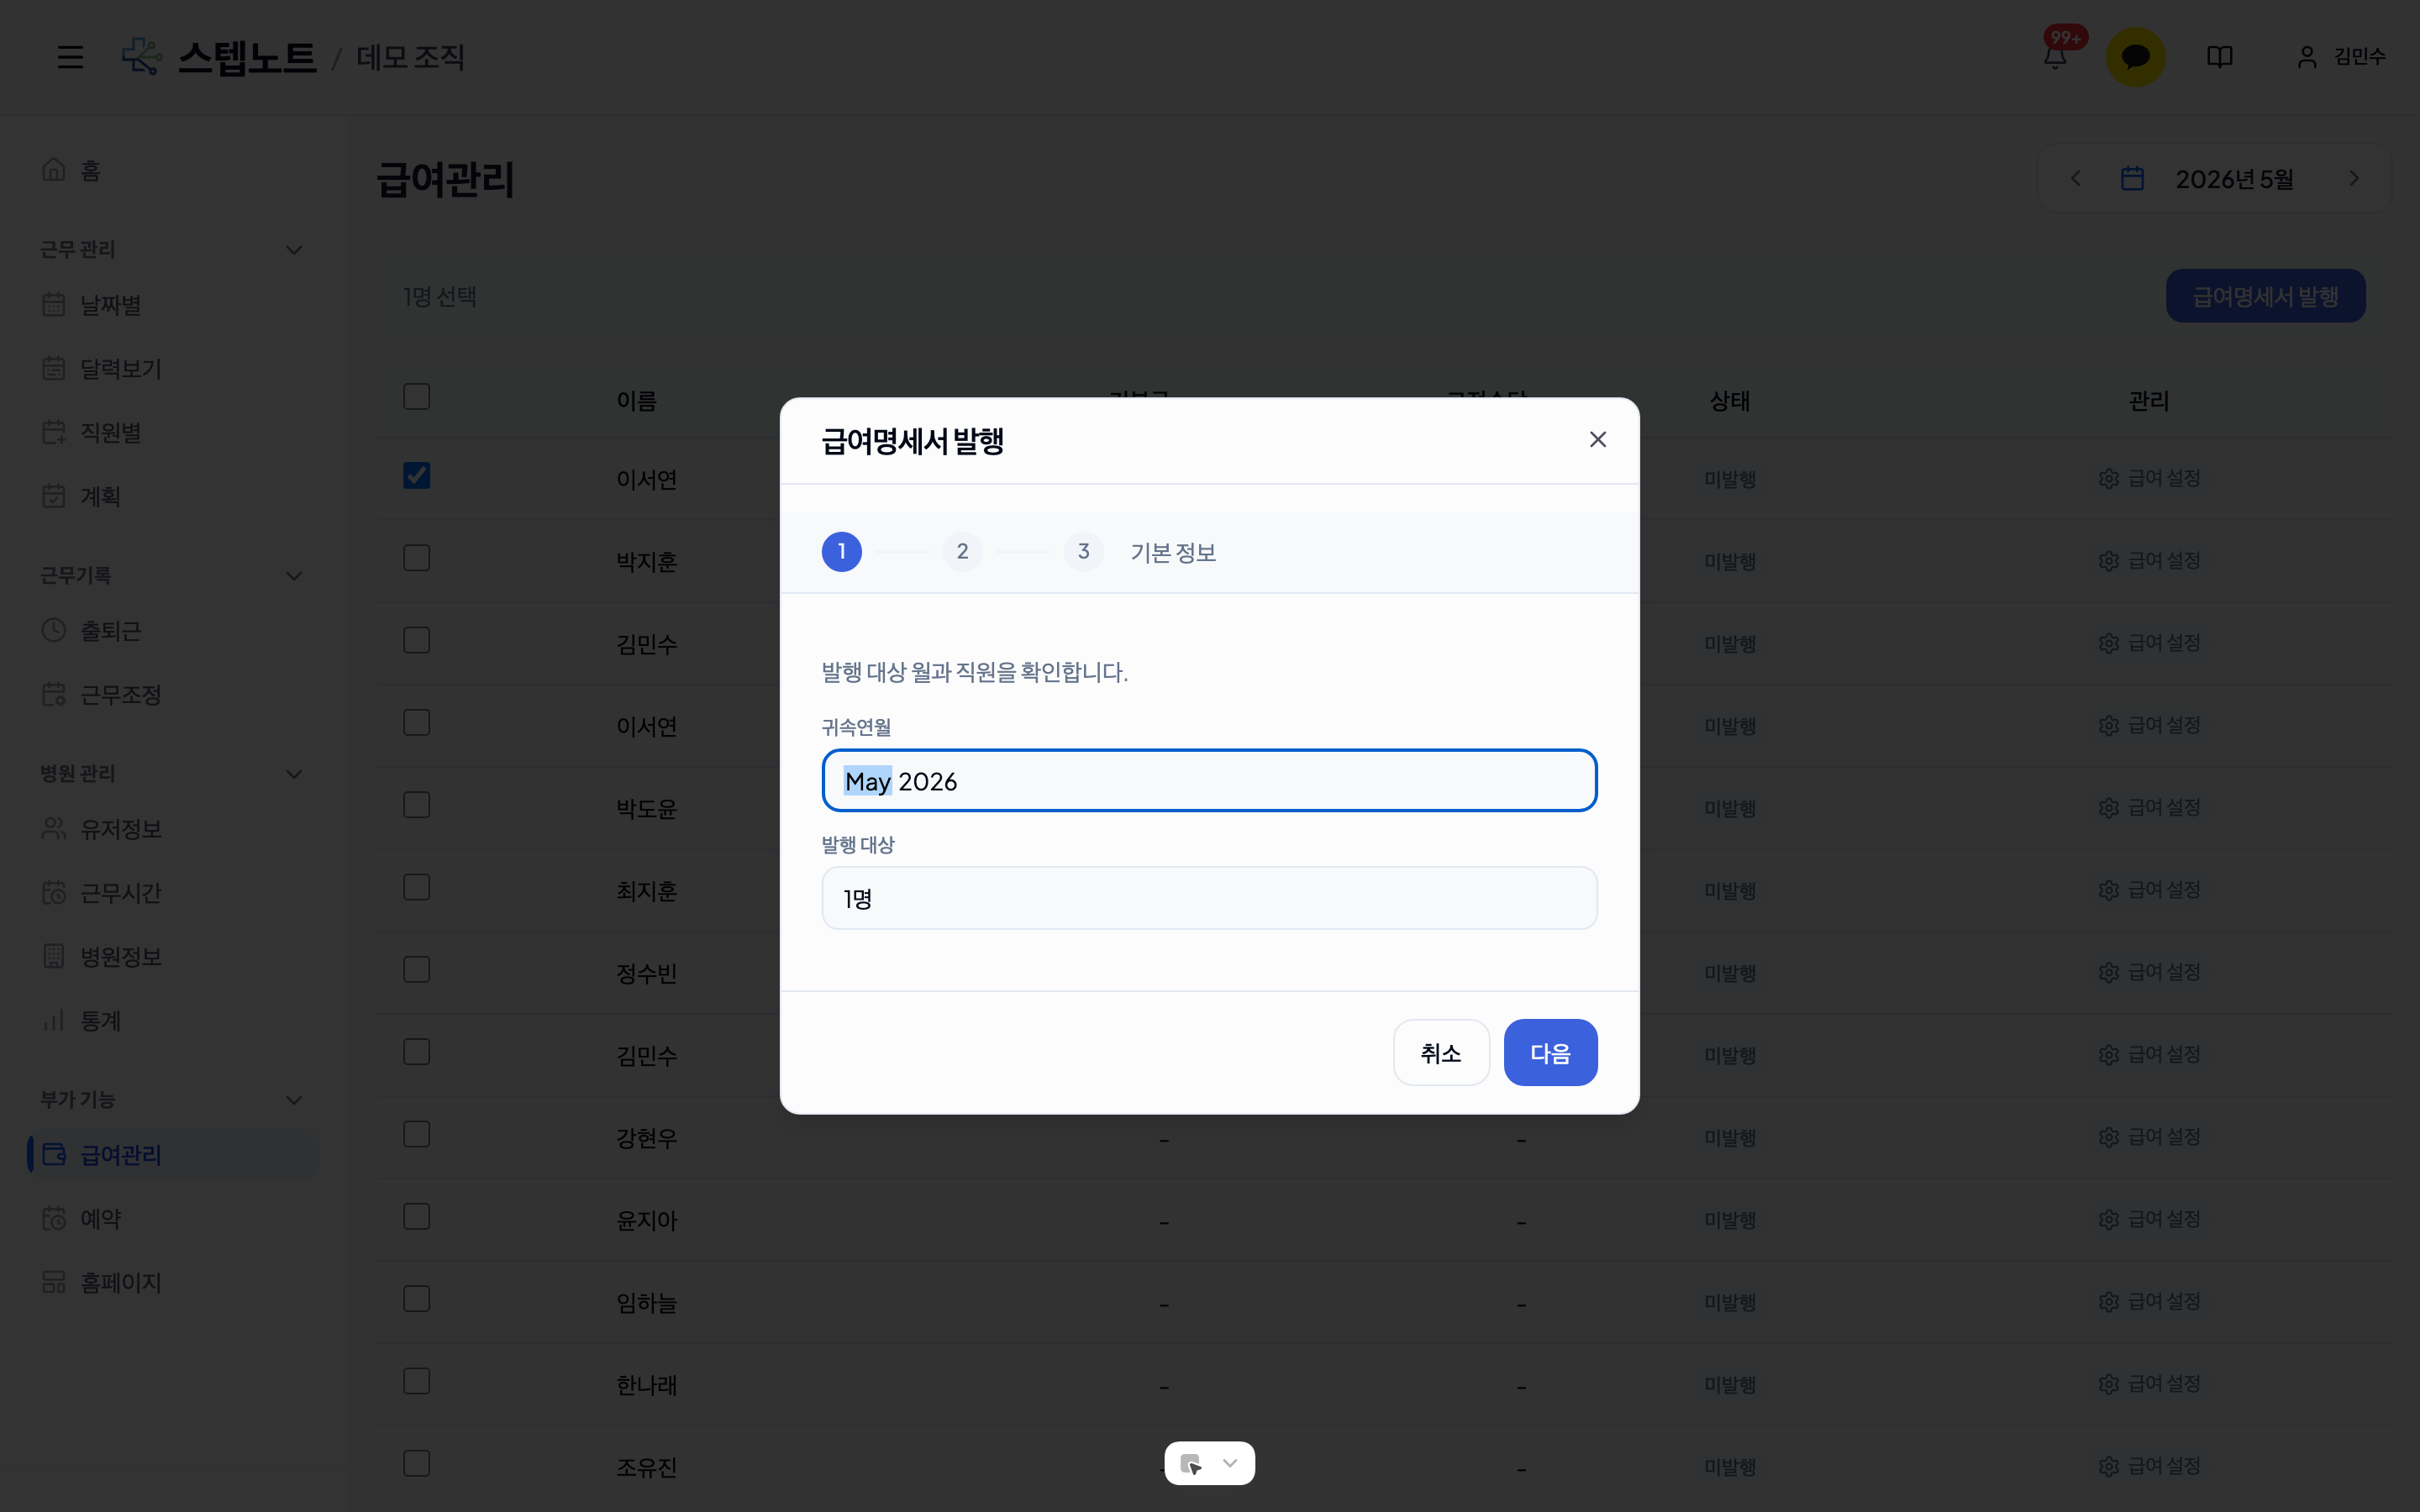
Issuing Steps
| Step | Content | Description |
|---|---|---|
| Step 1 | Basic info | Confirm the pay month and the number of recipients |
| Step 2 | Salary details | Check each staff member's base salary and additional pay this month; deductions are calculated automatically |
| Step 3 | Review & issue | Issue after final review |
- Base salary and fixed allowances are loaded automatically from the payroll settings, and if the salary amount was edited at the confirmation step, the edited amount is used in the calculation
- Additional pay this month (fixed overtime, holiday work, bonuses, etc.) shows the values entered up through the confirmation step — to change them, go back to the confirmation step
- For Korean (KRW) organizations, National Pension, health insurance, long-term care, employment insurance, income tax, and local income tax are calculated automatically from the payroll settings (tax status, social insurance basis), and the deduction total and net pay are shown as well (deduction calculation does not apply to overseas organizations)
- Issued statements are saved with the "Issued" status
- Issuing again for a month that has already been issued is treated as a reissue and overwrites the statement with values recalculated from the latest salary settings and rates
6.5 Viewing Pay Statements (Admin)
- View a statement
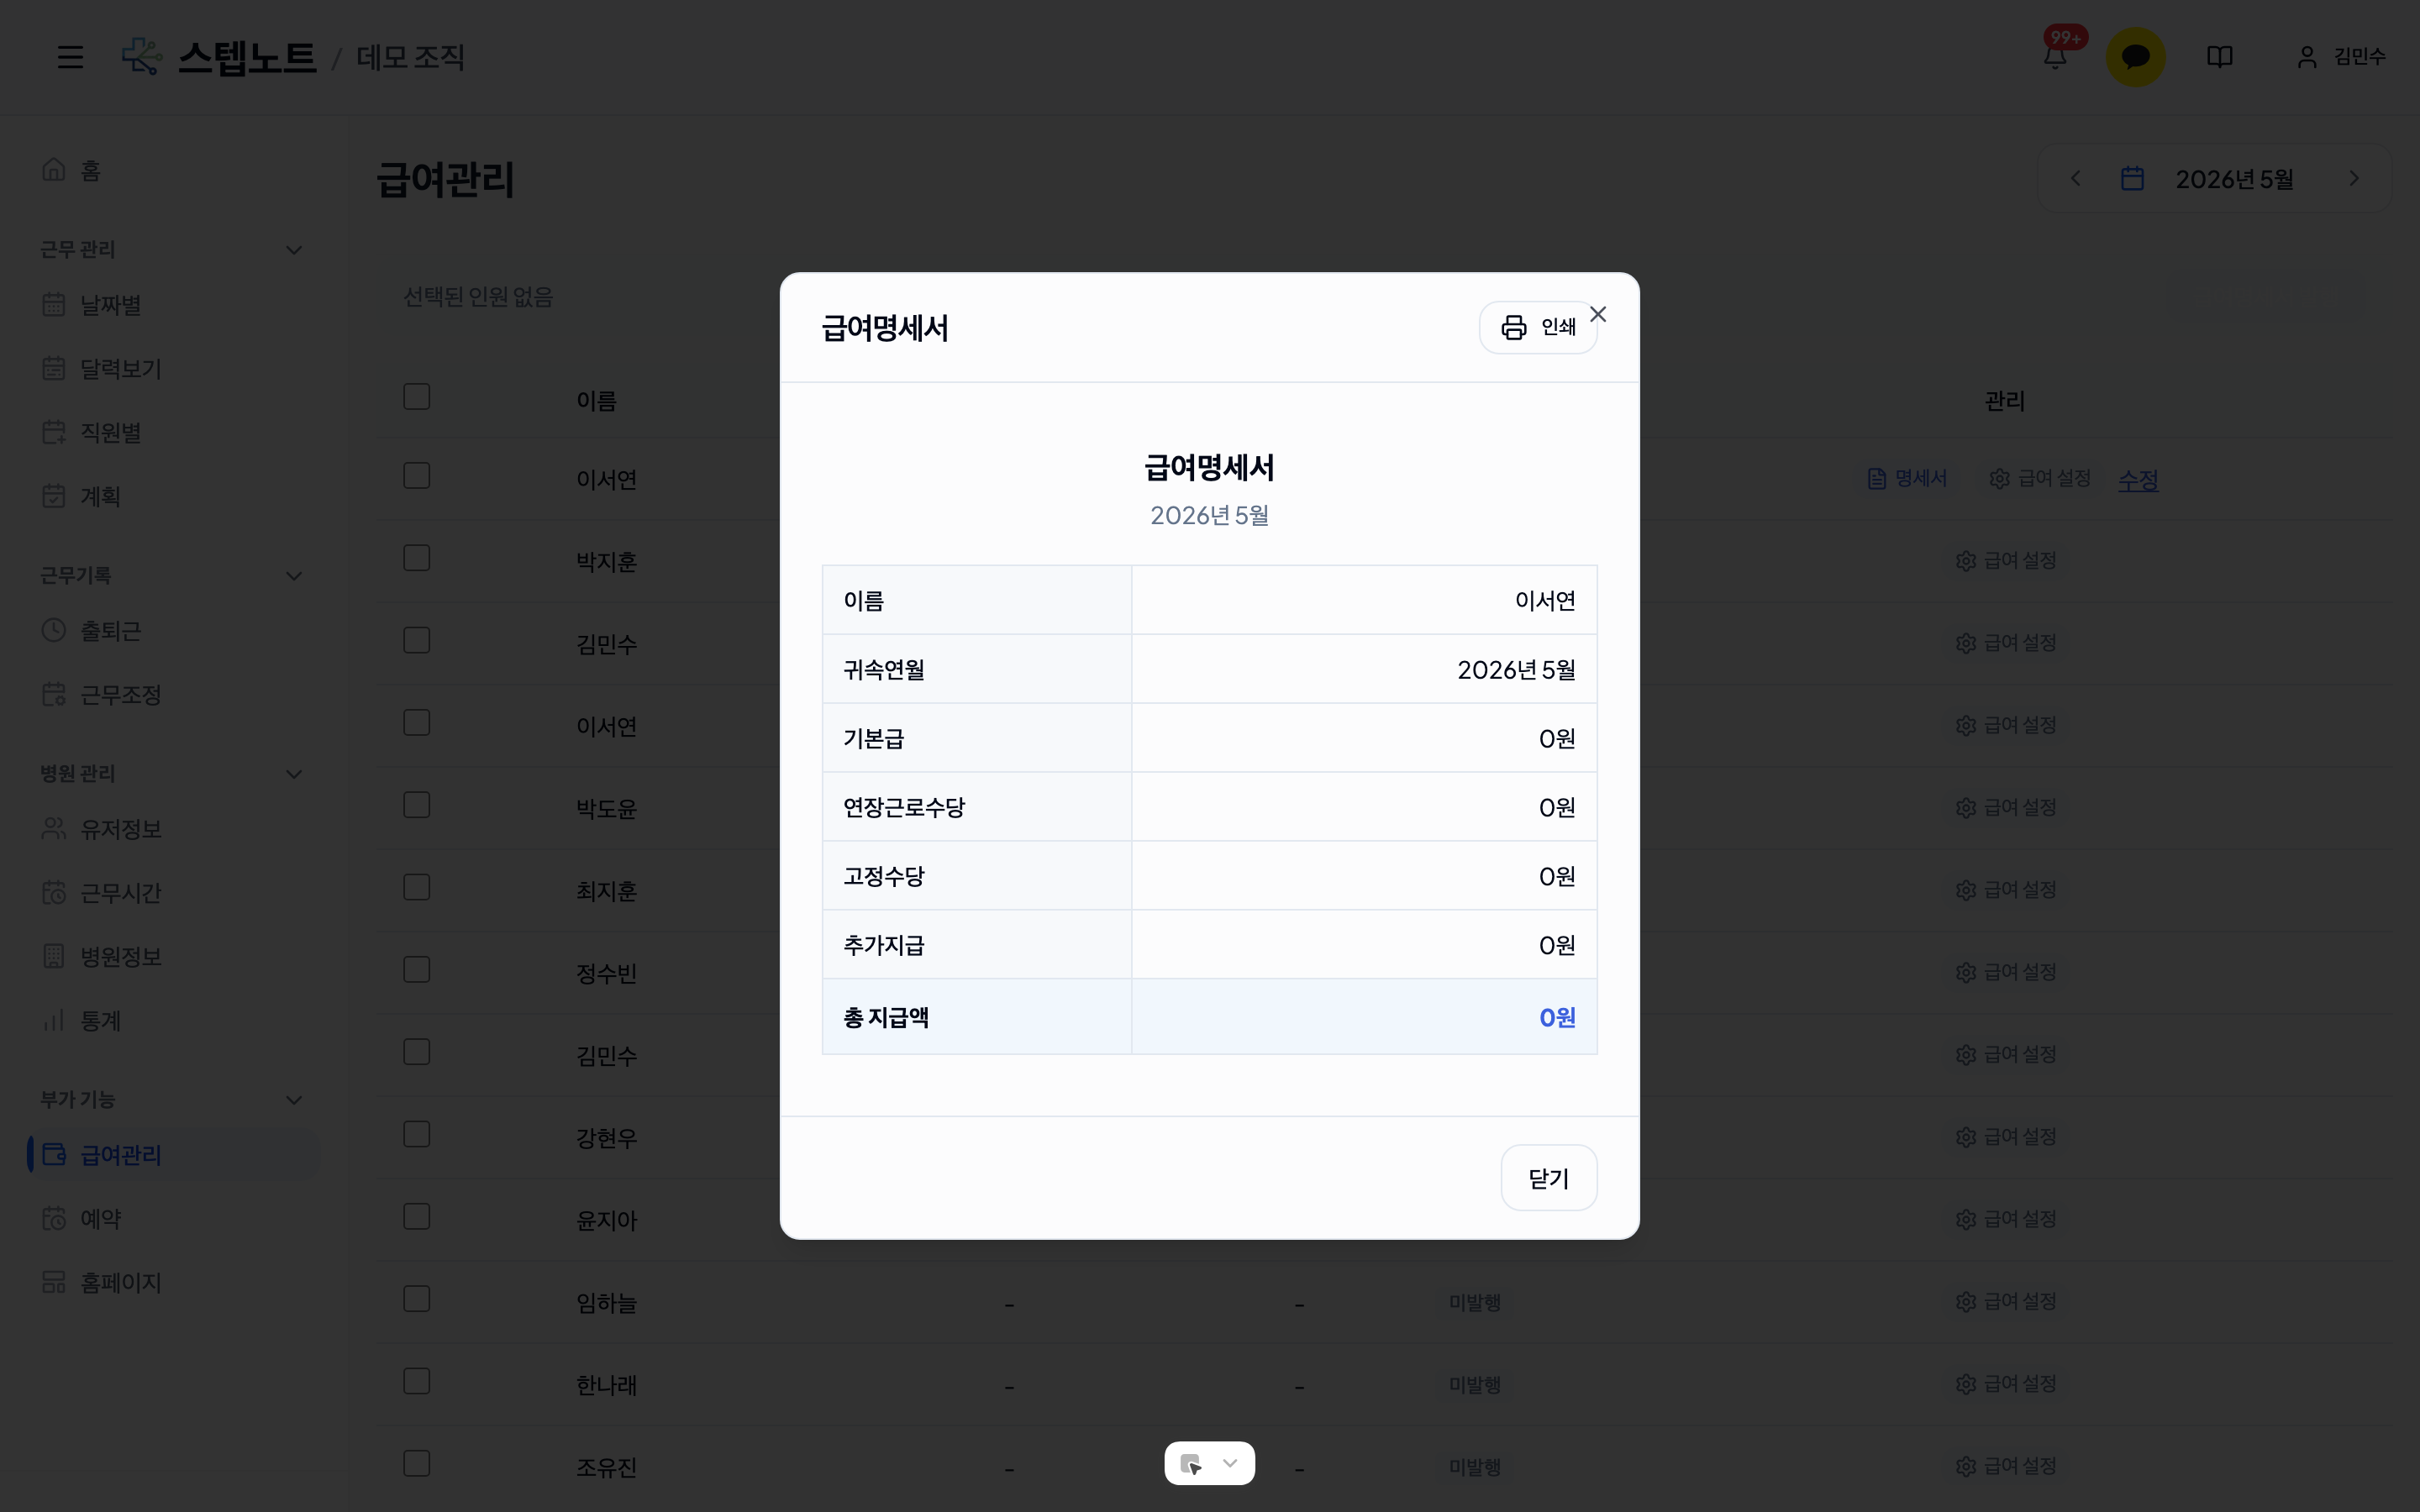
- Click the "Statement" button for a staff member who has an issued statement
-
Displayed items
- Name, pay month
- Base salary, fixed allowances (itemized), additional pay this month
- Deductions: National Pension, health insurance, long-term care, employment insurance, income tax, local income tax, and the deduction total (Korean organizations only)
- Total earnings and net pay (highlighted at the bottom)
-
Printing
- Click the "Print" button at the top of the modal to open a print-friendly wage statement view in a new window
- Along with the earnings and deductions, a calculation method table (item · formula · amount) is printed too, so you can see exactly how the fixed overtime allowance was derived from the hourly rate or how net pay was back-calculated
- You can print it or save it as a PDF
💡 Statements issued before automatic deduction calculation was introduced show only earnings. Run "Issue pay statements" again to update them to the latest format including deductions and net pay.
💡 If salary settings change after issuing, a "Reissue needed" badge appears in the statement list. The detail modal also shows a "reflects the amounts before the change" notice, and reissuing updates the statement to the latest values.
6.6 Editing Pay Statements (Admin)
-
Open the edit modal
- Click the "Edit" button for a staff member who has an issued statement
-
Editable items
- Base salary, fixed allowances, and additional pay amounts (the automatically calculated deductions are recalculated from the edited earnings)
- Status changes (Draft ↔ Issued)
-
When editing past months
- When editing a statement from before the current month, entering an edit reason is required
- Edit history is recorded automatically and can be reviewed
6.7 Viewing My Payroll (Member)
Regular staff (members) can view their own payroll information and statements in the Payroll tab.

Salary Information Card
The currently applied salary information is shown at the top of the screen:
- Salary type: Annual or monthly salary
- Salary amount: The configured amount (for annual salaries, the monthly equivalent is also shown)
- Applicable period: Start date – end date of that salary
- Fixed allowances: Currently applied fixed allowance items and amounts
Past Salary History
Past salary history is shown below the current salary:
- View previously applied salary information by period
- Each period shows the salary type, amount, applicable period, and related allowance information
Pay Statement List
You can view pay statements issued by year:
- Select a year: Change the year with the < > buttons
- Statement cards: Each month's statement is shown as a card
- The pay month, status (Issued/Draft), and total earnings are shown
- View details: Click a card to expand the itemized breakdown
- Base salary, fixed allowances (itemized), additional pay this month, deductions (Korean organizations only), net pay
- View statement: Click the "View statement" button to open a printable detail modal
Status Guide
| Status | Meaning | Color |
|---|---|---|
| Not issued | No confirmation or issuance has happened for that month | Gray |
| Confirmed | The pre-issue review (payroll confirmation) is complete and the statement can be issued | Blue |
| Issued | The statement has been issued | Green |
| Draft | The statement has been written but not yet finalized | Yellow |
| Reissue needed | Salary settings changed after issuing, so the statement differs from the latest values | Orange |
Cautions
- Configurations with overlapping salary periods cannot be registered
- When editing a past month's statement, you must provide an edit reason
- Re-issuing for a month that has already been issued overwrites the existing statement
- Members can only view their own payroll information and statements, not other staff members' information
- Social insurance and income tax rates are managed by the StepNote system administrators. For questions about rate changes or calculation results, contact
support@stepnote.works
Payroll Confirmation Step (Updated 2026-08)
The pay statement flow now has 3 stages: Not issued → Confirmed → Issued.
- Before issuing, each staff member's attendance aggregates (total work hours, confirmed schedule, work adjustments) and salary contract must be reviewed and confirmed in the "Confirm payroll" step, and only confirmed staff can be issued statements (see 6.3 for details)
- At the confirmation step you can edit that month's salary amount directly or enter additional pay this month such as bonuses and incentives, and confirmed staff can be previewed to check the calculation before issuing
- A confirmation can be reverted at any time (⋯ menu in the staff member's row)
- Staff without salary settings are shown separately in the "Not managed for payroll" section
Automatic Payroll Calculation (Updated 2026-08)
An automatic social insurance and income tax calculation engine has been introduced for pay statement issuance in Korean (KRW) organizations.
- Enter the tax information — tax status (regular employee/daily worker/business income), regular hourly rate, date of birth, dependents, etc. — in the payroll settings, and National Pension, health insurance, long-term care, employment insurance, income tax, and local income tax are calculated automatically at issue time, with the deduction total and net pay shown as well
- Payments that only occur in a given month — fixed overtime, holiday work, bonuses, etc. — can be pre-entered under "Monthly allowances" and are reflected automatically on the issue screen
- Statements issued before automatic calculation show only earnings; issuing again (reissue) updates them to the latest format including deductions and net pay
- If salary settings change after issuing, a "Reissue needed" badge appears on the statement so you know right away it should be reissued with the latest values
Visual Improvements (Updated 2026-05)
Colors across the payroll screens have been unified with the design system's semantic tokens. Accent colors in manual screenshots may differ from the actual screens, but their meaning remains the same.
- Consistent status colors: Normal/paid uses success tokens (green), unpaid/pending uses warning tokens (orange/yellow), and errors/deletions use danger tokens (red).
- Dark mode support: Pay statement cards, tables, and modals use semantic tokens, so their tone switches automatically in OS dark mode.
- Focus/hover: Input field focus rings use
ring-ring, and action button hovers align to a 90% tone of the same hue, reducing visual strain.