7. WiFi attendance setup
7. WiFi Attendance Setup
Audience: Clinic directors, clinic admins
Purpose
Set up automatic clock in/out recording for staff using the clinic's WiFi network.
What Is WiFi Attendance?
WiFi attendance automatically determines staff clock in/out based on the clinic's WiFi IP address.
| Item | Description |
|---|---|
| Clock in/out detection | When the clinic WiFi IP address matches the IP of a staff member's device, it is recorded as clock in/out |
| GPS geofence | Acts as a trigger in the iOS app that automatically attempts a WiFi check when entering the area near the clinic |
| Auto clock out | Automatically records clock out when the WiFi connection is lost |
💡 Key principle: Clock in/out is determined by WiFi IP only. GPS plays a supporting role that wakes the app to attempt the WiFi check.
Prerequisites
- Admin or Owner permissions are required
- If you configure the settings while connected to the clinic WiFi, the IP can be filled in automatically
Setup Steps
7.1 Go to the Clinic Info Tab
- Open the organization dashboard
- Click the "Clinic Info" tab in the left menu
- Select the "Attendance settings" subtab at the top, then find the "WiFi Attendance Setup" section
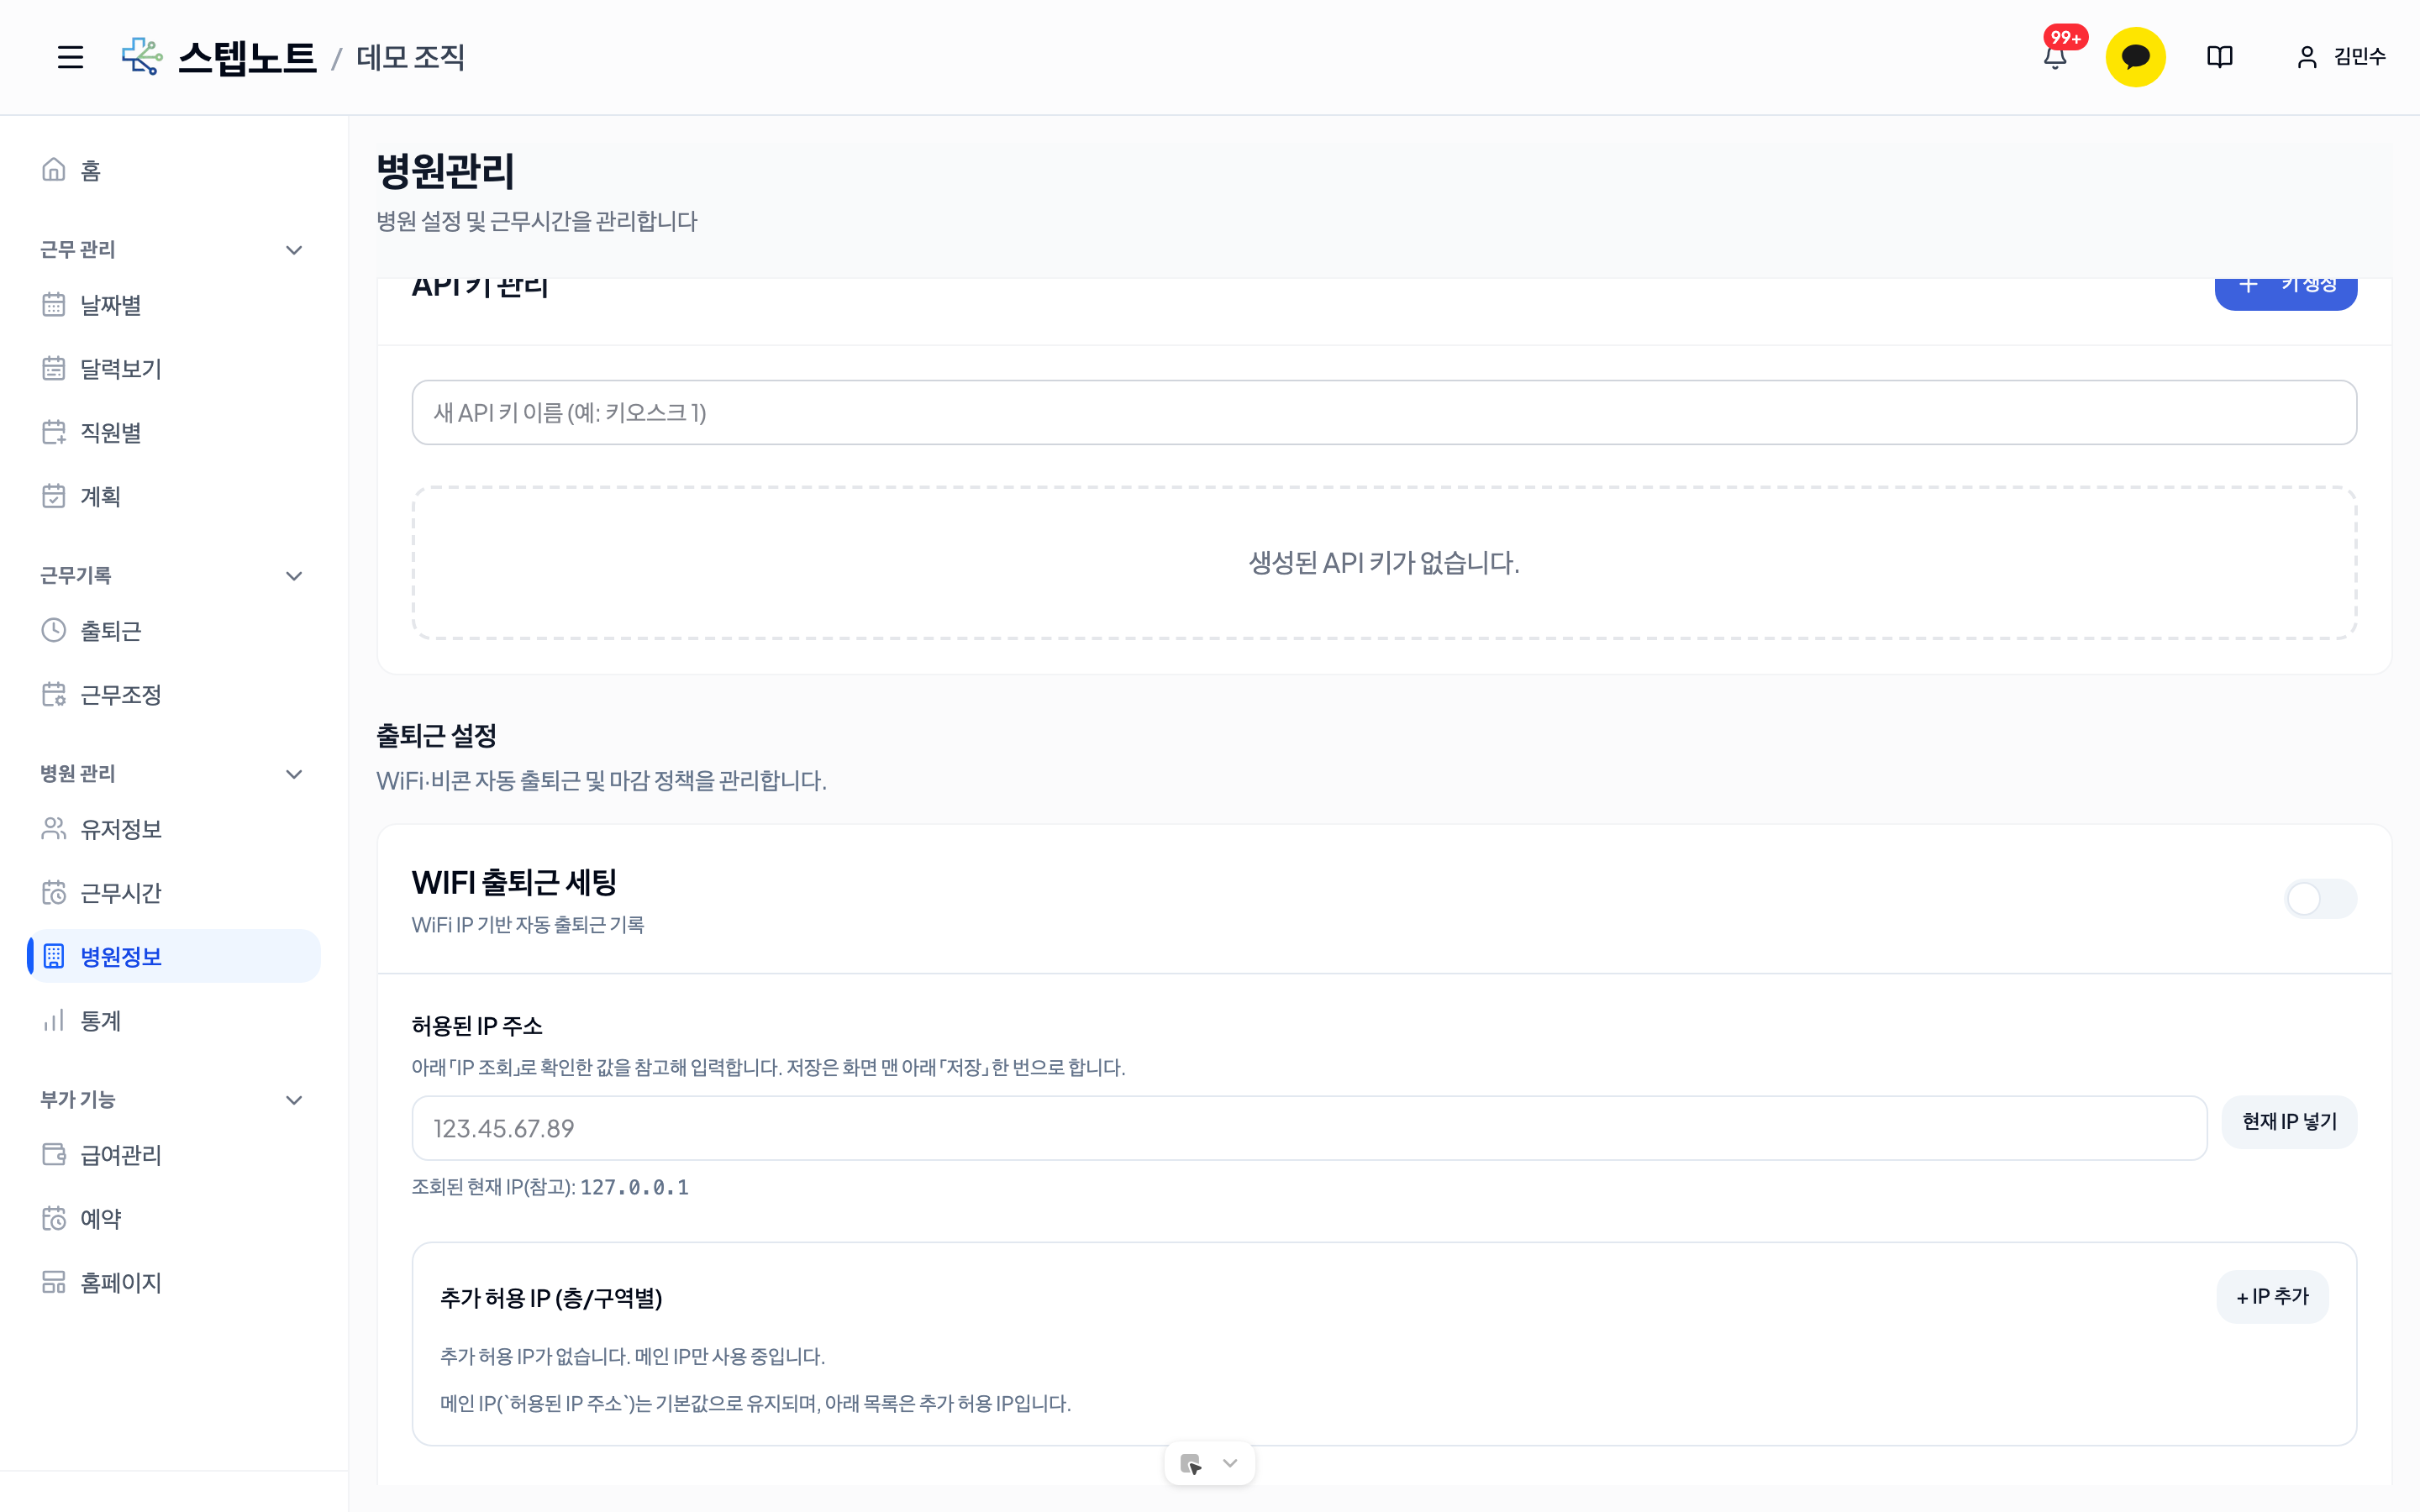
7.2 Set the Allowed IP Address
Enter the IP address of the clinic's WiFi network.
-
Check the current IP
- The "Detected current IP (reference)" information is shown at the bottom of the screen
- If you are connected to the clinic WiFi, this is the clinic's IP
-
Enter the IP
- Click the "Use Current IP" button to fill in your current connection IP automatically
- Alternatively, you can type the IP address directly into the input field
💡 Tip: Make sure you are connected to the clinic WiFi when using the "Use Current IP" button. Pressing it on mobile data or another network will enter the wrong IP.
- Register additional IPs (optional)
- If your clinic network uses multiple IPs, you can register additional IPs after saving the primary IP
- The additional IP field is only enabled once a primary IP has been set
- For clock in/out detection, a match with either the primary IP or any additional IP is accepted
7.3 Set the Workplace GPS Geofence
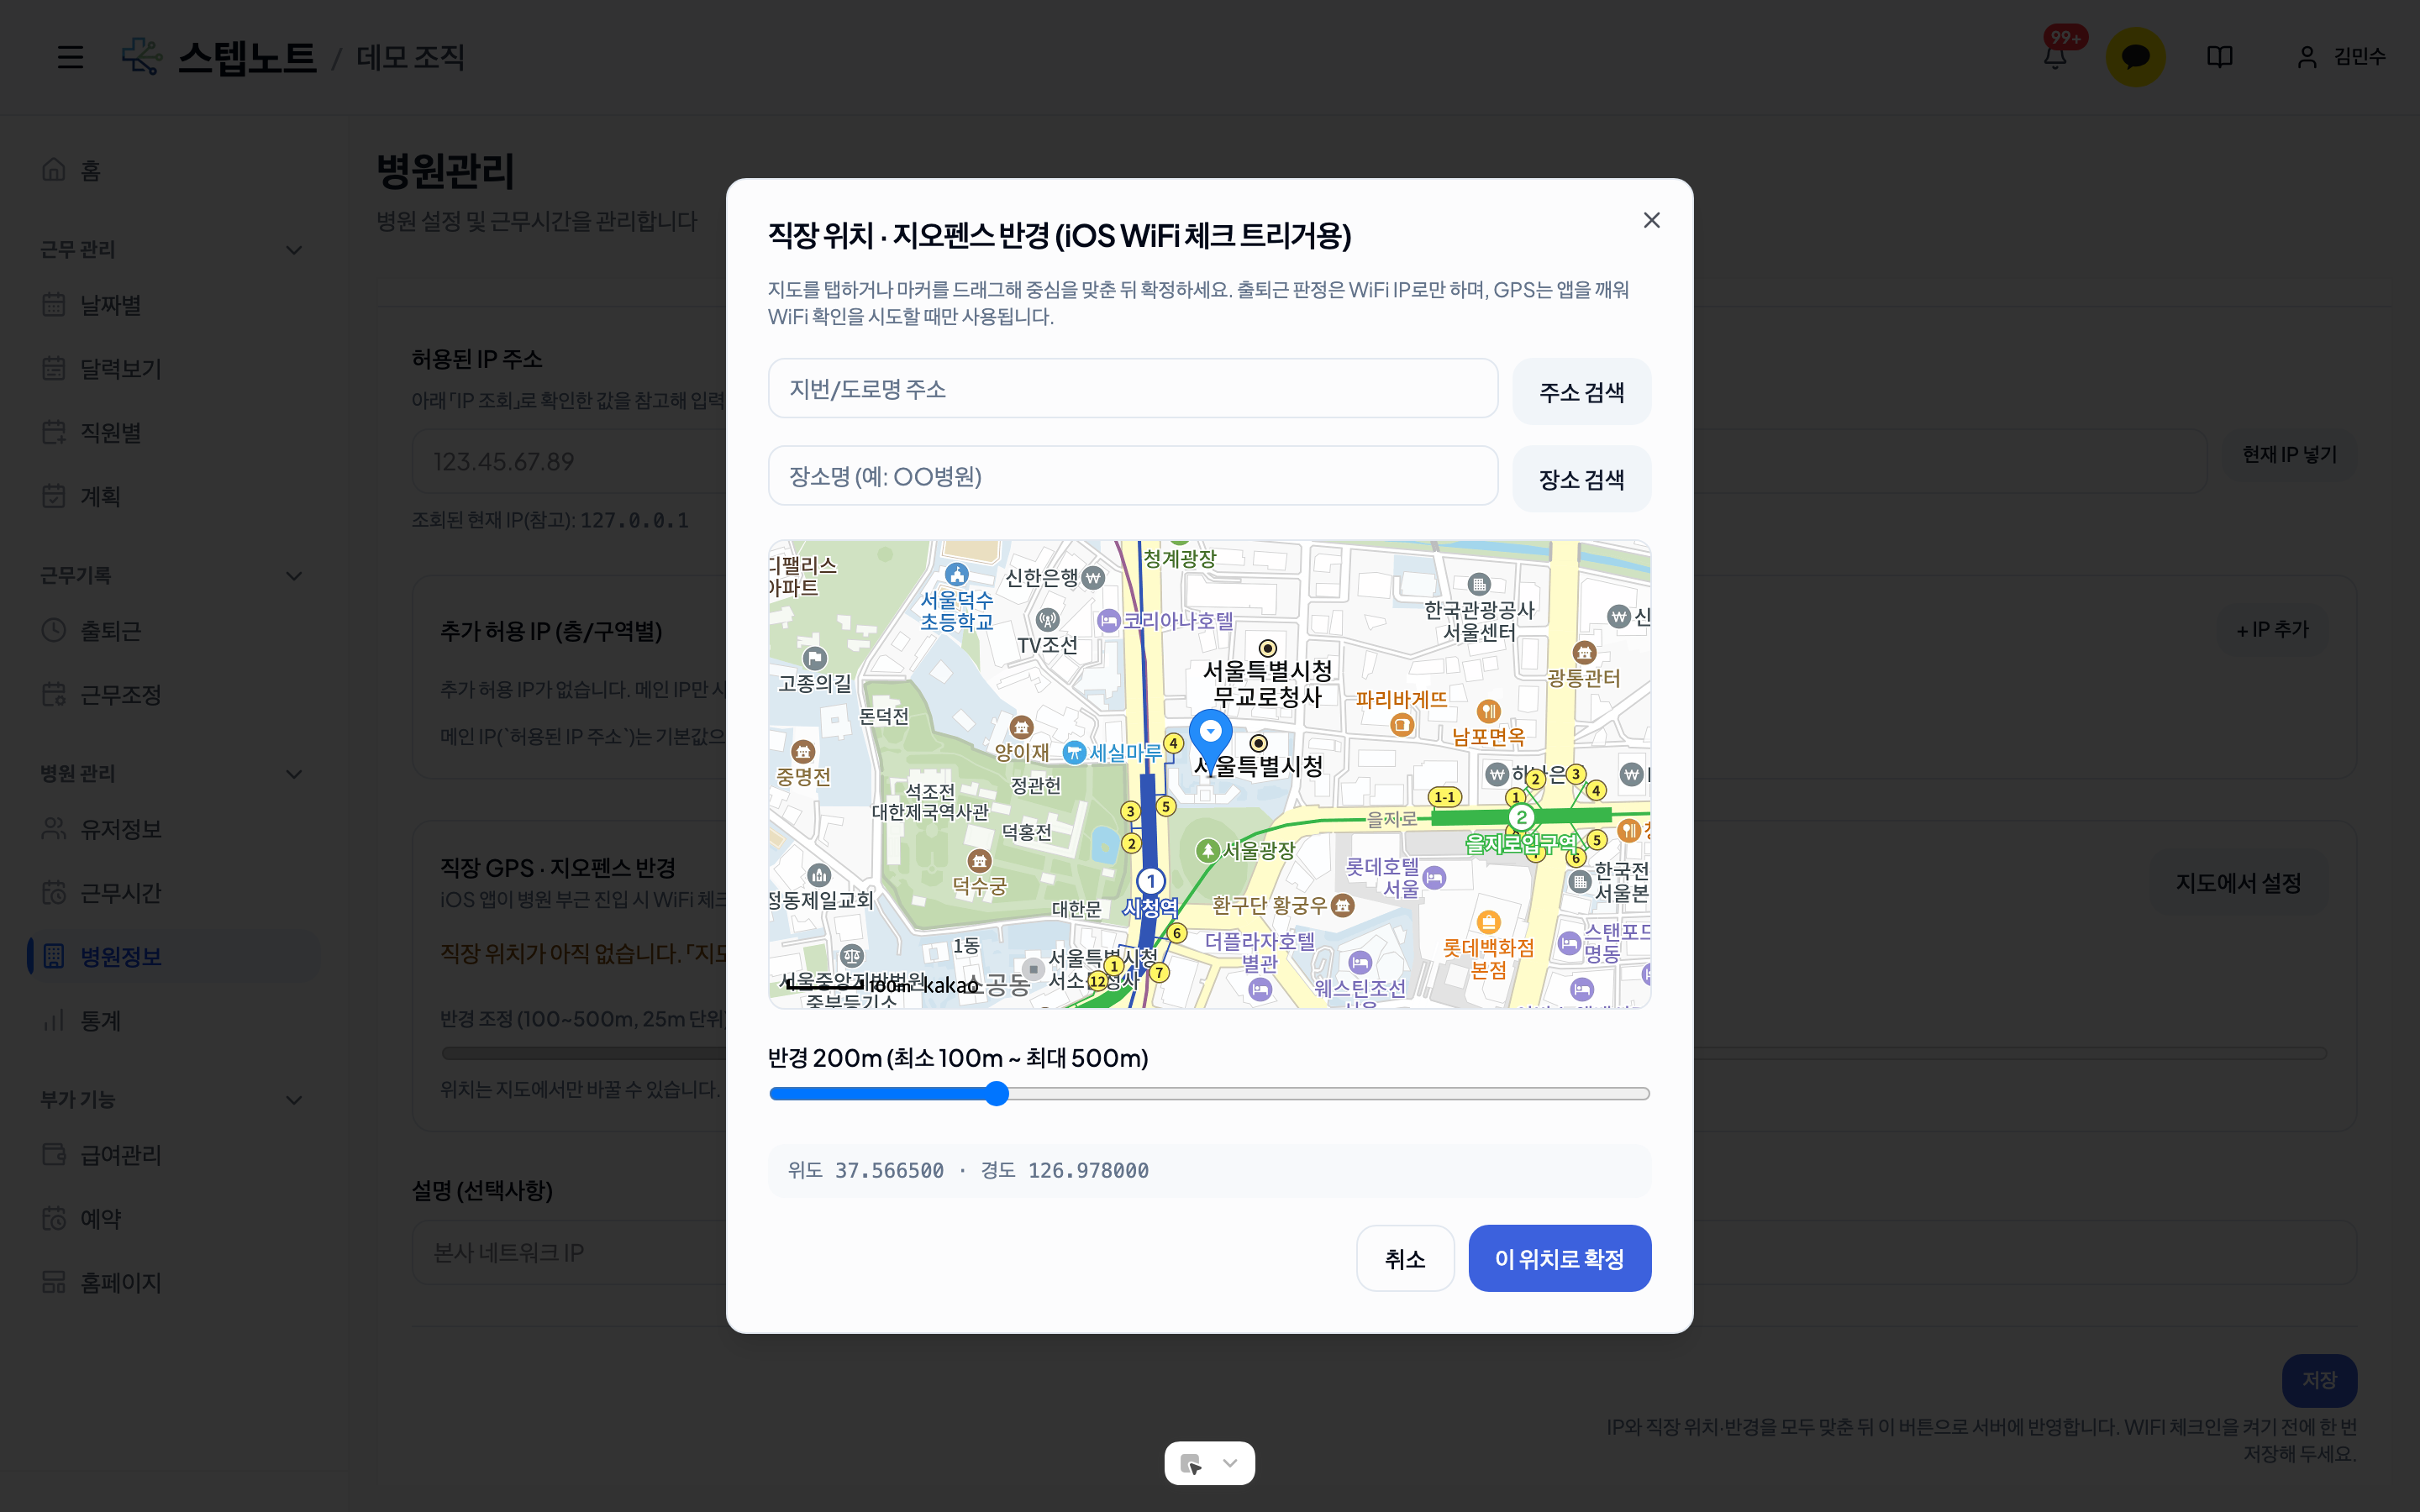
The GPS geofence is a trigger that makes the iOS app automatically attempt a WiFi check when entering the area near the clinic.
- Click the "Set on Map" button
- The map dialog opens
-
Find the clinic location
- Lot/street address: Enter the address and click the "Search Address" button
- Place name: Enter the clinic name and click the "Search Place" button
- You can also click directly on the map to set the location
-
Adjust the radius
- Adjust the radius with the slider at the bottom (minimum 100m – maximum 500m, in 25m steps)
- The default is 200m
- Set it considering the size of the clinic building and its surroundings
-
Confirm the location
- Check that the marker position and radius are correct
- Click the "Confirm This Location" button
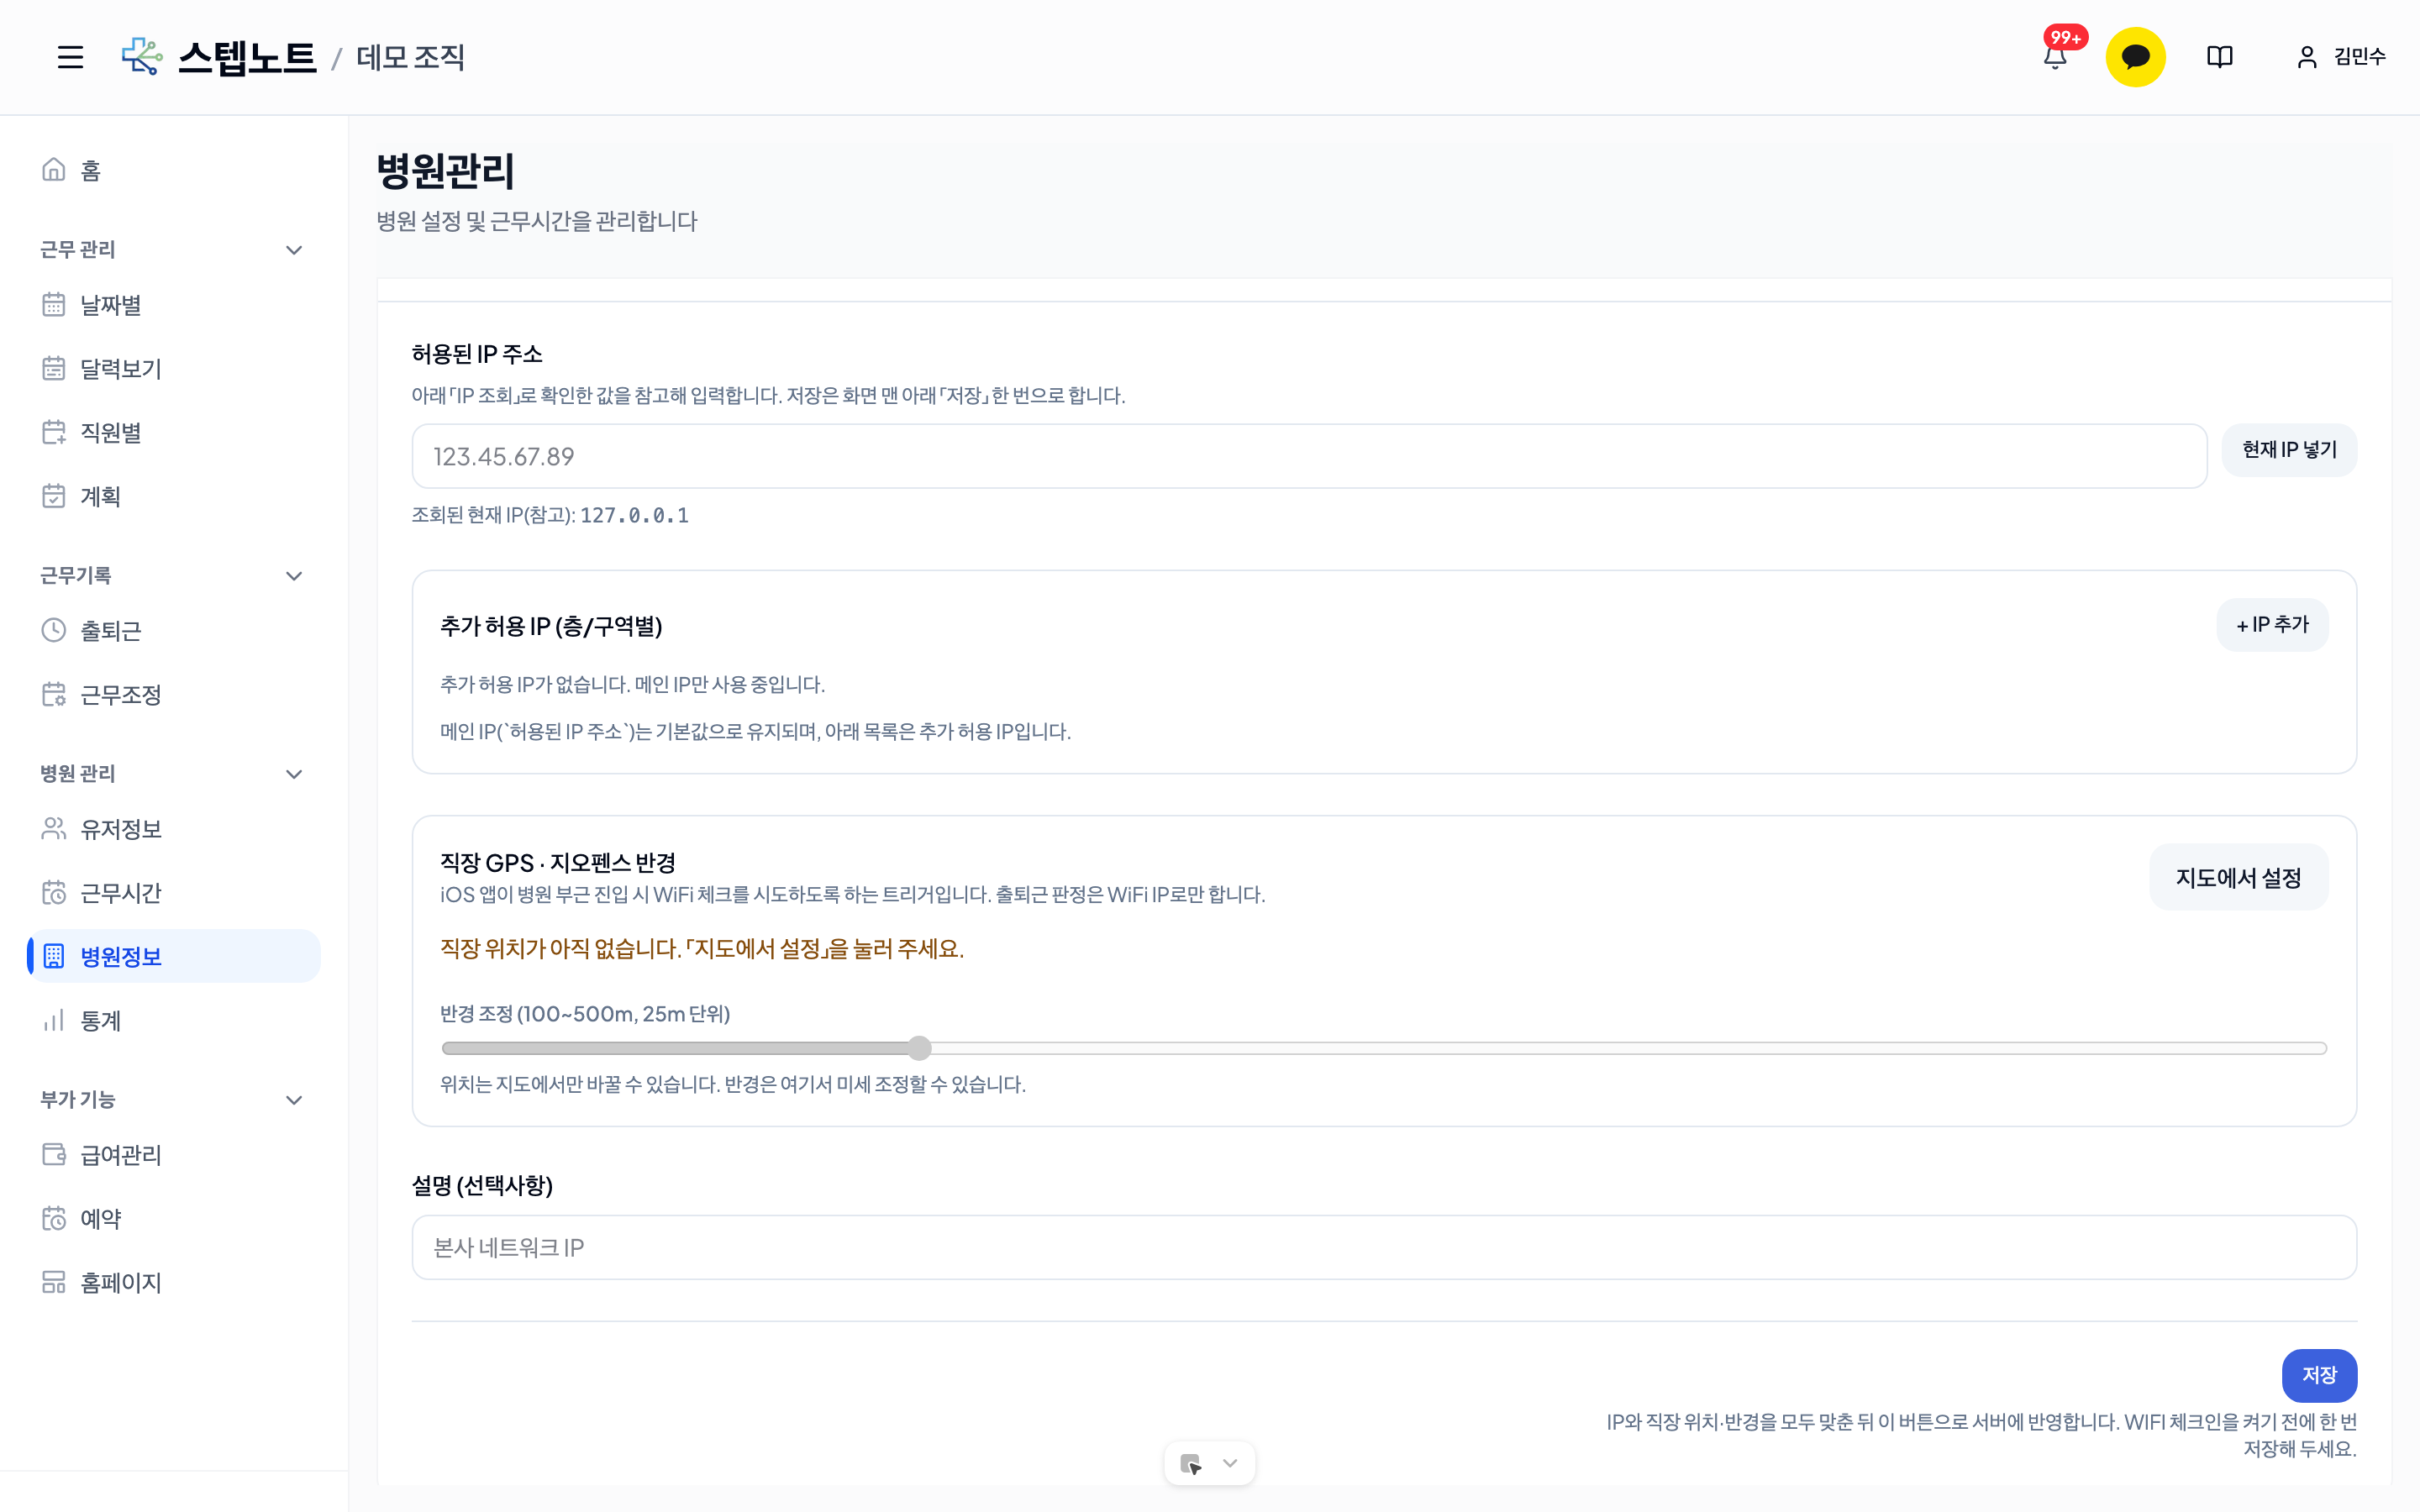
7.4 Save the Settings and Activate
-
Enter a description (optional)
- You can leave a note in the "Description (optional)" field (e.g., "Head office network IP")
-
Save
- Click the "Save" button to apply the IP and geofence settings to the server
- Both the IP and the geofence must be set before saving
-
Activate WiFi check-in
- Switch the toggle at the top to ON
- Both the IP and geofence must be set before it can be activated
💡 Tip: Press the Save button first, then activate the toggle. If you try to turn on the toggle first, a message tells you the setup is not complete.
How Staff Use It
Once setup is complete, staff clock in/out is recorded automatically with no extra steps.
| Action | Description |
|---|---|
| Auto clock in | Automatically records clock in when connected to the clinic WiFi |
| Auto clock out | Automatically records clock out when the clinic WiFi connection is lost |
| Duplicate prevention | Duplicate records within 1 minute are blocked automatically |
When Using the iOS App
- If a GPS geofence is set, the app automatically attempts a WiFi check when entering the area near the clinic
- Location permission must be set to "Always Allow" for it to work in the background
When Using the Android App
- Detects WiFi connection state changes and records clock in/out automatically
Cautions
- Only IPv4 format is supported for allowed IP addresses (e.g., 192.168.0.1)
- If the clinic's network environment changes (e.g., internet line replacement), the IP address must be set again
- WiFi check-in applies to all organization members (individual settings are not available)
- If the geofence radius is too small, the trigger may be unreliable due to GPS error
Troubleshooting
| Symptom | Solution |
|---|---|
| Clock in is not recorded | Check that you are properly connected to the clinic WiFi. The IP may have changed, so reset it with "Use Current IP" |
| "IP does not match" error | The allowed IP differs from your current connection IP. Check that you are connected to the correct WiFi. In a multi-IP environment, check the additional IP registration |
| The toggle cannot be turned on | Check that both the IP address and the geofence are set and saved |
| Auto check does not work on iOS | Go to Settings → StepNote → Location → change to "Always Allow" |
| Badge updates slowly after WiFi reconnects | Update the app to the latest version so network change events are reflected immediately |
7.5 Checking Attendance Records (Attendance Tab)
Once setup is complete, admins can check and manage all staff attendance records in the left sidebar → Attendance tab.
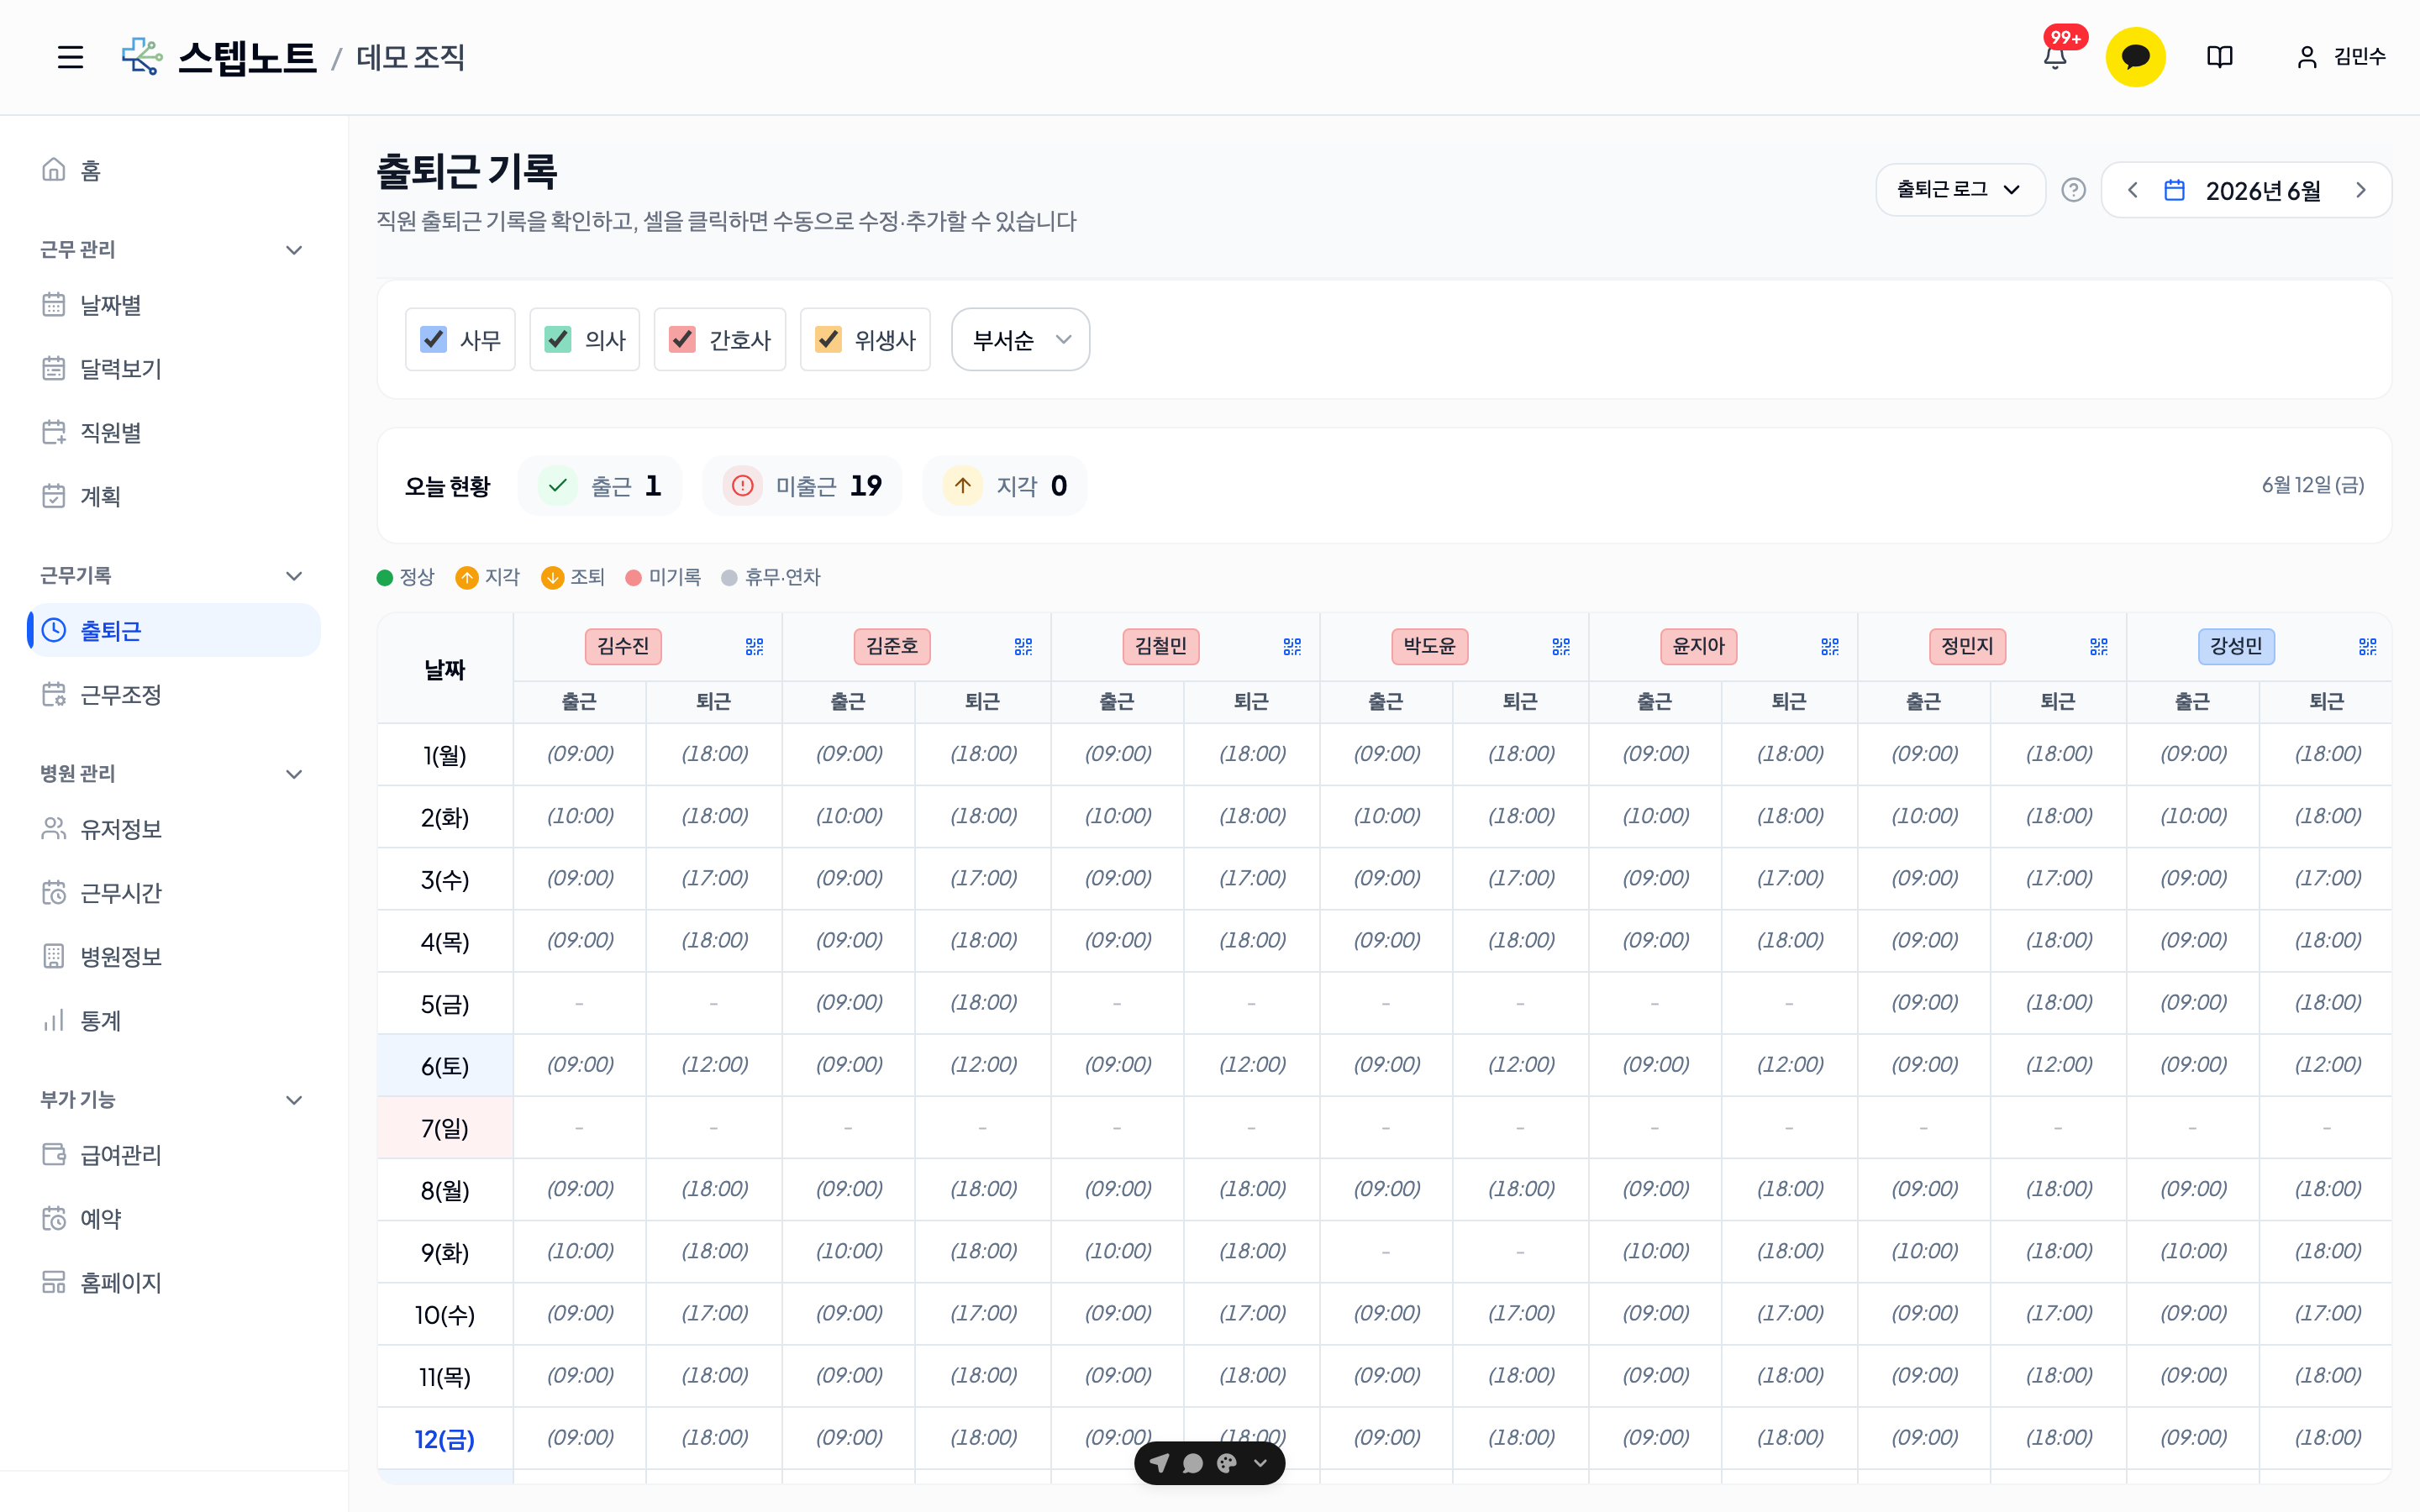
Screen Layout
| Area | Content |
|---|---|
| Today's overview (top) | Summarizes clocked in, not clocked in, and late headcounts as numbers — visible to admins only |
| Legend | Explains colors and icons by attendance status — also shown on mobile |
| Attendance table | Clock in/out times by staff member × date |
How Statuses Are Displayed
| Status | Display | Description |
|---|---|---|
| Normal | Time shown (muted color) | Clocked in/out within the scheduled time |
| Late | ↑ icon + yellow | Clocked in later than scheduled |
| Left early | ↓ icon + yellow | Clocked out earlier than scheduled |
| Not recorded | Italics + scheduled time (09:00) | A shift was scheduled but no record exists |
| Day off / annual leave | Gray | No shift on that date |
Late and left-early states are distinguished not only by color but also by arrow icons and text, making them easy to identify even in color-blind or dark-mode environments.
Clicking a Cell — Manual Clock In/Out Entry and Editing
Clicking a cell opens the manual clock in/out modal.
- You can directly correct a wrongly recorded time or manually add a missing record.
- Example: if a staff member actually arrived on time but was logged late and marked as late, edit the time directly.
Visual Improvements (Updated 2026-05)
Colors on the WiFi attendance setup screen have been unified with the design system's semantic tokens. Accent colors in manual screenshots may differ from the actual screens, but their meaning remains the same.
- Consistent status colors: Connected/normal uses success tokens (green), caution states such as WiFi disconnected or out of range use warning tokens (orange/yellow), and failures use danger tokens (red).
- Dark mode support: Settings cards and the geofence dialog use semantic tokens, so their tone switches automatically in OS dark mode.
- Focus/hover: Input field focus rings use
ring-ring, and action button hovers align to a 90% tone of the same hue, reducing visual strain.
7.6 Registering Kiosk Devices (New)
To let staff clock in on a terminal at the entrance (the kiosk app on an Android tablet or phone), you no longer copy an API key onto the terminal. Instead, approve the 6-digit code shown on the terminal from clinic settings. Each approved device gets its own credential, so if one terminal is lost you just disable or delete that device and the others keep working. Attendance records also show which terminal they came from.
Where: left menu Clinic Settings → Clinic Info → Attendance settings subtab → the Kiosk devices card (above the API key management card). Only owners and admins can manage it.
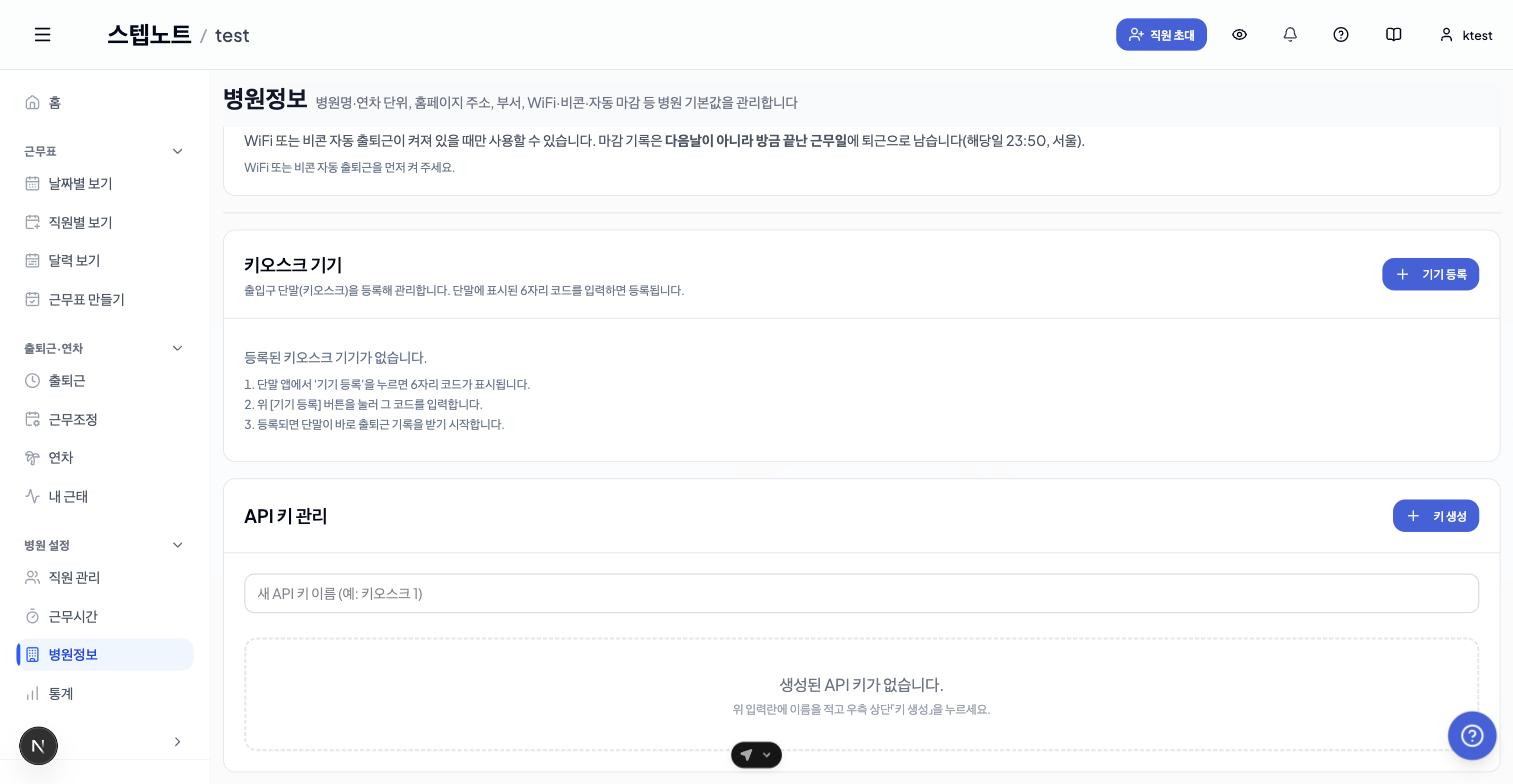
Registration steps
- Tap Register device on the terminal app to show a 6-digit code (the code is valid for 5 minutes and can be used once).
- In the Kiosk devices card, press [Register device], enter the 6-digit terminal code and a device name (e.g. 1F entrance), then press Register.
- Once registered, the terminal starts recording attendance right away. Nothing else is needed on the terminal.
| Message | Meaning | What to do |
|---|---|---|
| This code has expired | 5 minutes have passed | Get a new code on the terminal and enter it again |
| This code has already been used | The same code was entered twice | Get a new code on the terminal and enter it again |
| Code not found | The digits were mistyped | Check the digits on the terminal screen again |
Managing registered devices
- The list shows each device's name and last used time (just now / N minutes ago / never used). Use it to check that a terminal is alive.
- The power icon toggles Disable / Enable. A disabled device gets a Disabled badge and its clock-ins are blocked.
- The trash icon deletes the device. A deleted terminal must be registered again with a new code.
💡 The PC tray QR reader (Windows/macOS) still uses a key created in the API key management card right below. Device registration is for the Android kiosk app.
⌚ Clocking in with a smartwatch (Apple Watch · Wear OS) — turn on Mobile card check-in in the same sub-tab and staff can clock in by tapping the card icon in the watch app and holding the watch near the BLE terminal (it vibrates on success). On failure the watch shows "Turn on Bluetooth / Move closer to the terminal / Please try again". The Terminal card (QR) in the staff app and showing a QR on the watch keep working as before.